
If you want to squeeze the utmost performance out of your PC, you can use your graphics card’s memory as temporary storage. Several experimental tools, such as VRAMDISK and GpuRamDrive, allow you to mount a portion of your GPU memory as a virtual drive in Windows. In this guide, we’ll briefly look at the available options and then walk you through the process using VRAMDISK.
What is a VRAM Disk?
A VRAM disk is a virtual storage drive that uses the video memory (VRAM) of your graphics card instead of your SSD, HDD, or system RAM. When you create it, Windows treats it like any other drive. It receives its own drive letter, appears in File Explorer and lets you copy files to and from it. However, it’s important to note that VRAM is volatile memory. This means that everything stored on the drive disappears when you shut down your computer, restart Windows, or remove the virtual disk. Because of this, a VRAM disk is better for temporary files rather than for long-term storage.
Tools to create VRAM disk on Windows computer
Creating a VRAM disk is still an experimental feature, so only a handful of tools support it. Depending on your hardware and requirements, you can choose from the following options.
VRAMDISK
VRAMDISK is an open-source utility that lets you mount a portion of your GPU’s VRAM as a virtual storage drive in Windows. It provides a simple interface for selecting your GPU, specifying the amount of VRAM to allocate, and mounting it as a drive. This guide uses VRAMDISK for the demonstration.
GpuRamDrive
GpuRamDrive is another open-source project that uses your graphics card’s memory to create temporary storage. Like VRAMDISK, it is intended primarily for experimentation and development rather than everyday use. Since the project is still evolving, compatibility varies depending on your graphics card and installed drivers.
ImDisk Toolkit
If your system isn’t compatible with GPU-backed storage, ImDisk Toolkit is a reliable alternative. Although it creates a RAM disk using your computer’s system memory instead of VRAM, it offers similar benefits for temporary files, application caches, and testing environments. It is widely used because of its stability and broad hardware compatibility.
Read: How to check how much Video RAM (VRAM) you have in Windows 11
How to mount GPU memory (VRAM) as a RAM disk on Windows computer
To mount your GPU memory or create a VRAM disk on a Windows computer, follow the steps mentioned below.
- Meet the prerequisites
- Download VRAMDISK
- Launch the Application
- Choose how much VRAM to allocate
- Create and verify
Let us discuss them in detail.
1] Meet the prerequisites
Before creating a VRAM disk, make sure your system meets a few basic requirements.
- A Windows PC
- A dedicated GPU with available VRAM
- Administrator privileges
- The open-source VRAMDISK project from GitHub
It’s also worth closing games or GPU-intensive applications before creating the disk so you don’t accidentally reserve memory that’s needed elsewhere.
2] Download VRAMDISK

For this tutorial, we’ll use VRAMDISK. Start by downloading the latest release from its GitHub repository.
After downloading it, extract the files to an easy-to-access folder.
Since this is an experimental project, Windows may ask for administrator permission during installation or when loading the driver.
3] Launch the Application
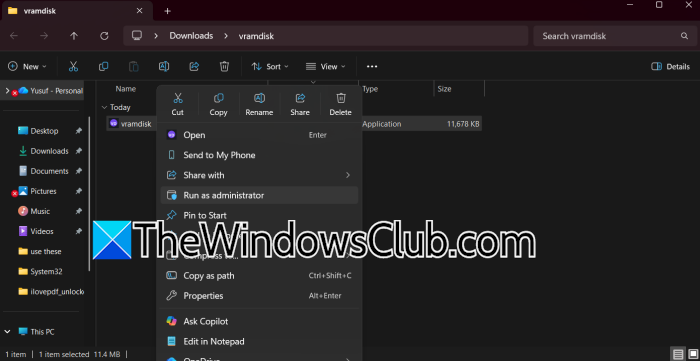
Open the VRAMDISK application with administrator privileges.
Once it starts, it should detect your graphics card and display the amount of available video memory.
If your GPU isn’t detected, make sure your graphics drivers are up to date before trying again.
4] Choose how much VRAM to allocate
Now comes the important part. We need to select how much GPU memory you want to dedicate to the virtual disk. Although it may be tempting to use several gigabytes, it’s usually better to start small.
For example:
- 512 MB for testing
- 1 GB for temporary files
- 2 GB if your GPU has plenty of free VRAM
Avoid allocating most of your VRAM, especially if you regularly play games, edit videos, or run AI applications. Those workloads need GPU memory to perform well.
5] Create and verify
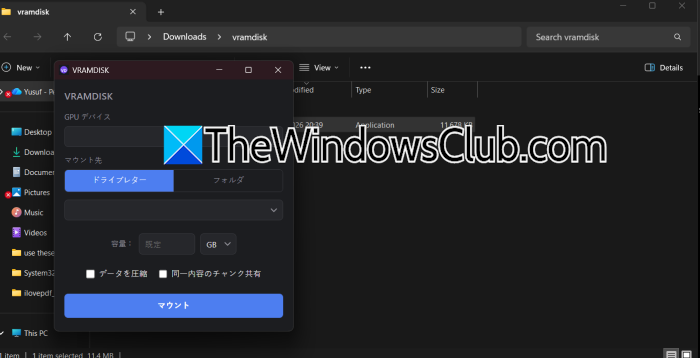
After you choose the size, click Create or Mount the disk. Windows should recognize a new storage device within a few seconds. If it asks, format the drive as NTFS, just like you would with any new disk. Once the formatting is done, the drive is ready to use.
Now, we need to verify that it works. For that, open File Explorer. You should now see a brand-new drive with its own drive letter. Try creating a folder, copying a few files, or running a benchmark to verify that everything works correctly. At this point, you’ve successfully created a VRAM disk on Windows.
Before using a VRAM disk in your workflow, keep in mind a few important limitations. First, every megabyte you assign to the VRAM disk reduces the memory available to your GPU. If you then start a resource-intensive game, you might see a drop in performance or experience memory errors. Second, how well the VRAM disk works can depend on your graphics drivers and the VRAMDISK project itself. Some GPUs may perform better than others, so your experience may differ. Lastly, remember that this tool is still experimental. While it’s useful for testing and learning, do not use it to store important data.
While this guide focuses on VRAMDISK, you can also explore GpuRamDrive for other GPU-backed storage solutions. If your PC doesn’t have a compatible dedicated GPU, a RAM disk utility such as ImDisk Toolkit is a good alternative for creating high-speed temporary storage using system memory.
Read: Benchmark Memory, VRAM, etc with OCCT for PC
Can I add RAM to VRAM?
No, you cannot physically convert your system RAM into dedicated VRAM. Dedicated VRAM is built into a discrete graphics card and cannot be upgraded separately. However, some integrated GPUs can dynamically borrow a portion of your system RAM for graphics tasks. While this increases the amount of memory available to the GPU, it does not offer the same speed or performance as dedicated VRAM because system RAM is significantly slower than graphics memory.
Can a GPU use RAM memory?
Yes, a GPU can use system RAM under certain circumstances. Integrated GPUs rely entirely on shared system memory because they lack dedicated VRAM. Discrete GPUs with dedicated VRAM may also use system RAM as overflow memory when VRAM is exhausted, although this can reduce performance because accessing system RAM is slower than accessing dedicated video memory. For graphics-intensive tasks, having sufficient dedicated VRAM still provides the best performance.
Also Read: Increase dedicated Video RAM in Windows 11.
