
Hyper-V is a virtualization platform that allows you to run multiple virtual machines on a single physical computer. A common error users encounter is that Hyper-V is unable to allocate RAM to a virtual machine, even when the host system appears to have enough physical memory available. This issue prevents VMs from starting and is typically related to memory management constraints rather than a simple lack of free RAM. In this post, we will discuss this issue and explore potential solutions to resolve it.
Fix Hyper-V unable to allocate RAM
Allocation failures occur mainly because Hyper-V and the Windows memory manager prioritize committed memory over physical memory. Committed memory includes all the physical RAM currently in use, plus the highest amount that could be used if all processes required their allocated memory at once, including the page file support. If the total committed memory gets close to or exceeds the system’s limit, known as the commit limit (which is the sum of physical RAM and page file size), Windows will stop any new memory requests. This action prevents system problems, but it can cause Hyper-V errors even when there is still free physical RAM available.
If Hyper-V is unable to allocate RAM, follow the solutions mentioned below.
- Check and manage Host Commited Memory
- Restart the Hyper-V Management Service
- Configure a Static Memory Allocation for the VM
- Free up Disk Space for the Page File
Let us talk about them in detail.
1] Check and manage Host Committed Memory
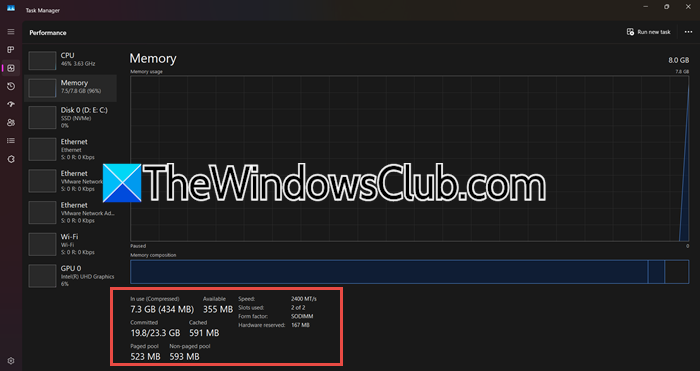
Hyper-V blocks new allocations if the total potential memory usage (Committed) nears the system’s maximum limit (Commit Limit). Reducing the current load lowers the committed value, creating the necessary headroom for the new VM to start. Follow the steps below to complete the same task.
- Open the Task Manager by Ctrl + Shift + Esc.
- Then, go to the Performance tab and select Memory.
- Check the Committed value; if it is near or exceeds the Commit Limit, you must free up resources.
- In the Processes tab, sort by Memory and close unnecessary applications or stop other running VMs.
Finally, start your virtual machine and see if the issue is resolved.
2] Restart the Hyper-V Management Service
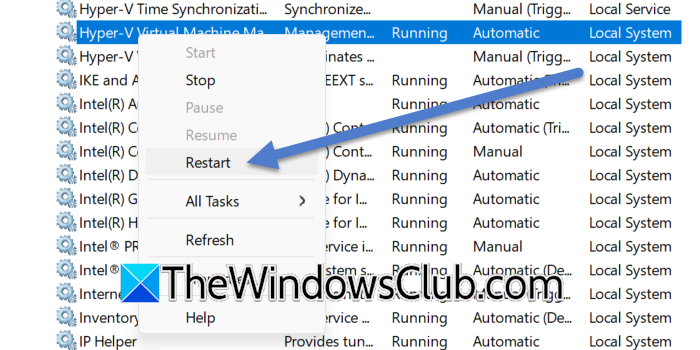
Restarting the Hyper-V Virtual Machine Management service (VMMS) can resolve the RAM allocation error by clearing the service’s internal state and freeing up memory allocations that it has locked, even when physical memory appears available. This process does not affect running virtual machines.
So, open Services.msc from the Start Menu, locate Hyper-V Virtual Machine Management, right-click on it, and select Restart.
Alternatively, open Windows PowerShell as an administrator and run the following command.
Get-Service vmms | Restart-Service
The service may take several minutes to fully restart. During this time, virtual machines might temporarily disappear from Hyper-V Manager but should reappear once the service is running again. If the service fails to restart or the RAM allocation issue persists, a full reboot of the Hyper-V host is the next logical step. But if that doesn’t work, go to the next solution.
3] Configure a Static Memory Allocation for the VM
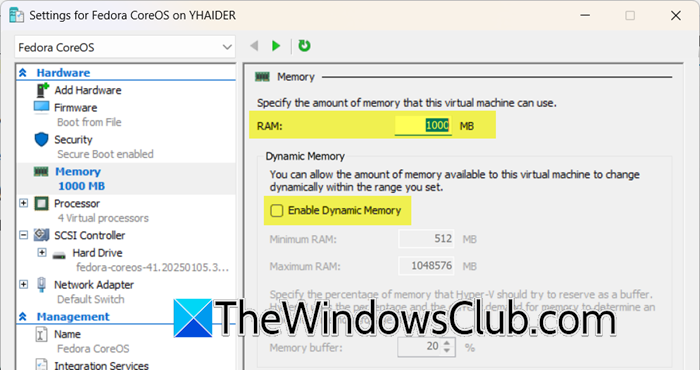
Dynamic Memory can cause allocation failures during VM startup if the host cannot immediately guarantee the VM’s maximum potential memory. Setting a static, fixed amount ensures the exact required RAM is reserved at startup, eliminating dynamic allocation conflicts. Follow the steps below to complete the same task.
- Open Hyper-V Manager.
- Right-click the affected VM and select Settings.
- In the Memory section, uncheck Enable Dynamic Memory.
- Set the RAM to a fixed value that fits within your host’s available memory.
- Click on Apply > Ok.
Now, try starting the VM.
4] Free up Disk Space for the Page File

Windows uses the page file to back committed memory guarantees. If the disk is full, the system cannot expand the page file, which artificially lowers the total Commit Limit and prevents new memory allocations, even when physical RAM is available. To make the changes, follow the steps outlined below.
- Open File Explorer, right-click your system drive (usually C:), and select Properties to see available space. Ensure you have at least 5-10 GB free.
- Press Win + R, type cleanmgr, and press Enter.
- Select your system drive and delete Temporary Files and Recycle Bin contents.
- If space is critically low, go to System Properties > Advanced tab > Performance Settings > Advanced > Change.
- Ensure Automatically manage paging file size is checked, or manually set a larger size on a drive with free space.
Finally, check if the issue is resolved.
Hopefully, with the help of these solutions, your issue will be resolved.
Read: Not enough memory in the system to start the virtual machine.
How to allocate more RAM to Hyper-V?
To allocate more RAM to a Hyper-V virtual machine, open Hyper-V Manager, right-click the VM, and select Settings. Navigate to the Memory section and increase the Startup RAM value. Ensure the new amount does not exceed the available physical memory on your host machine to maintain system stability.
Read: How does Virtualization or Hyper-V work on Windows 11
How much RAM is needed for Hyper-V?
Hyper-V requires a minimum of 4 GB of RAM. Still, it is recommended to plan for significantly more to ensure adequate memory for the host operating system and all virtual machines you intend to run simultaneously. For practical use, a minimum of 16 GB is recommended for small setups, with 32 GB or more being ideal for running multiple VMs.
Also Read: Ethernet Port Failed to allocate resources while connecting.
