If a Hyper-V Virtual Machine cannot communicate with its host M/C, then you are facing the classic network issues. The reason behind connectivity issues varies from simple configuration to more complex network stack issues. In this article, we will explore them and find ways to solve them, enabling the host and VM to communicate again.
Hyper-V VM cannot connect to the Host M/C
If Hyper-V is not connecting to the Host M/C, execute the solutions mentioned below:
- Change the Default switch to an External switch
- Configure a static IP on the default switch
- Verify Host Firewall rules
- Disable VLAN Identification on the VM
- Reset the Hyper-V Virtual switch configuration
Let’s get started with the troubleshooting guide.
1] Change the Default switch to an External switch
First and foremost, we are going to create and assign a new external virtual switch. Doing so solves the problem by directly connecting the VM to the physical network the host uses.
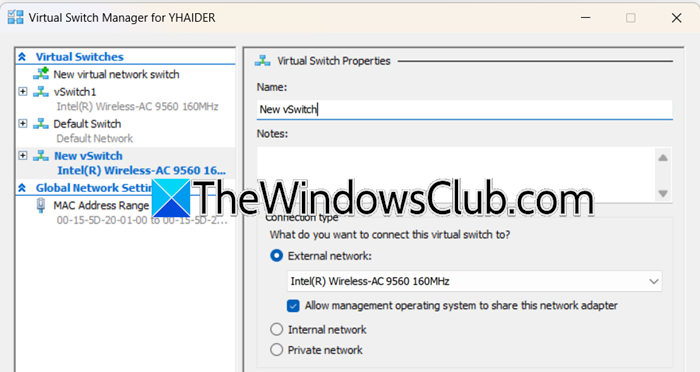
- Launch Hyper-V Manager, go to the Actions tab, and click on Virtual Switch Manager.
- In the window, select New Virtual Network Switch from the left side, then select the External type and click on the Create Virtual Switch button.
- Give it a name, select External Network in Connection Type, and click on the drop-down menu to select the network adapter that is connected to the main network and has internet access.
- Check the Allow management operating system to share this network adapter option, click Apply or OK, and hit the Yes button when prompted.
- Return to the Hyper-V Manager, click on the VM that can’t connect, and select Settings.
- In the settings, navigate to the Hardware section, select the old network adapter, and under Virtual Switch, select the newly created switch using the drop-down menu. Lastly, click the OK button to save the changes and close the window.
Restart the VM, and check if the issue is resolved. If the issue persists, try the next solution.
2] Configure a static IP on the default switch
When a Hyper-V VM cannot connect to its host via the default switch, it can be due to the dynamic, and sometimes unreliable NAT NAT-based networking it uses. Manually assigning static IP addresses to both the host’s virtual adapter and the VM forces a direct, predictable communication path on the subnet and helps bypass the MAT layer entirely. Here’s how to do the same.
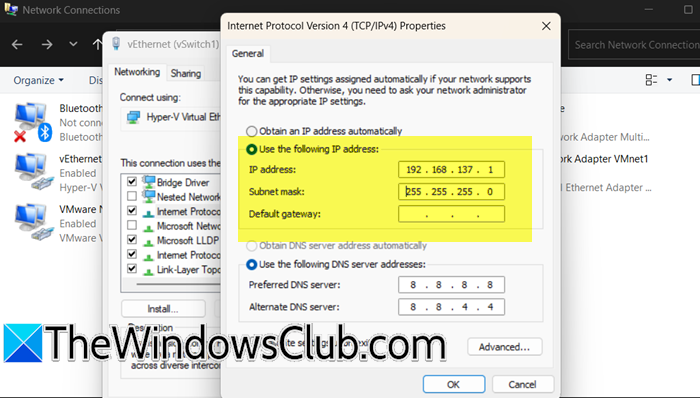
- To open network connections for the Host’s virtual adapter, launch the Run dialogue box, type ncpa.cpl, and hit Enter.
- Find and right-click on the connection named vEthernet, select Properties, and double-click on Internet Protocol Version 4 (TCP/IPv4).
- Check Use the following IP address, and enter the following information:
IP address: 192.168.137.1
Subnet Mask: 255.255.255.0 - Leave the Default gateway and DNS Server fields blank, and click OK twice to close the properties window.
- The next step is to configure the VM’s network adapter. Start the VM, log in to the OS, and then go to Settings > Network and Internet > Ethernet.
- Click on the network connection, select Change Adapter options, and right-click on the active Ethernet adapter.
- Select Properties > Internet Protocol Version 4 (TCP/ IPv4), and click Properties.
- Select Use the following IP address, and enter the following information:
IP address: 192.168.137.10
Subnet mask: 255.255.255.0
Default gateway: 192.168.137.1 - Click on Use the following DNS Server addresses, and enter a DNS server:
Preferred DNS Server: 192.168.137.1 (The host’s IP) or 8.8.8.8 (Google’s public DNS). Hit the OK button twice to save the changes.
Test the connection to see if it’s working now. Proceed to the next solution if the issue persists.
3] Verify Host Firewall rules

A common but often overlooked reason is the Windows Defender Firewall blocking the necessary network requests. In this solution, we will enable rules that allow core networking protocols essential for basic connectivity testing.
- Open the Run dialog box, type wf.msc, and press Enter to open the Advanced Firewall settings.
- Click on Inbound Rules, find and right-click on the File and Printer Sharing, and select Properties.
- Navigate to the Advanced tab, under the Profiles section, check the boxes for both Domain and Private, and hit the OK button. In the main list, check the Enabled column for this rule. It should say Yes.
For more thorough access, users can create a new rule to allow all communication from the specific VM, which is useful for more than just ping.
4] Disable VLAN Identification
A VLAN ID instructs the network switch to segregate traffic. All the communication can be blocked if the value is set incorrectly on the VM while the host’s adapter is untagged or on a different VLAN. To check this, follow the steps mentioned below.
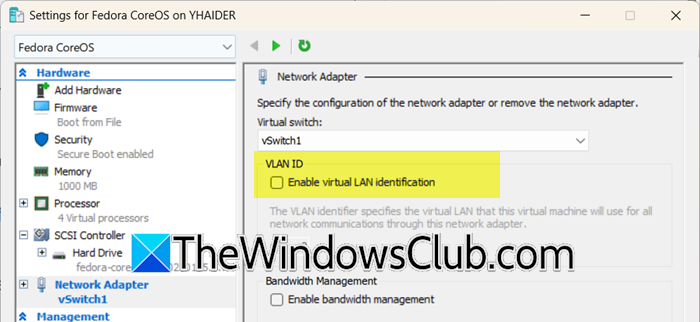
- Open Hyper-V Manager, right-click the affected VM, and select Settings.
- Go to the Network Adapter section.
- In VLAN ID, untick Enable virtual LAN identification.
- Click on Ok.
Finally, check if the issue is resolved.
Read: Update the Network adapter driver.
5] Reset the Hyper-V Virtual switch configuration
Last but not least, to eliminate persistent Hyper-V networking issues, a full reset of the virtual network stack is often required. However, before doing this, ensure that you have all the details needed to recreate the network setup beforehand.
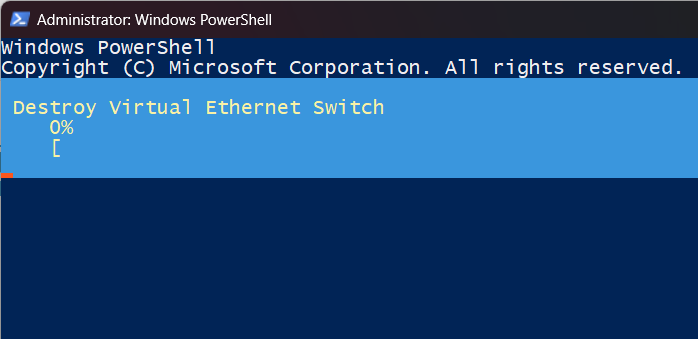
- On the Hyper-V host machine, open an elevated PowerShell window, run the following command to find all the virtual switches and delete them.
Get-VMSwitch | Remove-VMSwitch -Force
- Next, execute this command to remove all Virtual Network Adapters:
Get-NetAdapter | Where-Object {$_.Name -like "*vEthernet*"} | Remove-NetAdapter -Force
- Once done, reboot the host PC, and then Open Hyper-V Manager, and recreate the External or Default switch.
This will clear all the underlying corruption, and hopefully, you won’t face any issues while connecting to the host M/C.
Read: Fix Error applying Virtual Switch Properties changes in Hyper-V
How to fix the Virtual Machine version is not compatible with the version of the host?
To fix the compatibility issue, users need to update the Hyper-V host’s OS to the same version or a newer one than the one used to create the VM. Once done, they need to go to the Hyper-V Manager and make the VM upgrade to the newer version to make it compatible with the current host.
Read: Can’t Connect to Hyper-V Virtual Machine on Windows computer
Why is my VM not connecting to the network?
The VM may not be connecting to the next because its virtual network adapter is likely configured to use an incorrect or isolated virtual switch. It’s also necessary to verify the host’s physical NIC is functioning and not blocked by a firewall.
Also Read: Can’t Connect to Hyper-V Virtual Machine on Windows computer.