When using a laptop for both Office and home, we often have to switch printers. Windows 11/10 doesn’t offer an easy way to switch printers, as it will make sure there is a default printer. It has happened to me so many times that I had put something to print only to realize it went to my Office printer instead of one at home. So how do you set a default printer in Windows 11/10? That is what we will look into today.
How to set the Default Printer in Windows 11

The following steps will help Windows 11 users set the default printer:
- Press Win + I keys to launch the Settings app.
- In the Settings app, select Bluetooth & Devices from the left side.
- Now, click on the Printers & Scanners tab on the right side.
- On the Printers & Scanners page, you will see a list of all the printers added to your computer. Select the printer that you want to set as default and click on the Set as default button.
Windows 11 also has a feature to select the default printer automatically based on the most recently used printer at a specific location. Turning this feature on will save your time in selecting the default printer at different locations manually.

To enable this option on Windows 11, go to “Settings > Bluetooth & Devices > Printers & Scanners.” Scroll down on the Printers & Scanners page and turn on the button that says Let Windows manage my default printer. You will find this option in the Printer preferences section.
Do note that, after turning on this feature, you will not be able to set a printer as default manually. To do so, you have to turn off this option.
How to set the Default Printer in Windows 10
To set the default printer on your Windows 10 PC, do the following:
- Open Windows 10 Device Settings (Win + I) > Devices
- Switch to Printers and scanners
- Click on the printer you want to set as default, and then click on Manage
- Then click on Set as default button to set the printer as default.
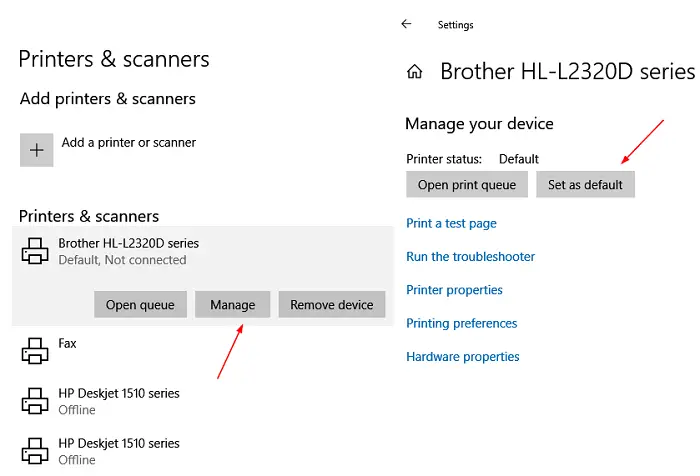
Once you do that, the printer will appear as the selected printer when you go ahead to print anything. Also, the printer will have status as Default in the printer list.
Automatically switch default printer based on location
While it is easy to change the default printer, it doesn’t help. If the default printer can change automatically based on the location of the computer. So if I go home, the default printer is my home printer, and the office printer when I go to work.
Read: Set as default printer Context Menu item is missing.
Let Windows manage my default printer
Under Printers and scanners, check the box which says “Let Windows manage my default printer.” When this is turned on, Windows will set your default printer to be the one you used most recently at your current location.

It has one drawback though in certain use cases. If you keep switching printers at the office, then the default printer will be the recently used printer at that location.
I hope the guide was useful for you and that you were able to set the default printer for Windows 11/10.
There is no Network-based option to change the default printer like in Windows 7, so you must let Windows manage the default printer.
How do I stop Windows 11 from changing my default printer?
In Windows 11/10, there is a setting named Let Windows manage my default printer. When this setting is enabled, Windows automatically selects your default printer according to the most recently used printer at a particular location. This feature is useful if you use the same laptop with different printers at different places like in your home, office, etc. You have to disable this setting to stop Windows 11/10 from changing your default printer. We have explained the steps to do so above in this article.
If you want, you can permanently disable this feature by using Group Policy Editor and Registry Editor.
Should I let Windows manage my default printer?
The answer to this question depends on you. If you use the same laptop in your office and your home and you have to change the default printer daily, you can leave this task for Windows.
PS: See this post if the Default Printer keeps changing in Windows.