Microsoft has removed the Network Location aware feature for Printers in Windows 11/10 and changed its behavior. Windows 11/10 now sets the last selected printer as the default printer. This can get irritating at times. If you are looking for a way to stop Windows from changing your default printer, you can use Windows Settings or edit the Windows Registry.
Why does Windows 11 keep changing my default printer?
Windows 11 may change your default printer because it automatically sets the printer you use most often as the default. If you manually choose a default printer, Windows will notify you that it won’t change it automatically.
Default Printer keeps changing in Windows 11/10
To do this, you need to follow these two steps.
Toggle Let Windows manage my default printer setting to Off
Windows 11
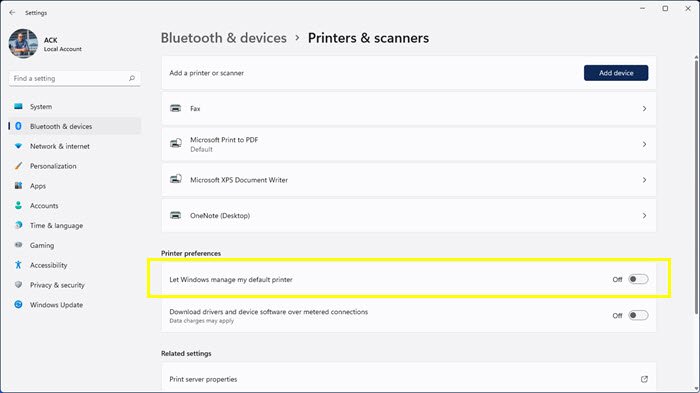
To Turn Off Let Windows manage my default printer setting in Windows 11:
- Open Settings
- Open Bluetooth and devices settings
- On the right side, select Printers and Scanners
- Scroll down a bit and locate Printer preferences section
- Turn the option saying ‘Let Windows manage my default printer’ to OFF.
Windows 10
- From the WinX Menu, open Settings > Devices > Printers & scanners.
- Scroll down a bit till you see a setting Let Windows manage my default printer.
- When this setting is turned On, the default printer is the last used printer.
- Toggle the switch to the Off position.
Set your default printer in Windows 11/10
Windows 11

The following steps will help Windows 11 users set the default printer:
- Press Win + I keys to launch the Settings app.
- In the Settings app, select Bluetooth & Devices from the left side.
- Now, click on the Printers & Scanners tab on the right side.
- On the Printers & Scanners page, you will see a list of all the printers added to your computer. Select the printer that you want to set as default and click on the Set as default button.
Windows 10
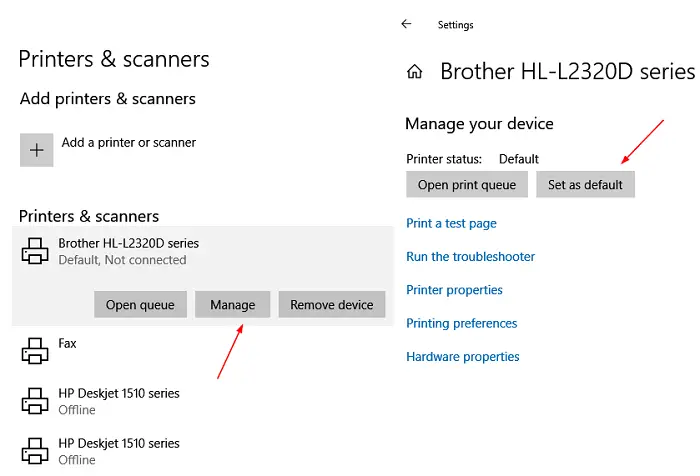
Now go set your default printer. You will see the entire list of printers a little above this setting.
Select the printer and click Manage > Set as default button.
Windows will not change it again, even if you use another printer.
Use Registry to set the default printer
If, for some reason, this does not help you, edit your Registry and see.
Run regedit and navigate to the following key:
HKEY_CURRENT_USER\SOFTWARE\Microsoft\Windows NT\CurrentVersion\Windows
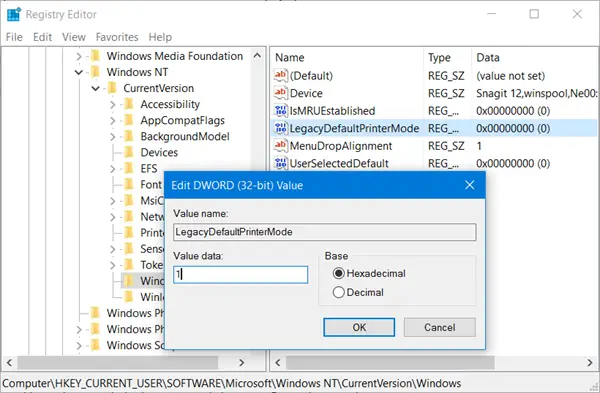
Change the value of LegacyDefaultPrinterMode from the default 0 to 1.
Having done this, set your default printer again.
Hope this helps.
See this post if you find that the Printer icon is not showing in your Desktop, Control Panel, Devices, and Printers.
How do I stop Windows from managing my default printer?
To stop Windows from managing your default printer, open Windows Settings. Navigate to Bluetooth & devices, then choose Printers & scanners. Under Printer preferences, turn off the toggle for Let Windows manage my default printer. This prevents Windows from automatically changing your default printer.