Setting a static IP address for an Azure Virtual Machine is a smart move for IT administrators and developers who want predictable network configurations for backend services, databases, or internet services. In this guide, we will walk through the step-by-step process of stepping up a static private IP address for an Azure Virtual Machine.

How to set static private IP address for Azure Virtual Machine?
To set a static private IP address for an Azure Virtual Machine, follow either of the following methods.
- Via Azure Portal
- Via Azure PowerShell
Let’s get started.
1] Via Azure Portal
To begin the process, it’s necessary to have an Azure account with an active subscription and an existing Azure Virtual Machine. By default, Azure assigns a dynamic private IP address to VMs, allowing users to change it after a VM is deallocated or rebooted. The primary method for setting up a static IP address on an Azure Virtual Machine is through the Azure Portal. Here’s how to do the same:
- Navigate to the Azure Portal, sign in with your credentials, and click Virtual Machine from the left-hand menu.
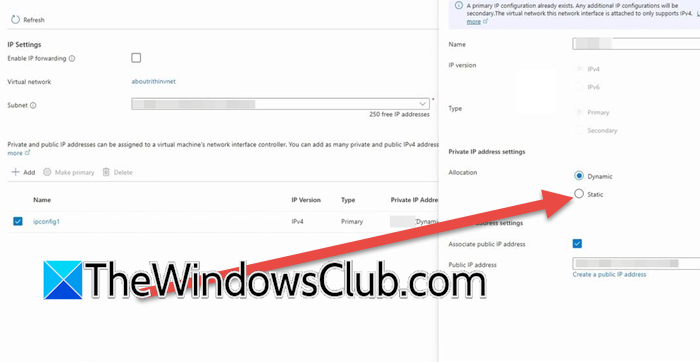
- Select the VM for which you want to set the static IP address, and go to its Networking section in Settings.
- Under the Network Interface label, click on the listed network interface name to open a new blade dedicated to that NIC.
- In the NIC settings menu, choose IP configurations, select the existing IP configuration, and change the assignment from Dynamic to Static.
- Lastly, hit the Save button to apply the changes.
The next step is to confirm that the change has been applied, and for that, stay on the IP configuration page where the assignment should now show as Static. Now, navigate to the Networking tab, and check if the new static IP address is visible or not.
2] Via Azure PowerShell
 Suppose you want to change the IP address, particularly for multiple VMs, or want to integrate networking settings into the deployment scripts. In that case, doing so via Azure PowerShell is the right thing to do.
If you are starting from scratch, the first step is to create a resource group to organize your resources, and then create a VM to which you will assign a static IP address. However, your first step should be to open PowerShell. For that, click on the Shell icon in the Azure Portal. Once the Terminal opens, click on Bash, there will be a down-arrow, and select Powershell. You will be asked for confirmation, so click Yes.
Finally, run the following script.
# Sign in to Azure
Connect-AzAccount

# Define variables
$rgName = "myResourceGroup"
$vmName = "myVM"
$nicName = "myVMNic" # Name of the network interface
$privateIp = "10.0.0.5" # Desired static IP (within subnet range)

# Get the NIC
$nic = Get-AzNetworkInterface -Name $nicName -ResourceGroupName $rgName

# Update IP configuration to Static
$nic.IpConfigurations[0].PrivateIpAllocationMethod = "Static"
$nic.IpConfigurations[0].PrivateIpAddress = $privateIp

# Apply changes
Set-AzNetworkInterface -NetworkInterface $nic
After configuring the static IP, you need to run the following command to verify.
Get-AzNetworkInterface -Name $nicName -ResourceGroupName $rgName | Select-Object -ExpandProperty IpConfigurations | Format-List Name, PrivateIpAddress, PrivateIpAllocationMethod
We have now assigned a static private IP address to the Azure VM. Alternatively, users can also perform the same via Azure CLI. For that, they make use of the following script. Do keep in mind that the following are the Bash commands.
First of all, we need to assign variables using the following
command.rg="myResourceGroup"
nic="myVMNic"
ipConfig="ipconfig1"
privateIp="10.0.0.5"

After configuring the variable, you can just run the following command to set Static IP.
az network nic ip-config update \
--resource-group $rg \
--nic-name $nic \
--name $ipConfig \
--private-ip-address $privateIp \
--allocation-method Static
After configuring, run the following command to verify.
Before you begin configuring static IPs, I would like to highlight a few key points.
- Never set IP inside the guest OS: Since Azure uses DHCP to assign the IPs, one should not manually set an IP in Windows or Linux guest OSs, as that will cause conflicts. Always keep OS network settings as DHCP/Automatic.
- Check your Subnet: The static IP must belong to the subnet of the VM’s virtual network, for example, 10.0.0.0/24’s usable IPs would be 10.0.0.4 – 10.0.0.254. You can check the current subnet mask.
That’s it!
Read: Cannot connect to VM (Azure VDI VM) using RDP
How to assign a static IP Address to a VM?
To assign a static IP address to an Azure VM, use Azure’s management tools (Portal, PowerShell, or CLI). Navigate to the VM’s network interface in the Azure Portal, select IP configurations, change the allocation method from Dynamic to Static, and specify an available IP address within your subnet range. Finally, save the configuration. Do not disable DHCP or manually set the IP inside the VM’s operating system, as Azure uses DHCP to assign the static IP, and manual OS configuration causes network conflicts. Always verify the IP is unused and within the subnet (e.g., for subnet 10.0.0.0/24, valid IPs are 10.0.0.4–254).
Read: In-place upgrade is not supported on Azure Virtual Machines
Is a static IP address private?
A static IP address can be either private or public, depending on its configuration. A private static IP is used within a local network and doesn’t connect directly to the Internet. An ISP assigns a public static IP and makes it accessible over the Internet. The key is that static means the address doesn’t change; however, network scope and purpose decide whether it’s private or public.
Also Read: Azure Virtual Machine Agent Status is not ready – Troubleshoot.