The AADSTS5000225 error message, indicating that your Microsoft Entra ID (formerly Azure AD) tenant has been blocked due to inactivity, is a security and resource management measure by Microsoft. It prevents access to your Azure portal, applications, and data, and appears when you try to sign in. In this post, we are going to see what you can do if you get ADSTS5000225: This tenant has been blocked due to inactivity.

ADSTS5000225: This tenant has been blocked due to inactivity
Microsoft has a system that automatically manages and cleans up unused resources. If your tenant stays inactive for more than 200 days after its billing cycle, it will be blocked. Inactivity means there are no sign-ins by administrators or users in any applications or services linked to that tenant. Once blocked, the tenant enters a crucial 20-day grace period. If you do not take action to restore it within these 20 days, the tenant and all its data will be permanently deleted and cannot be recovered.
If you encounter ADSTS5000225: This tenant has been blocked due to inactivity, follow the solutions mentioned below.
- Contact Microsoft Support for Reactivation
- Use target tenant sign-in
- Clean up your personal Microsoft Account
- Create a new tenant
Let us talk about them in detail.
1] Contact Microsoft Support for Reactivation
This error results from an administrative policy enforcement, not a technical fault. Only Microsoft Support has the backend administrative tools and authority to review your tenant’s inactivity status and manually lift the imposed block, effectively reversing their automated cleanup process.
Before contacting support, gather your Tenant ID/Domain, the full error message with Trace ID, Correlation ID, and Timestamp, and a brief business justification for restoration.
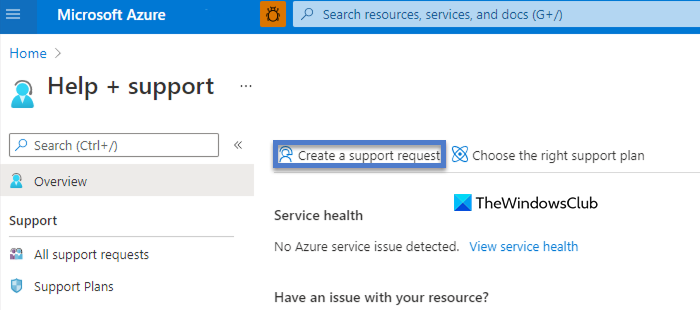
If you can log into the Azure Portal, submit a standard support request through the Help + support section > Create a support request.
If you can not log in, call the Global Business Support hotline (support.microsoft.com). When the system prompts you, say Authenticator to get routed to a live agent who creates a ticket.
Alternatively, create a new, free Microsoft 365 trial tenant using a different email address. Then, from the Admin Center of this new tenant, submit a support ticket and specify the details of your blocked tenant.
Clearly give the agent all the prepared details. Explicitly state that the tenant is blocked (AADSTS5000225) and within the critical 20-day grace period to ensure proper escalation to the dedicated Azure Identity team.
2] Use targeted tenant sign-in
When you have access to multiple tenants, your browser or session may automatically direct you to the most recently used tenant, which could be blocked. To avoid this, you can append the specific Tenant ID you want to access directly to the portal URL. This ensures that the authentication request is explicitly routed to a valid tenant, allowing the sign-in process to proceed correctly.
You can follow the steps mentioned below to do the same.
- First of all, you need to find your active Tenant ID. If you don’t know it, look for it in an old email from Microsoft Azure, in the properties of a saved Azure PowerShell connection, or ask a colleague who is already signed into the active tenant to find it under Microsoft Entra ID > Overview.
- Open a new browser window (preferably in private/incognito mode to avoid cached sessions) and go to https://portal.azure.com/<your_active_tenant_id>. Make sure to replace <your_active_tenant_id> with the actual ID. For example – (e.g., https://portal.azure.com/contoso.onmicrosoft.com or https://portal.azure.com/12345678-90ab-cdef-ghij-klmnopqrstuv).
- You will be presented with the standard Microsoft login page. Enter your work email and password. This should now successfully sign you into the active tenant you specified in the URL.
For long-term management of multiple tenants, consider using separate browser profiles or the Switch tenant feature within the Azure portal once you are logged in to avoid future redirect issues.
Hopefully, this will do the trick for you.
3] Clean up your personal Microsoft Account
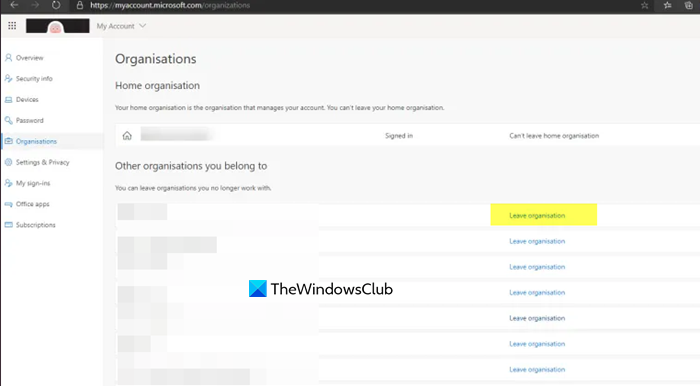
When you use a personal Microsoft Account (e.g., @outlook.com) that was once linked to a work tenant, Microsoft’s login system can automatically redirect you to that associated “home” tenant. By visiting your personal account’s organization page and manually removing the blocked tenant, you sever the automatic redirection link, allowing you to sign in cleanly without being forced to the blocked resource.
- Open a new InPrivate or Incognito browser window and go to https://myaccount.microsoft.com/organizations
- Sign in with your personal email (e.g., @outlook.com, @hotmail.com, or @live.com) and password.
- On the Organizations page, find the blocked Azure AD tenant, click on it, and select Leave organization or Remove. Confirm your choice.
- Close all browser windows. Then, open a new browser and navigate to [https://portal.azure.com](https://portal.azure.com). Sign in using your work or school account credentials. You should now be able to log in without being redirected to the blocked tenant.
Finally, check if the issue is resolved.
4] Create a new tenant
If your tenant has gone beyond the 20-day period and has been deleted, or if reactivation does not work, you need to create a new tenant. This is also the best option for test or learning tenants. To do this, sign up for a new Azure Free Account or Microsoft 365 trial using a different email address. This will create a new tenant for you. Make sure to cancel any trial subscriptions after you sign up to avoid being charged.
That’s it!
Read: Fix AADSTS7000112, Application is disabled error
How to fix User blocked due to risk on home tenant?
To resolve User blocked due to risk in the home tenant, administrators should log into the Microsoft Entra admin center, go to Protection > Identity Protection > Risky users, select the affected user, and choose Reset password for a temporary password or Dismiss user risk if it’s a false positive. They can also visit https://aka.ms/RiskyUsers for these actions. Users can self-remediate by registering for multi-factor authentication (MFA) and self-service password reset (SSPR) to securely change their password.
Read: Fix CAA20004 Microsoft Teams Sign in Error
How do you override the directory inactivity timeout policy?
To override the directory inactivity timeout policy, users or administrators can set a shorter personal timeout. This is done by clicking the settings icon in the Microsoft Entra admin center or Azure portal, selecting the Signing out + notifications tab, checking Override the directory inactivity timeout policy, and entering a new duration. Users cannot extend sessions beyond the Global Administrator’s directory-wide limit; they can only set a more restrictive timeframe for their own sessions. Only a Global Administrator can configure the maximum allowed timeout.
Also Read: AADSTS90072: User Account from identity provider does not exist.