
Enabling SSH (Secure Shell) in Oracle VirtualBox transforms how you interact with your virtual machines. Instead of being limited to the VirtualBox console window, SSH allows you to access your VM’s command line from your host machine or any other computer on the network. In this post, we will show how to enable SSH in Oracle VirtualBox.
Enable SSH in Oracle VirtualBox
Using SSH makes it easier and more effective to manage your virtual machines. After you set it up, you can open a terminal on your host computer, like PowerShell on Windows or Terminal on macOS/Linux, and connect directly to your VM as if you were sitting at its console. This lets you easily copy and paste commands, securely transfer files with SCP or SFTP, and manage multiple VMs from a single window.
SSH also supports remote work, so you can use powerful development tools on your host computer to write and run code in your virtual environment without hassle. Overall, SSH enables your host and guest operating systems to communicate efficiently and securely.
To enable SSH in Oracle VirtualBox, you need to follow the steps or methods mentioned below.
- Using Bridged Network
- Using Port Forwarding
Let us talk about them in detail.
1] Using Bridged Network
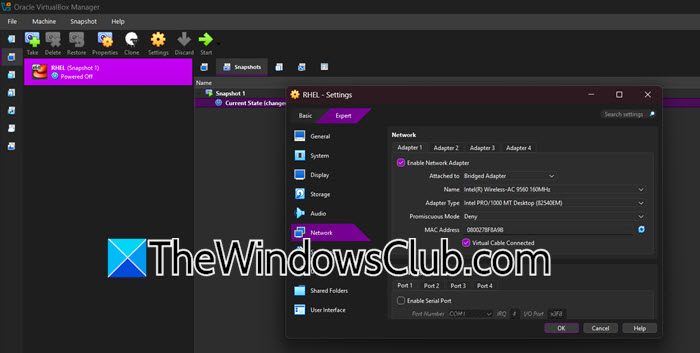
First, we need to update your VM’s network configuration to use the Bridged Adapter. Bridged Adapter makes your VM act like a separate physical computer on your network. It will request its own IP address from your router, just like your host computer does. This makes it easily discoverable.
To make these changes, follow the steps below.
- Open Oracle VirtualBox and ensure your virtual machine is in a powered-off state. You cannot modify these settings while the VM is running.
- Select your virtual machine from the list on the left.
- Click the Settings button (the orange gear icon) in the toolbar.
- In the Settings window, navigate to the Network tab.
- You should see the Adapter 1 tab. Ensure the Enable Network Adapter checkbox is ticked.
- In the Attached to: dropdown menu, you have two primary choices. The simplest for a home or local network is a Bridged Adapter.
- After selecting “Bridged Adapter,” choose the correct Name from the dropdown. This should be the name of your host computer’s physical or wireless network interface that is currently connected to the internet (e.g., “Realtek PCIe GbE Family Controller” for Ethernet or a Wi-Fi adapter).
- Click OK.
Now, we need to install SSH on your VM.
After configuring the network adapter, boot your virtual machine, open a terminal, and verify that SSH is running with systemctl status ssh. If not installed, run sudo apt update && sudo apt install openssh-server -y for Ubuntu/Debian, or sudo dnf install openssh-server -y for Red Hat-based systems. Once installed, start the service with sudo systemctl start ssh and enable it to launch on boot using sudo systemctl enable ssh.
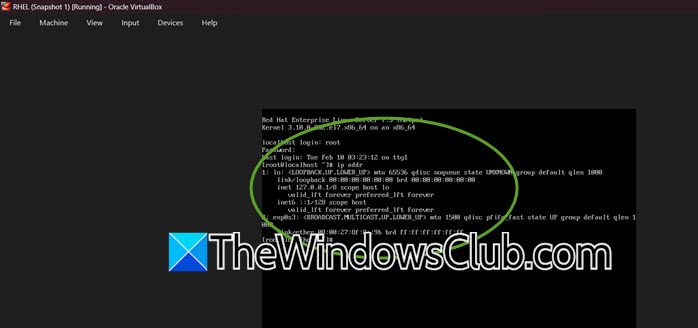
In your VM’s terminal, find its IP address by running ip addr or ifconfig, then look for your network interface (such as eth0 or enp0s3) and note the inet address, which typically appears as 192.168.x.x. Next, open a terminal on your host machine and initiate the SSH connection using ssh username@ip_address. For example, ssh [email protected], and when prompted for the first time, type yes to confirm the host’s authenticity, then enter your VM user password, after which you should be successfully logged into your virtual machine.
2] Using Port Forwarding
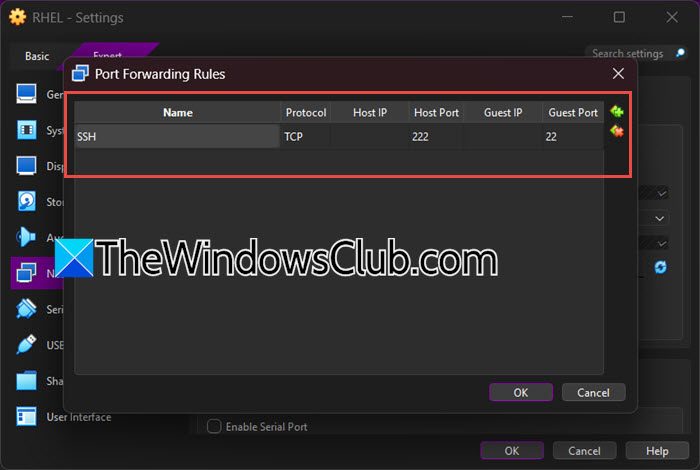
If you cannot use a Bridged Adapter, such as on a restricted corporate network or a public Wi-Fi that isolates clients, you can use Port Forwarding with the default NAT network mode. This approach allows VirtualBox to forward traffic from a specific port on your host machine to the SSH port on your guest machine. Follow the steps outlined below.
- Your virtual machine should be in the Powered Off state.
- Go to Settings> Network.
- Ensure Adapter 1 is set to Attached to: NAT.
- Click the Advanced drop-down to expand the options.
- Click the Port Forwarding button. A new window will open.
- Click the green “+” icon on the right to add a new rule.
- Fill in the details as follows.
- Name: SSH (or any descriptive name)
- Protocol: TCP
- Host IP: Leave blank (or 127.0.0.1 to accept connections only from your host machine)
- Host Port: 2222 (You can choose any unused port, e.g., 2222)
- Guest IP: Leave blank (or the static IP of your VM if you have set one)
- Guest Port: 22 (This is the default port for SSH inside the VM).
- Click OK to save the rule, then OK again to save the network settings.
- Make sure SSH is enabled (check out the previous method to do the same).
On your host machine, connect using the following command:
-p 2222 [email protected]
The -p 2222 tells the SSH client to connect to port 2222 on your host machine (127.0.0.1), which VirtualBox will then forward to port 22 on your guest VM.
Note: Use SSH client tools such as MobaXterm or PuTTY to connect to your machine.
Read: How to install Oracle Linux on Oracle VirtualBox
How to enable SSH on VirtualBox?
First, configure your VM’s network adapter to either Bridged mode or set up Port Forwarding under NAT in the Network settings. Then, boot the VM, install the OpenSSH server using commands like sudo apt install openssh-server, and ensure the service is running with sudo systemctl start ssh.
Read: How to install Debian on VMware Workstation
How to SSH into Oracle VM?
Find your VM’s IP address by running ip addr or ifconfig inside the guest terminal. On your host machine, open a terminal and connect using ssh username@ip_address (e.g., ssh [email protected]), then accept the host key and enter your password when prompted.
Also Read: Install VMware ESXi on VirtualBox VM.
