
Whenever a new drive or storage device is connected to a Windows 11/10 computer, the operating system automatically assigns a drive letter to it. This is not limited to assigning a letter; the OS also maps the drive’s location. This helps it map the letter to the drive’s exact port and serve user requests. This builds up a small cache segment according to the pattern in which the user tends to use the computer’s storage. This process is called Auto Mounting. It works for Hard Disks or Optical Drive readers connected using the SATA Ports as well as for USB Drives connected using the USB Ports perfectly.
In Windows 11, auto-mounting of drives is enabled by default, meaning any new disk, volume, or USB drive gets automatically mounted and assigned a drive letter.
Enable or Disable Auto-Mount feature in Windows 11/10
We will be taking a look at three methods that will show us how to enable or disable Drives’ Auto Mounting:
- Using the Registry Editor.
- Using the DiskPart Utility.
- Using the MountVol tool.
I recommend that you create a System Restore Point. This is because if something goes wrong, you can always revert. Also, note that you have to be signed in as an administrator to enable or disable the automount feature.
1] Using the Registry Editor
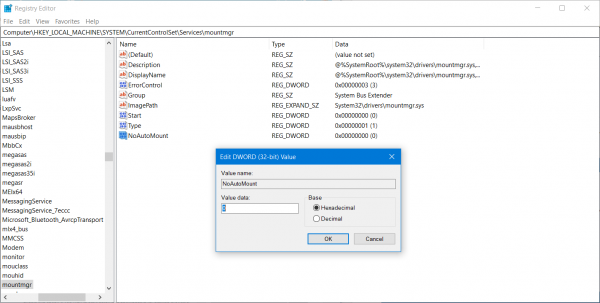
Hit the WINKEY + R button combination to launch the Run utility, type in regedit and hit Enter. Once Registry Editor opens, navigate to the following key-
Computer\HKEY_LOCAL_MACHINE\SYSTEM\CurrentControlSet\Services\mountmgr
Now, check if you find a DWORD named as NoAutoMount. If you don’t, just create one with the same name. Make sure that the base is selected to Hexadecimal.
Double-click on it and change its Value to 0 to enable it and, to 1 to disable it.
Reboot your computer for the changes to take effect.
2] Using the DiskPart utility
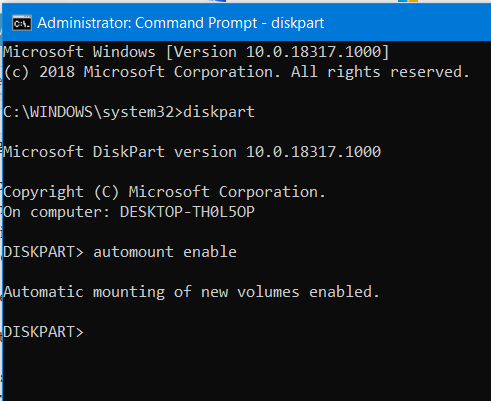
Run Command Prompt as Administrator and execute the following command:
diskpart
This will start the DiskPart Utility. It is a command line based utility and will get a UAC Prompt once you invoke it. You have to click on Yes for the UAC Prompt. Then, type in-
automount
This will show output either – Automatic mounting of new volumes enabled or Automatic mounting of new volumes disabled.
This means it can be used to check the status of Auto Mount.
Another command which can be helpful is-
automount enable
It can be used to enable the Auto Mount feature.
This command can help you to disable the Auto Mount feature-
automount disable
The following command will help you to remove all the assigned letters and history of drives previously connected-
automount scrub
3] Using MountVol tool
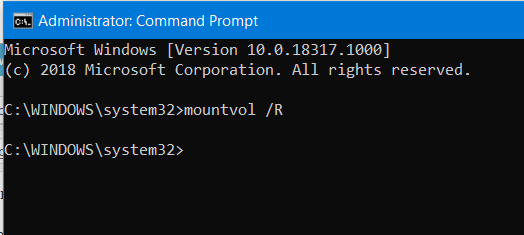
Here, we will be taking a look at the mountvol command.
Run Command Prompt as Administrator and execute the following command:
mountvol /E
It will enable the Auto Mount feature.
This command will help you in disabling the Auto Mount feature-
mountvol /N
The following command will help you to remove all the previously assigned drive letters-
mountvol /R
You need to reboot your computer for the changes to take effect.
If you disable auto-mount, new drives won’t appear automatically in File Explorer. You’ll need to manually assign letters via Disk Management. Forgetting that auto-mount is disabled may cause confusion when plugging in USB drives, as they won’t show up until mounted manually.
Now read: How to enable or disable USB Drives or Ports in Windows.
