Both Intel and AMD have been the dominant brands in the PC industry, so it is pretty obvious that there will be some healthy competition. But a few years back, Nvidia announced a list of AMD FreeSync Monitors that could run the adaptive sync technology, G-Sync, and also deployed software-based G-Sync. In this article, we are going to see what is G-Sync and how you can enable G-Sync on Windows FreeSync Monitor.

What is G-Sync?
G-Sync, as the name suggests, is a technology that allows the monitor to match the framerate of the game that you are playing. This technology was patented by Nvidia. It is especially useful for someone who is constantly experiencing a drop in framerates.
You see, most graphics cards start at the required FPS, but as you play the game, they throttle and subsequently drop the frame rate. This is not something a gamer would want. If you have bought a powerful GPU, you would want it to perform well and deliver the framerates you have set for that game. It can not only cause a poor experience but also trigger issues due to discombobulated refresh rates. G-Sync helps with all these issues. So if you can, enable G-Sync immediately.
Can I use G-Sync on a FreeSync monitor?
Yes, Nvidia has made it possible for users with some AMD FreeSync Monitors to use G-Sync. First of all, check if your monitor supports this feature, and if you have a supported graphics card. Then, you just need to Enable G-SYNC, G-SYNC Compatible setting in NVIDIA Control Panel, and other options required to make G-Sync and FreeSync work together.
Read: G-Sync vs FreeSync explained
Enable G-Sync on Windows FreeSync Monitor
Before enabling G-Sync, there are a few prerequisites you need to take care of. They are.
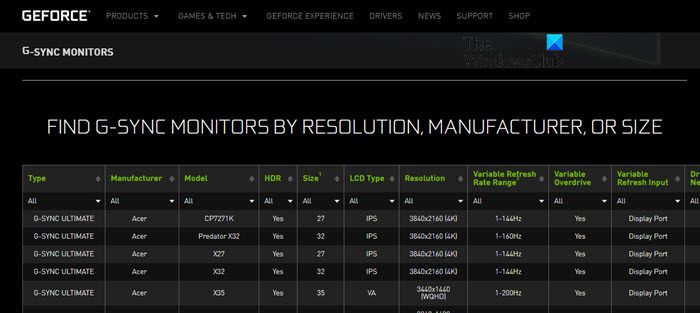
- Go to nvidia.com and see if your Monitor is compatible with G-Sync.
- Have an Nvidia GeForce GTX 10-series or better.
- Your monitor should be connected via DisplayPort and not HDMI; it won’t work otherwise.
- Download Nvidia Game Ready Driver from nvidia.com/download.
Once you are done with the prerequisite steps, it’s time to enable G-Sync on Windows FreeSync Monitor.
Follow the given steps to do the same:
- First of all, we need to enable FreeSync from your Monitor, press the Settings button of your Monitor (usually placed below the screen), go to Game Adjust, FreeSync, and selected Extended (Steps to enable FreeSync can vary depending on the manufacturer).
- Open Nvidia Control Panel. You can either search it out from the Start Menu or right-click on the Desktop and select Nvidia Control Panel.
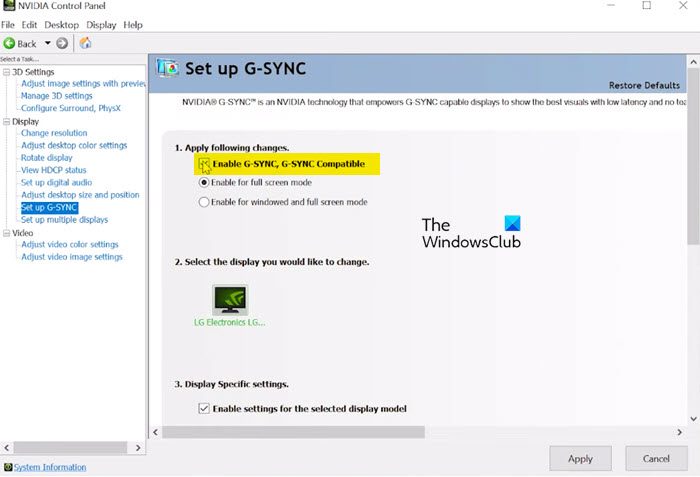
- Expand Display and select Set up G-SYNC.
- Tick the box associated with Enable G-SYNC, G-SYNC Compatible.
- Select Enable for full screen mode or Enable for windowed or full screen mode depending on the way you play your game.
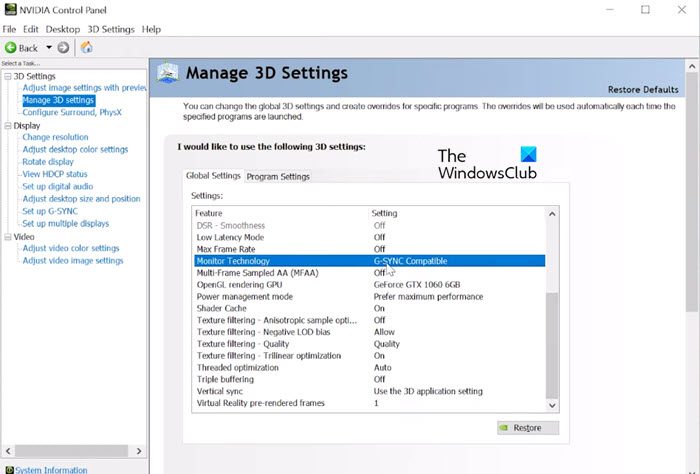
- Then, go to 3-D Settings > Manage 3-D Settings from the left panel of the window.
- Look for Monitor Technology and select G-SYNC Compatible.
- Scroll down and enable Vertical sync.
- Click Apply.
Finally, close the app and enjoy your game.
Why can’t I turn on G-Sync?
If G-Sync is not working on your computer, check out the following solutions.
- Make sure that your hardware is compatible
- Turn on V-sync
- Update Graphics Drivers
- Recheck the setup.
Let us talk about them in detail.
1] Make sure that your hardware is compatible
First of all, you need to make sure that your devices are compatible with running G-Sync. Not all Nvidia Drivers support G-Sync technology. If you want to use G-Sync, make sure your drivers are for an Nvidia GeForce GTX 10-series or better.
Other than that, it is important to make sure that your Monitor supports the technology. Nvidia has made an official list of Monitors who can run G-Sync, check out the prerequisite steps aforementioned to know more about the list.
Last but not least, your Monitor should be connected via a DisplayPort monitor. HDMI cables won’t work in this case.
2] Turn on V-Sync
First of all, you should try to turn on Vertical sync or V-sync from the Nvidia Control Panel. Just open the app, and go to Manage 3-D Settings. Scroll down to reach Vertical sync and enable it. If this didn’t work, move to the next solution.
Related: What is V-Sync in games? Should I Turn Off or On V-Sync?
3] Update Graphics Drivers
Next up, we need to make sure that your Graphics Drivers are not experiencing any incompatibility issues. For that, it is important to keep them updated. We have mentioned a few methods to update Graphics Drivers.
- Install Optional Updates to update your GPU Driver.
- Go to the manufacturer’s website and download your driver.
- Update your driver from the Device Manager.
- Use free driver update software.
Hopefully, it will do the job for you.
4] Recheck the setup
Last but not least, we urge you to refer to the guide on enabling G-Sync (aforementioned) and follow it step by step. This way, you can get rid of any kind of misconfiguration and resolve the issue. This should do the job for you.
That’s it!
Read Next: How to enable Radeon FreeSync for Individual Applications.