
In this tutorial, we will show you how to enable built-in Sysmon on a Windows 11 PC. Sysmon (or System Monitor) is a device driver and system service that allows you to capture system events, record the hashes of process image files, log process creation, DLL or driver loading, network connections, and changes in file creation dates, and more. Earlier, we had to download and install Sysmon separately to use it, but now Windows PCs include Sysmon functionality natively. You can enable or install the built-in Sysmon using Windows 11’s native features, and its functionality remains unchanged.
Is Sysmon included in Windows 11?
Yes, Sysmon is now included in Windows 11 natively. This feature is currently available to insiders, but it will be available in the stable release soon. The built-in Sysmon remains disabled by default, so you must enable it explicitly. Also, note that if you have already installed Sysmon from the official website, you need to uninstall it first before enabling the built-in Sysmon.
How to enable built-in Sysmon in Windows 11
You can enable the built-in Sysmon in Windows 11 using three native options:
- Enable built-in Sysmon using the Settings app
- Install built-in Sysmon using PowerShell
- Enable built-in Sysmon via Command Prompt.
Let’s check these options.
1] Enable built-in Sysmon using the Settings app
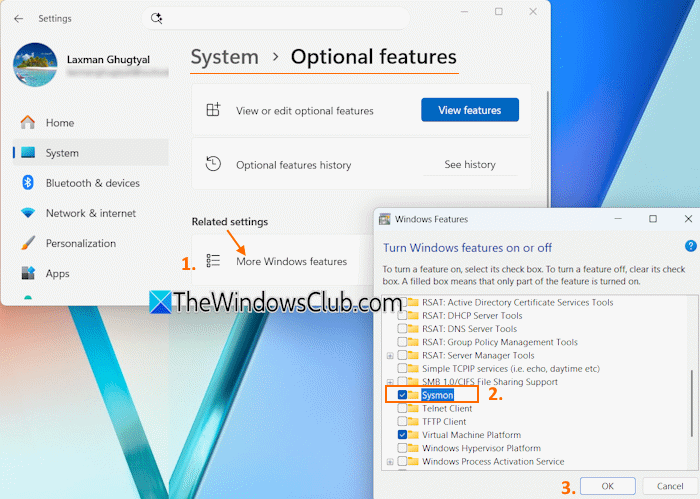
Here are the steps to enable the built-in Sysmon using the Settings app:
- Press the Win+I hotkey to open the Windows 11 Settings app
- Select the System category
- Click on the Optional features option
- Click on the More Windows features option (under the Related Settings section)
- A Windows Features box will open
- Check or tick mark the Sysmon option
- Press OK
- Press the Close button.
- This will successfully enable the built-in Sysmon. But you need to finish the installation. For this, open an elevated Command Prompt window or PowerShell window
- Execute the following command:
Sysmon -i
Once the installation is completed, you can use Sysmon on your Windows 11 PC.
Related: Install SysInternals Suite using PowerShell INF Script
2] Install built-in Sysmon using PowerShell
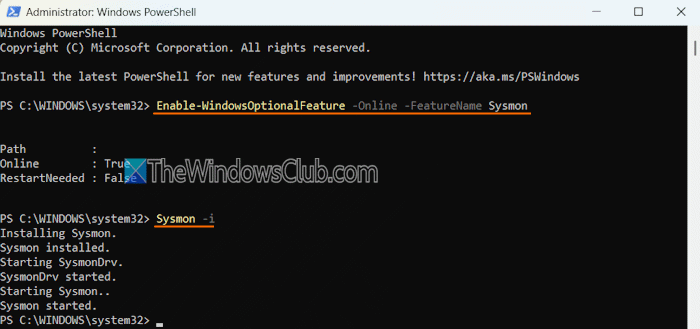
The steps to enable and install built-in Sysmon using PowerShell are as follows:
- Open an elevated PowerShell window
- Execute the following command to enable the built-in Sysmon:
Enable-WindowsOptionalFeature -Online -FeatureName Sysmon
- Once the command is executed successfully, run the following command to start the built-in Sysmon:
Sysmon -i
That’s it.
3] Enable built-in Sysmon via Command Prompt
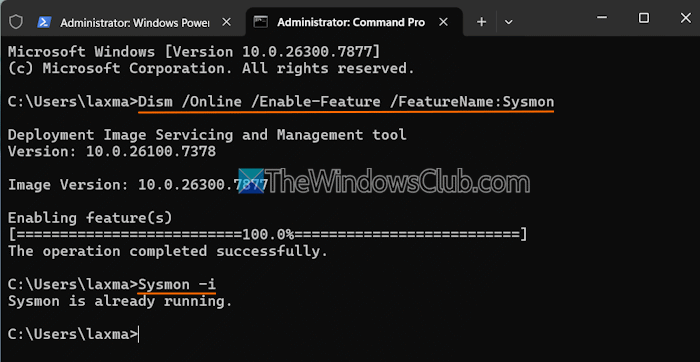
You can enable the built-in Sysmon via the Command Prompt window using the following steps:
- Right-click on the Start button
- Select the Terminal (Admin) option. This will open Windows Terminal as an administrator on your Windows 11 PC
- Open a Command Prompt profile in a new tab
- Execute the following command to enable the built-in Sysmon tool:
Dism /Online /Enable-Feature /FeatureName:Sysmon
- To finish the installation, run the command given below:
Sysmon -i
- Close the Terminal window.
That’s it.
Now read: How to crash, hang, and cause kernel memory leaks in Windows?
How do I enable the built-in administrator in Windows 11?
To enable the built-in administrator account in Windows 11, open the Command Prompt window as an administrator. After this, execute the following command:
Net user administrator /active:yes
You can also set a password for the built-in administrator account if needed.
Read next: RAMMap is a memory usage analysis utility from Sysinternals.
