Automating the connection between GitHub and Hugging Face transforms how you build, version, and deploy AI projects. Instead of manually uploading files, a CI/CD pipeline keeps your Hugging Face Spaces or models always in sync with your GitHub repository. In this article, we will see how to connect GitHub to Hugging Face.
How to connect GitHub to Hugging Face
Before starting, make sure you have the following.
- A GitHub account and a Hugging Face account.
- Git is installed on your local machine.
- (Optional) A GitHub repository to host your project’s code and a Hugging Face Space to host your app. Don’t worry if you don’t have these yet; the steps below will guide you.
To connect GitHub to HuggingFace, follow the steps below.
- Generate a Hugging Face Access Token
- Store the Token as a GitHub Secret
- Create the GitHub Actions Workflow File
- Set up your Hugging Face Space
- Commit, Push, and Watch it Work
Let us talk about them in detail.
1] Generate a Hugging Face Access Token

We will turn your GitHub repository into the single source of truth and automate deployments. For this, the first thing we need is an access token from Hugging Face. To fetch that, follow the steps mentioned below.
- Log in to your Hugging Face account.
- Click on your profile and then select Settings.
- From the left sidebar, click on Access Tokens and select Create new token.
- Choose a name and select write as the token type to grant GitHub permission to push updates.
- Click on Create token, copy it, and save it somewhere.
Make sure to save it somewhere safe, as you might not be able to fetch it again.
2] Store the Token as a GitHub Secret

Now that we have a token generated from Hugging Face, let us store it in your Git repo. To do this, follow the steps below.
- Go to your GitHub repository and navigate to Settings > Secrets and variables > Actions.
- Click New repository secret.
- Name the secret HF_TOKEN (this exact name is crucial) and paste your Hugging Face token into the value field.
- Click on Add secret.
From Repository secrets, you will see our newly created secret.
3] Create the GitHub Actions Workflow File
We need to create the YAML file that defines your CI/CD pipeline.
In your GitHub repository, create the following directory path: .github/workflows/. Inside the workflows folder, create a file named deploy.yml.

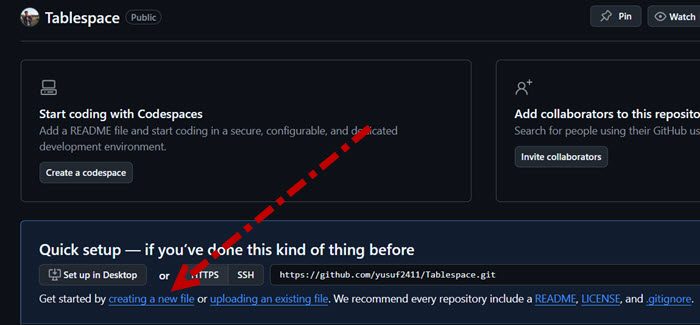
For this, you need to click creating a new file hyperlink. Then, in the Name your file field, type .github/workflows/deploy.yml.
Paste the following lines of code.
name: Sync to Hugging Face hub

on:
push:
branches: [main] # Triggers the workflow on pushes to the main branch.
workflow_dispatch: # Allows you to manually trigger the workflow from the Actions tab.

jobs:
sync-to-hub:
runs-on: ubuntu-latest
steps:
- name: Checkout repository
uses: actions/checkout@v3
with:
fetch-depth: 0 # Fetches all history for all branches and tags.
lfs: true # Checks out any Git LFS files.

- name: Push to Hugging Face Hub
env:
HF_TOKEN: ${{ secrets.HF_TOKEN }}
run: git push https://HF_USERNAME:[email protected]/spaces/HF_USERNAME/SPACE_NAME main
Don’t forget to replace HF_USERNAME with your Hugging Face username and SPACE_NAME with the name of your Space.
4] Set up your Hugging Face Space
If you’re starting fresh, create the Hugging Face Space where your app will live. You need to follow the steps mentioned below.
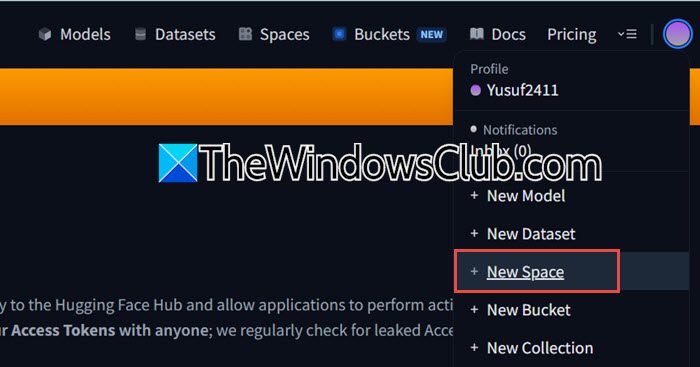
- Log into Hugging Face and click on your profile picture > New Space.
- Give your Space a name, select an SDK (like Gradio or Streamlit), and set the Space to Public.
- Click Create Space.
You can leave the default files as they are; your GitHub Action will overwrite them.
5] Commit, Push, and Watch it Work
Now, commit the .github/workflows/deploy.yml file to your GitHub repository. Push the commit to the main branch. Go to the Actions tab in your GitHub repository. You will see your Sync to Hugging Face hub workflow running. If it succeeds, your code is now live on your Hugging Face Space!
Hopefully, with the help of this guide, you will be able to integrate or connect your GitHub repository to Hugging Face.
Read: How to install Qwen AI Locally on Windows 11
Does Hugging Face use GitHub?
Yes, Hugging Face integrates closely with GitHub, though it is a separate platform. Hugging Face provides Git-based repositories for models, datasets, and Spaces, meaning you can clone, push, and pull using standard Git commands just like you would with GitHub. This allows developers to version control their AI assets, automate deployments via GitHub Actions, and sync code between the two platforms seamlessly. Many Hugging Face Spaces and model repos are directly linked to GitHub repositories for continuous integration and easier collaboration.
Read: How to use GitHub Spark to create Web Apps?
How do I push code to Hugging Face?
You can push code to a Hugging Face Space or model repository using standard Git commands after cloning the repository URL from Hugging Face (e.g., https://huggingface.co/spaces/your-username/your-space-name). First, authenticate with a Hugging Face access token (using git remote set-url with the token embedded or huggingface-cli login). Then add, commit, and push your changes: git add ., git commit -m “message”, and git push origin main. For automation, you can also set up a GitHub Actions workflow that pushes to Hugging Face on every GitHub push, using an HF_TOKEN secret stored in your GitHub repository.
Also Read: Use DeepSeek to generate Images.