You often need to forward emails to another account based on specific criteria automatically. It could be based on a subject, keywords, or from a particular sender. In this post, we will share how you can set up rules to automatically forward email in MS Outlook, Office 365, Outlook app, or Outlook.com.

Automatically Forward Email in Microsoft Outlook
Since forwarding could be based on multiple criteria, we must create Rules. It is a feature in Outlook that allows you to perform an action based on specific criteria. Our criteria here is to forward emails. You can use rules for almost anything, including moving deleted emails to a folder.

- Go to File > Rules and Alerts > click on Manage Rules and Alerts
- In the pop-up window, select the Email Rules tab and click on New Rule.
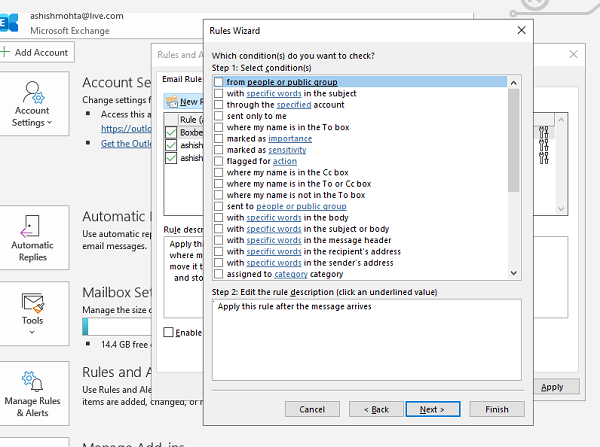
- It will open the Rules Wizard which will have two steps:

- Step 1: Select from a Blank Rule, and select Apply the rule on messages I receive
- Step 2: Select the rule that says Apply this rule after the message arrives and hit Next.
- In the next screen, you will need to select conditions. Based on these, incoming email messages will be forwarded.
- Do not select any condition if you want to forward all your messages. It is useful if you are planning to change your email ID and slowly tell everyone about it.
- If you are only forwarding individual emails, then choose based on keywords, email ID, a specific word, a specific group, etc.
- Make sure to choose to Apply this rule after the message arrives. Then hit Next and confirm.
- Next, you will have to decide where to forward the email. You can check the box which says Forward it to people or public group.

- Click on the link for people or public group. It will open the contact book from where you can select a contact or group email id, or you can type it.
- The next screen will allow you to add an exception. If you want certain emails to remain in the inbox, you can add them here.
- Lastly, you need to add a name to the rule so you can recognize it. Also, you need to tick the box that says Turn on this rule. Click Finish, and you are done.

You can also choose to Run the rule right away to apply to your inbox. If you have multiple accounts in Outlook, then you can choose to apply the rule for every account
It also works with Office 365.
How to set up email forwarding in the New Outlook app
To set up email forwarding in the New Outlook app, follow these steps:

- Open the New Outlook app.
- Click the gear-shaped icon in the top-right corner to open Settings.
- Select Mail > Forwarding.
- Turn on the Enable forwarding button.
- Now, write the email address to which you want to forward your emails.
If you want the New Outlook app to keep a copy of your forwarded emails, select the “Keep a copy of forwarded messages” checkbox. When you are done, click Save.
How to set up email forwarding on Outlook.com
To enable email forwarding on Outlook.com, follow these steps:

- Open your favorite web browser and visit outlook.com.
- Log in to your Outlook account.
- Click the gear-shaped icon in the top-right corner to open Settings.
- Select Mail > Forwarding and IMAP.
- Scroll down and turn on the Enable forwarding button.
- Enter an email address to which you want to forward all your emails.
- Select the “Keep a copy of forwarded messages” checkbox to keep a copy of all forwarded emails in Outlook.com. Otherwise, skip this step.
- Click Save.
I hope the steps were clear and that you were able to set up email forwarding in Outlook.
How to automatically forward emails from a specific sender to a folder in Outlook?
To automatically forward emails from a specific sender to a folder in MS Outlook, Outlook app, or Outlook.com, you need to create rules. In MS Outlook, go to File > Info, and click Manage Rules & Alerts. Now, create a new rule to forward all emails from a specific sender to the required email address. In the Outlook app or Outlook.com, open Settings and select Mail > Rules > Add new rule.
How to activate auto forward?
To activate the auto-forward feature in an email client, you need to enable the automatic email forwarding option. Different email clients have different interfaces. Open your email client settings and look for the email forwarding or similar feature.
Related read: How to setup Automatic Replies in Outlook.