When you play a video, both audio and video sync together to deliver you the best experience. However, sometimes the audio lags behind or ahead of the video. This is known as the syncing issue between audio and video. You may experience this issue with any media player or web browser installed on Windows 11/10. Even sometimes the issue occurs while playing video games.
Why is my video and audio out of sync on my computer?
The reasons can be many. It could be a corrupted media file, outdated graphics or audio drivers, altered Windows settings, or perhaps your media player needs to be updated or repaired.
Fix Audio and Video out of sync on Windows PC
To fix this issue, we suggest you try the following solutions:
- Update your graphics drivers
- Change the audio format of your device
- Disable the “Allow applications to take control of this device” option
- Turn off Hyper-V
- Disable Fast Startup
- Drop frames and enable DirectX Video Acceleration (only for Windows Media Player)
Let’s see how you can do it.
1] Update your graphics driver
You may be experiencing video syncing issues on your Windows computer due to the corrupted or outdated graphics driver. To fix this issue, update your graphics driver.
2] Change the audio format of your device
Changing the audio format of the device is one way to troubleshoot audio and video syncing issues on Windows systems.

The following instructions will guide you on how to do that:
- Launch Control Panel.
- Select Large icons in the View by mode.
- Click Sound.
- Select your audio device under the Playback tab.
- Click Properties.
- Click on the Advanced tab.
- Select DVD Quality from the drop-down menu under the Default Format section.
- Click Apply and then OK to save the changes you made.
This should fix the audio syncing issues with video on Windows OS.
3] Disable the “Allow applications to take control over this device” option
If the above method does not fix the audio and video syncing issue on your device, we suggest you disable the “Allow applications to take control over this device” option. You will find this option under the Advanced settings of your speaker. To open your speaker’s Advanced settings, follow the first six steps described above.
4] Turn off Hyper-V

Some users experienced this issue because the Hyper-V service was running in the background. If a virtual machine runs in the background, it continuously utilizes the CPU cores, which can negatively impact the performance of your system. Hence, turning off the Hyper-V may fix the issue.
5] Disable Fast Startup
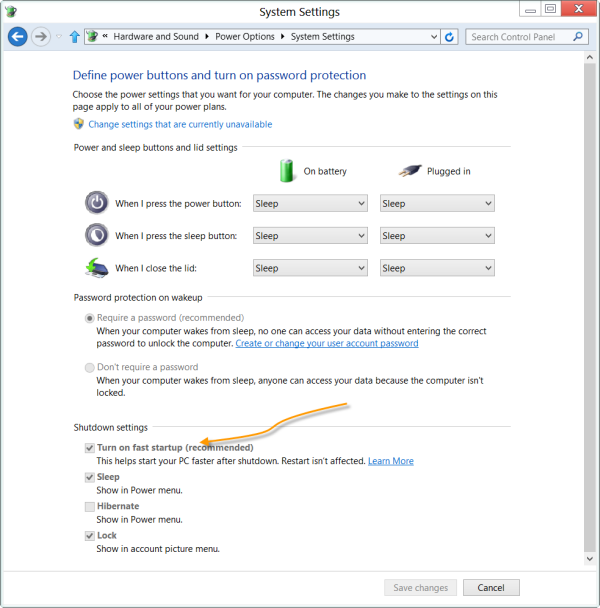
According to the feedback of some affected users, disabling the Fast Startup in Windows can fix the issue. You can also try it. The Fast Startup boots a computer faster than the normal mode. Although it is a useful feature that reduces boot-up time in Windows computers, it may sometimes create issues.
6] Drop frames and enable DirectX Video Acceleration (only for Windows Media Player)
If the issue is occurring in Windows Media Player, dropping the frames and enabling the DirectX Video Acceleration may fix it.

The steps to do this are as follows:
- Launch Windows Media Player.
- Go to “Tools > Options.”
- Click on the Performance tab.
- Under the Video Playback section, enable the checkboxes next to the “Drop frames to keep audio and video synchronized” and “Turn on DirectX Video Acceleration for WMV files” options.
- Click Apply and then OK to save the settings.
Close the Windows Media Player and launch it again.
This should help.
Related: Fix Audio and Video play and pause automatically on Windows.
How do I fix audio delay in Windows video?
To fix audio delay in a Windows video, update your audio and video drivers, adjust the audio synchronization settings in your media player, use a video editing software to manually sync audio and video or try a different media player. These steps should help you resolve the audio delay issue and enjoy synchronized audio and video playback.