If you see the Fatal Error, Disc read error while playing Call of Duty Warzone Modern Warfare, this article may help you fix it. There are many reasons you are receiving the Fatal Error, Disc read error in Warzone, such as corrupted display drivers, a third-party app or software conflict, etc. Call of Duty Warzone is a popular battle royale game available for Windows. But, like any other BR game, Warzone has been in the news among gamers due to various errors. Among all the errors, the one that has been troubling players the most is Disk read error. If you are also encountering the same problem, continue with the troubleshooting guide to fix it.

Why do I keep getting the fatal error in Modern Warfare?
The most common cause of fatal error in Modern Warfare is corrupted or outdated drivers. Apart from that, there are other causes too. Some users reported that the error occurred due to Malwarebytes, while others attributed it to third-party software.
Fix Warzone Fatal Error, Disc read error on Windows PC
If Call of Duty Warzone Modern Warfare is crashing with Fatal Error, Disk read error 3.1, 5.0, 6.154, 8.6, etc. on your Windows 11/10 PC, then these suggestions are sure to help you fix the issue:
- Update your graphics card driver
- Rebuild your game files
- Verify the integrity of the game files
- Disable the Sonic Studio Virtual Mixer
- Disable NVIDIA In-game Overlay
- Turn off Malwarebytes or your antivirus software
- Turn off HDR
- Uninstall the Blitz app
- Turn off Discord Overlay
- Disable On-demand Texture Streaming in your Game Settings
- Run ChkDsk
- Run Warzone in Administrator Mode
- Change the Installation
- Turn Off Game Mode and Xbox Game Bar
- Uninstall and reinstall the game
Let’s see all these fixes in detail.
1] Update your graphics card driver
One of the causes of this issue is the corrupted or outdated graphics card driver. Therefore, we suggest updating your graphics card driver and seeing if it helps. When it comes to updating the graphics card driver, you can follow any of the methods mentioned below:
- You can update the graphics card driver via the Windows Optional Updates feature.
- You can visit the manufacturer’s website, download the latest version of your graphics card driver, and install it manually. But before you run the installer file, you have to uninstall the current version of your graphics card driver from the Device Manager.
- Update the graphics card driver from the Device Manager. The steps for the same are listed below:
- Press Win + R keys. This will open the Run command box.
- Type
devmgmt.mscand click OK. Device Manager will appear on your screen. - In the Device Manager, expand the Display adapters node.
- Right-click on your graphics card driver and select Update driver.
- Now, click on the Search automatically for drivers option. After that, Windows will install the latest version of your graphics card driver automatically.
After updating your graphics card driver, restart your computer and see if it fixes the problem.
2] Rebuild your game files
Rebuild the COD Warzone game files and see if this helps. Follow the instructions below to rebuild your game files:
- Open the Call of Duty Modern Warfare folder. If you do not know the folder location in the File Explorer, open the Blizzard Battle.net client and then select the Call of Duty game from the left pane. Now, click on the Options drop-down menu and select Show in Explorer.
- Delete all the files. Do not delete the folders.
- Again, open the Blizzard Battle.net client and select the Call of Duty game.
- Go to “Options > Scan and Repair.”
- Wait till the process gets completed.
Now, launch the game. It will automatically start downloading the missing files. After the download completes, check whether the error occurs again.
3] Verify the integrity of the game files
This solution is for users who have installed Call of Duty: Warzone from the Steam Client. Verify the integrity of the game files and see if this fixes the problem. To do so, go through the following instructions:
- Open the Steam Client and go to Library.
- Right-click on the COD game and select Properties.
- Select the Local Files tab.
- Now, click on the Verify Integrity of Game Files option.
4] Disable the Sonic Studio Virtual Mixer
If you have an ASUS laptop, you may have Sonic Studio Virtual Mixer installed. According to some users, the Sonic audio suite was causing the problem. After disabling it, the problem was fixed.
- Launch the Control Panel.
- Select Large icons in the View by mode.
- Click Sound.
- Under the Playback tab, right-click on the Sonic Studio Virtual Mixer speaker and select Disable.
If this does not fix the problem, try the next solution.
5] Disable NVIDIA In-game Overlay
If you have the NVIDIA graphics card, you can try disabling the In-game Overlay in NVIDIA Geforce Experience and see if it brings any changes.

Go through the following instructions:
- Right-click on the NVIDIA icon in the system tray and select NVIDIA Geforce Experience.
- Log into your NVIDIA account (if you are prompted to do so).
- Click the gear-shaped icon to open Settings.
- Now, select the GENERAL category from the left side.
- Turn off the button next to IN-GAME OVERLAY.
6] Turn off Malwarebytes or your antivirus software
Some users have reported that the error was fixed when they turned off Malwarebytes. If you have installed Malwarebytes or any other anti-malware software on your system, disable it and check if you can play the game. If this fixes the problem, you can disable the anti-malware software during gameplay and turn it on again after exiting the game.
7] Turn off HDR
The issue might be occurring if HDR is enabled on your device. You can check this in your Windows 11/10 Settings. If you find it enabled, disable it and check if it fixes the issue.
8] Uninstall the Blitz app
Some users have found the Blitz app the culprit of the problem. If you have installed the Blitz app on your system, uninstalling it may help. You can uninstall the Blitz app from the Control Panel or Windows 11/10 Settings.
9] Turn off Discord Overlay
As we have explained previously in this article, one possible cause of this problem is the conflicting third-party applications. It might be possible that the issue is occurring due to the Discord Overlay feature. If this is the case with you, disabling the Discord Overlay will fix the problem.

The steps are listed below:
- Launch the Discord app.
- Open its Settings.
- Scroll down the menus on the left side and select Game Overlay.
- Turn off the switch next to Enable in-game Overlay.
10] Disable On-demand Texture Streaming in your Game Settings
Sometimes the On-demand Texture Streaming crashes the Warzone game and causes other errors. If you have enabled this feature, disabling it can fix the issue. The steps to turn off the On-demand Texture Streaming in Warzone are as follows:

- Launch the Warzone game.
- Open its Settings.
- Select the Graphics tab.
- Click on the On-demand Texture Streaming drop-down menu and select Disabled.
11] Run ChkDsk
Run ChkDsk and see if that helps in any way.
To run Check Disk on your System Drive (C), using the command line, type the following and hit Enter:
chkdsk /f C:
If required, restart your computer.
12] Run Warzone in Administrator Mode
The problem you are currently facing may be due to a lack of administrative privileges. So, grant the game all the administrator privileges to fix the issue. To do so, here are the steps you need to follow.
- Launch Battle.net and select Call of duty from the list.
- Click on the gear icon present next to Play, and choose Show in Explorer.
Now, launch the game and check if you are still coming across the same error message. If yes, right-click on the Warzone shortcut file and choose the Properties option. Tap on the Compatibility tab, and checkmark Run this program as administrator. Save the settings and open the game. Check if the problem is fixed or not.
13] Change the Installation
Another effective solution to get rid of Disk read error 6.154 is to modify the game installation. The unnecessarily installed content can also be the main reason for the issue. Thus, modify the installation to fix the problem. Here are the steps you need to follow.
- Launch Battle.net > COD Warzone > Gear Icon.
- From the list of options in the gear icon choose Modify Install.
- In the following window, uncheck Campaign, Special Ops, and Survival options.
Click on Apply to save the applied settings. Now launch the game and check if the problem is fixed or not.
14] Turn Off Game Mode and Xbox Game Bar
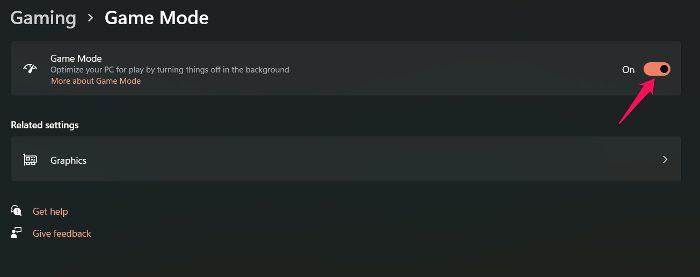
Windows has introduced a dedicated mode by the name, Game Mode to play games. The feature automatically clears all the unnecessary background running applications to enhance the gaming experience. But at the same time, it can cause different problems including the one you are currently facing. Thus, you can try disabling the game mode feature to see if it makes a difference. To do so, here are the steps you need to follow.
- Press the Windows + I shortcut key to open the Settings menu.
- Tap on the Gaming option present at the left panel of the screen.
- Tap on Game Mode, and disable the same in the following window.
Launch the game, and check if the problem is fixed. If not, you will have to disable the Xbox game bar feature. Windows 11 includes an Xbox Game Bar feature that lets you record gameplay and share it with your friends. However, it can also cause the mentioned issue. So, you can play the game with the Xbox Game Bar feature disabled to fix the issue. To do so, open Settings > Gaming > Xbox Game Bar. Toggle off the option.
15] Uninstall and reinstall the game
If none of the above solutions fixed your issue, uninstalling and reinstalling the game is the last option.
Hope this helps.
How do I fix the disc read error Warzone on Xbox One?
First, try disabling your antivirus or antimalware program to see if it helps. If the error persists, there may be third-party software causing it. Some users have reported that the error was occurring due to the Blitz app. Uninstalling and reinstalling the Warzone game has fixed the problem for many users. You can also try this.
What causes Disk read error 6.154 on Warzone?
There are multiple reasons causing the Disk read error 6.154 on Warzone. However, among all the most common one is corrupted or outdated drivers. In addition, third-party antivirus programs, the Overlay feature, and Sonic Studio Virtual Mixer can also cause the issue.
Read next: Fix Modern Warfare Warzone’s High CPU Usage on PC.