I have Windows Server installed on my VirtualBox VM; however, when trying to install a patch, it used to take a lot of time. Upon running an Internet speed tester, we found that the bandwidth is very slow and there is a huge disparity between the Internet speed of the host and the guest. In this post, we are going to talk about this issue and see what you can do if you are dealing with slow Internet in a VirtualBox VM.
Fix Slow Internet in VirtualBox VM
Slow internet in a VirtualBox VM is a common issue caused by suboptimal network configuration, driver limitations, or resource constraints. VirtualBox virtualizes network hardware, which can introduce overhead and reduce throughput compared to your host system.
If the Internet is slow in a VirtualBox VM, you can follow the solutions mentioned below.
- Switch to a Bridged Adapter
- Use a Paravirtualized Network Adapter
- Disable Large Send Offload (LSO)
- Enabled Nested Paging
- Disable Hyper-V
Let us talk about them in detail.
1] Switch to a Bridged Adapter
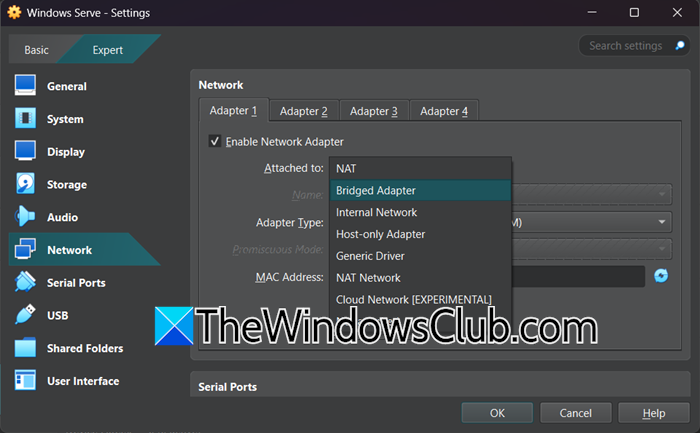
Switching to a Bridged Adapter resolves slow internet by eliminating the performance bottleneck of Network Address Translation (NAT). In NAT mode, VirtualBox acts as a middleman, rewriting the VM’s network packets to match the host’s IP address, which adds CPU overhead, latency, and artificial bandwidth caps. Bridged mode connects the VM directly to your physical network (like a standalone device), allowing it to obtain its own IP via DHCP from your router and communicate without translation.
To switch to a Bridged Adapter, follow the steps mentioned below.
- Open VirtualBox, make sure the VM is down, right-click on your VM, and select Settings.
- Click on Expert.
- Now, go to Network > Adapter 1.
- Changed “Attached to” to Bridged Adapter from NAT (or whatever is configured).
Now, start the machine and see if the issue is resolved.
2] Use a Paravirtualized Network Adapter
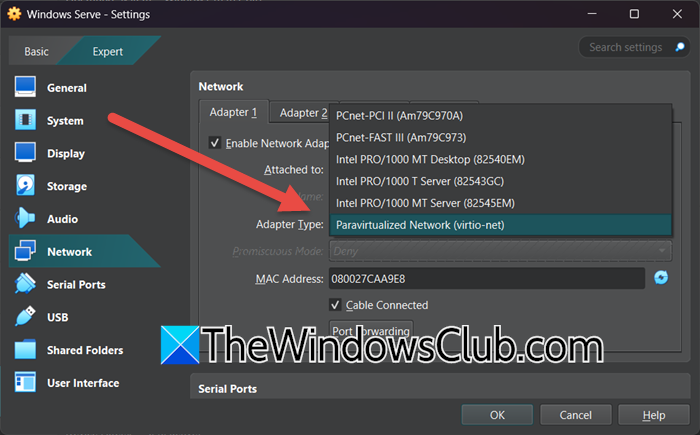
Using a Paravirtualized network adapter (VirtIO) accelerates VM internet by replacing VirtualBox’s emulated hardware (e.g., Intel PRO/1000) with a lightweight, virtualization-aware driver. Unlike traditional emulation, which mimics physical hardware at the cost of CPU-heavy translation layers, VirtIO operates through optimized virtio calls that bypass hardware simulation entirely. This allows the VM and host to communicate directly via efficient shared-memory rings and batch processing. Follow the steps mentioned below to do the same.
- First of all, shut down your VM.
- Then, download the latest virtio-win driver ISO from fedorapeople.org. You need to choose stable-virtio (e.g., virtio-win.iso)
- Now, go to Settings > Expert > Network > Adapter 1.
- Change Adapter type to Paravirtualized Network (virtio-net).
- Go to Storage > Empty.
- Now, go to Optical Drive, click on Disk icon, select Choose/Create a Disk, and select virtio-win.iso.
- Start the VM. Windows will detect “Ethernet Controller” as unknown hardware.
- Now, go to Device Manager > Other devices > Right-click Ethernet Controller > Update driver.
- Select Browse my computer for drivers.
- Enter the path – E:\vioscsi\2k22\amd64 (replace E: with your CD drive letter; 2k22 = Windows Server 2022, adjust for your OS version).
In Device Manager, the adapter should now appear under Network adapters as Red Hat VirtIO Ethernet Adapter. Run an Internet speed tester to know your bandwidth.
3] Disable Large Send Offload (LSO)

The problem occurs when the guest operating system, like Windows, tries to offload TCP packet segmentation to virtualized network hardware, which isn’t equipped to handle large frames effectively. This leads to software fragmentation in VirtualBox, causing increased CPU usage and reduced throughput. Turning off LSO allows the guest OS to manage packet segmentation itself, bypassing inefficient hardware emulation. This results in lower CPU load on both the host and guest, leading to smoother and faster data transmission. To disable Large Send Offload (LSO), you can follow the steps mentioned below.
- Open Device Manager.
- Expand Network adapters.
- Right-click on the VirtualBox driver and select Properties.
- Go to the Advanced tab and disable Large Send Offload (IPv4) and Large Send Offload (IPv6).
Finally, check if the issue is resolved.
4] Enable Nested Paging
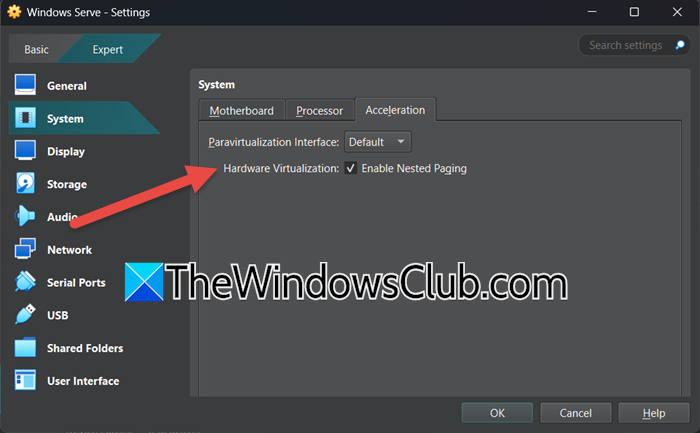
Enabling Nested Paging instantly resolved slow internet problems in their VMs. The main reason is that it removes the memory bottleneck that impacts networking performance most acutely, thus restoring the VM’s networking to expected speeds. To enable Nested Paging in VirtualBox Settings, you need to follow the steps mentioned below.
- Open VirtualBox.
- Right-click on the machine and select Settings.
- Go to the Expert tab, click on System > Acceleration.
- Tick Enabled Nested Paging.
- Click OK.
Finally, check if the issue is resolved.
5] Disable Hyper-V
Hyper-V silently hijacks hardware virtualization, forcing VirtualBox into slower emulation mode. You will see a turtle icon when this happens. To resolve it, open Command Prompt as an administrator and run the following command to disable Hyper-V.
bcdedit /set hypervisorlaunchtype off
DISM /Online /Disable-Feature:Microsoft-Hyper-V
This should boost your network speed.
That’s it!
Read: How to install Oracle Linux on Oracle VirtualBox
How to fix Internet connection on Virtual machine?
There are various reasons why you would encounter network issues in a virtual machine. Mostly, it is due to the switch that your VM uses to access the network from the host. If you are using VirtualBox, you can follow the solutions mentioned here to resolve your issue.
Read: How to install Arch Linux in VirtualBox
How to fix VirtualBox being slow?
Your VirtualBox might respond slowly because of the host system capacity or unnecessary processes running in the background. We recommend you check our guide to speed up VirtualBox. Hopefully, the guide will resolve your issue.
Also Read: VirtualBox Failed to attach the USB device to the virtual machine.