Using an external USB drive in a Hyper-V virtual machine can be challenging since Hyper-V lacks native USB passthrough support. This issue often arises when transferring data, performing backups, or using software that requires a physical USB dongle. In this post, we’ll explore solutions for when the external drive is not detected in a Hyper-V VM.
Why is my hard drive not getting detected?
Hyper-V is designed for server environments where stability and the ability to move virtual machines (VMs) between hosts are important. Using USB passthrough would connect a VM to specific hardware on the host, which is not in line with this purpose. As a result, when you plug a USB drive into the Hyper-V host, the VM cannot detect it automatically. The host operating system takes control of the drive, making it unavailable to VMs unless you use specific methods to redirect it.
Fix External Drive not detected in Hyper-V VM
Since your External Drive is not detected in a Hyper-V virtual machine, you can follow the solutions mentioned below.
- Use Enhanced Session Mode
- Configure Physical Disk Passthrough
- Create a VHDX File on the USB Drive
- Share the Drive over the Network
Let us talk about them in detail.
1] Use Enhanced Session Mode
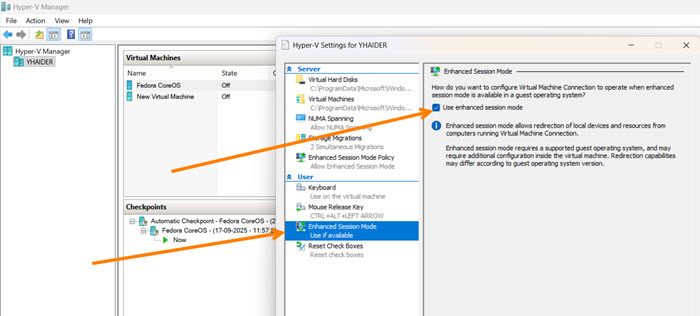
Enhanced Session Mode helps your computer and virtual machine (VM) work together more effectively. It allows you to use devices like USB drives with your VM. This feature uses Hyper-V’s built-in device redirection. It’s easy to use, but you need to connect to the VM through VMConnect.
Follow the steps below to do the same.
- Open Hyper-V Manager.
- Go to Action > Hyper-V Settings.
- Now, go to Enhanced Session Mode, and tick Use enhanced session mode.
- Launch the VM and connect to it.
- Now, go to the USB icon, select your connected USB drive from the list to redirect it to the VM.
Finally, check if you can see the external drive.
2] Configure Physical Disk Passthrough

In this solution, we will take the disk offline from the host and connect it directly to the VM’s virtual SCSI controller. This gives the VM direct access to the disk. When you do this, the host will no longer recognize the disk, allowing the VM to use it exclusively.
Note: This method turns off checkpoints (snapshots) for the VM and may cause boot failures if not handled correctly.

Follow the steps mentioned below to configure Physical Disk Passthrough.
- On the host machine, launch Disk Management.
- Find your USB drive, right-click on the disk label (e.g., Disk 1), and select Offline.
- Open Hyper-V Manager, right-click your VM, and go to Settings.
- Under SCSI Controller, click Hard Drive, and then Add.
- Select Physical hard disk, choose your offline USB drive from the dropdown, and click Apply.
Finally, start your virtual machine and look for the added hard disk.
Read: Cannot unmount the installation media in Hyper-V
3] Create a VHDX File on the USB Drive

Hyper‑V works smoothly with VHDX files, making it the most reliable approach. By creating a virtual hard disk (VHDX) on your USB drive and attaching it to the virtual machine, you can use checkpoints and disconnect the drive safely without the issues that come with passthrough. You can follow the steps mentioned below.
- On the host, open Hyper-V Manager.
- From the Actions, click on New > Hard Disk.
- Choose VHDX format, select Dynamically expanding, and set a size.
- When prompted for the location, save the new VHDX file directly to your USB drive.
- Attach this new VHDX file to your VM via its Settings (under SCSI Controller).
- Inside the VM, use Disk Management to initialize and format the new disk. You can then copy your files into this VHDX drive.
Finally, check if the issue is resolved.
Read: How to create a Virtual Hard Disk on Windows 11
4] Share the Drive over the Network
The host serves as a file server for the USB drive, while the VM connects to it as a client through the virtual network. If the other methods are not feasible, standard Windows file sharing can also be used.
On the Hyper-V host, right-click the USB drive in File Explorer and select Properties. Go to the Sharing tab, click Advanced Sharing, and share the drive with a permissions level that allows your VM to access it. Inside the VM, open File Explorer and navigate to \\<HostComputerName>\\<ShareName> to access the files.
We hope that with the help of these solutions, you can get your external drive working with your Hyper-V virtual machine.
Read: How to Shrink and Compact Virtual Hard Disks in Hyper-V
How to connect external hard drive to Hyper-V VM?
The most reliable way to connect an external hard drive to a Hyper‑V virtual machine is by creating a Virtual Hard Disk (VHDX) file on the external drive and attaching it to the VM. Hyper‑V treats the VHDX as a native disk, which ensures stability and enables advanced features such as checkpoints and safe disconnection without risking data corruption. You can refer to the aforementioned guide for instructions on how to do the same, along with other methods available to you.
Also Read: Error applying Hard Drive changes in Hyper-V.