
If you cannot unmount the installation media in Hyper-V, you may notice that your system doesn’t start. This usually happens when the related ISO file is deleted from the host system while the VM still references it in its configuration, although there are other reasons for this mishap. In this post, we will discuss all the solutions and workarounds needed to resolve this issue.
Cannot unmount the installation media in Hyper-V
This issue occurs because Hyper-V’s configuration files still reference the deleted ISO, creating a mismatch between the virtual machine’s expected state and the available resources. When the VM attempts to start, Hyper-V tries to access the installation media specified in its configuration. When it cannot find the file, it prevents the VM from starting while also preserving the virtual DVD drive configuration to maintain VM integrity, effectively creating a cycle where the media appears to remount itself despite removal attempts.
So, if you cannot unmount the install media in Hyper-V, you can follow the solutions, workarounds, and tips mentioned below.
- Use PowerShell to forcibly remove ISO references
- Kill the Hypber-V Management Process
- Remove all VM Snapshots/Checkpoints
- Recreate the VM with proper ISO dismount
Let us talk about them in detail.
1] Use PowerShell to forcibly remove ISO references
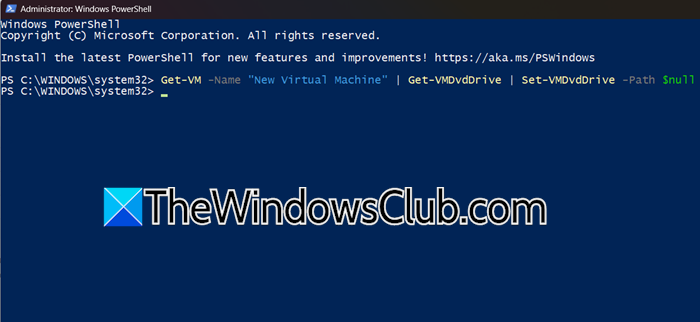
PowerShell can directly modify Hyper-V’s configuration database to remove outdated ISO references, which is more effective than using the Hyper-V Manager GUI for this specific issue. First of all, you need to open PowerShell as an administrator and then run the following command.
Get-VM -Name "YourVMName" | Get-VMDvdDrive | Set-VMDvdDrive -Path $null
- Get-VM -Name “YourVMName”: This cmdlet fetches the virtual machine object named exactly “YourVMName”. You must replace “YourVMName” with the actual name of your VM (e.g., “New Virtual Machine”).
- Get-VMDvdDrive: This receives the VM object from Get-VM and retrieves all the DVD Drive objects attached to that specific VM.
- Set-VMDvdDrive -Path $null: This is the crucial part. It takes the DVD Drive object and sets its -Path property to $null (a blank, empty value). This erases the path to the missing ISO file from the VM’s configuration.
If the command returns nothing, you are good to go. That’s a perfectly normal behaviour.
Once done, check if the issue persists.
2] Kill the Hyper-V Management process
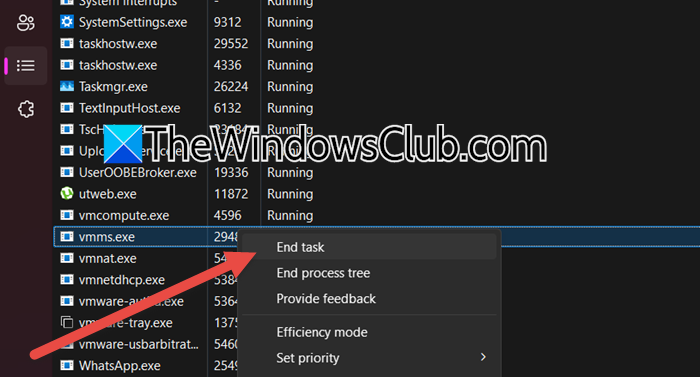
Stuck Hyper-V management processes can maintain outdated configurations in memory, preventing changes from persisting. Sometimes, rebooting the process is sufficient, but if not, we must kill the process before executing the next solution. To do so, open the Task Manager, go to the Services tab, and end the task for “vmms.exe” (Hyper-V Virtual Machine Management). Finally, check if the issue is resolved.
3] Remove all VM snapshots/checkpoints
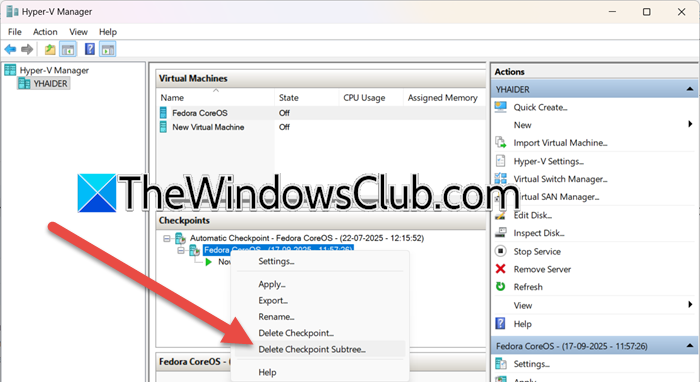
Snapshots save the virtual machine’s (VM’s) hardware setup at the time they are created, including the mounted ISO file path. If you remove the DVD drive later, applying or reverting to a snapshot will bring back the old setup, including the DVD drive. To make your changes to the DVD drive permanent, you need to delete the entire snapshot tree, which removes these old hardware setups.
- Open Hyper-V Manager.
- Right-click on your virtual machine and select Snapshot or Checkpoint.
- Now, right-click on the snapshot or the checkpoint and select Delete Snapshot Tree or Delete Checkpoint Tree.
- If asked to confirm, do that.
Now, try removing the DVD drive again.
4] Recreate the VM with proper ISO dismount
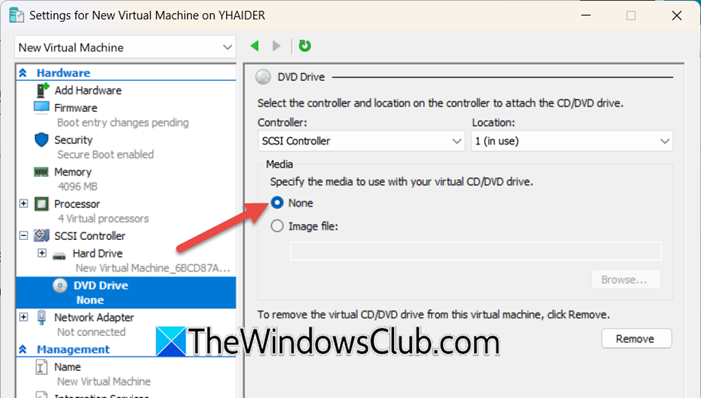
If configuration corruption has occurred, creating a new VM with the proper installation media removal procedure may be more efficient than troubleshooting. In this solution, we are going to delete your current ISO file and then add a new one. Follow the steps mentioned below.
- Go to Hyper-V Manager, right-click on your virtual machine, and click on Settings.
- Now, go to the DVD Drive and select None instead of the ISO file.
- Apply changes and shut down the VM completely.
- Now, you can delete your ISO file.
- If the ISO has already been deleted, recreate a dummy ISO at the original path temporarily to properly dismount.
You can even create a new virtual machine using the Hard Disk file (if you use Hard Disk instead of DVD Drive).
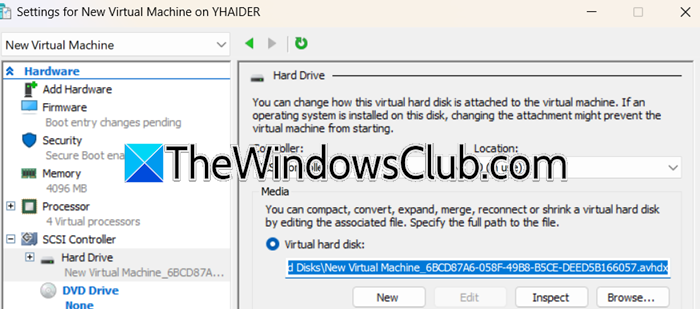
Follow the steps mentioned below to do the same.
- First of all, in Hyper-V Manager, right-click on your old VM and select Settings.
- Then, click on Hard Drive and note the path mentioned in the Virtual Hard Disk section (this is your .vhdx file).
- Delete the problematic VM (without deleting the .vhdx file).
- When creating a new machine, select “Use an existing virtual hard disk” and point it to the .vhdx file from the previous step.
This would do the job for you.
Read: How to install Hyper-V on Windows 11 Home
How do I force delete a virtual machine in Hyper-V?
To force delete a virtual machine in Hyper-V, use PowerShell with the Remove-VM cmdlet, which bypasses the GUI and deletes the VM’s configuration directly. This won’t remove the virtual hard disks, so you’ll need to manually delete those from File Explorer afterward. If the VM is running or stuck, end its process via Task Manager before deletion.
Read: How to configure Hyper-V Port Mirroring
What does Hyper-V do in Windows 11?
Hyper-V in Windows 11 is Microsoft’s built-in virtualization platform that lets you create and run virtual machines on your PC. It allows you to test different operating systems, run legacy software, or set up isolated environments for development, all without needing separate hardware. Each virtual machine operates independently, using allocated system resources like CPU and memory. It’s especially useful for IT professionals, developers, and power users looking for flexibility and control.
Also Read: Enable or disable Nested Virtualization for VMs in Hyper-V.
