Microsoft HyperV provides a robust disaster recovery solution through its built-in replication features. This guide explains how to set up asynchronous VM transfers between Windows Server 2025 hosts. In this post, we will see how to enable and set up replication in Hyper-V.
Hyper-V replication is a disaster recovery tool that helps administrators copy virtual machines from one server to another. This process updates the target server at set times rather than instantly. The target server maintains a complete copy of the original virtual machine, reducing downtime. Organizations use this feature to ensure that if the main server fails, they can quickly promote the replica to the new main machine. Using this technology protects your data and keeps services running smoothly across different locations.
How to enable and set up Replication in Hyper-V
To enable and set up replication in Hyper-V, follow the steps below.
- Enable the Replica Server Role
- Configure Firewall Exception
- Add a second Hyper-V Host
- Start Replication
Let us talk about them in detail.
1] Enable the Replica Server Role

You must first configure the target server to accept incoming virtual machine traffic from authorized partners. This administrative task sets the foundation for secure communication and defines where the system stores replicated data. You need to follow the steps mentioned below to do the same.
- First of all, you need to open the Hyper-V Manager on your target host.
- Now, right-click your Hyper-V Host.
- Then, from the context menu, you need to click on Hyper-V Settings.
- Now, from the Server section, navigate to the Replication configuration tab.
- Tick the checkbox next to Enable this computer as Replica Server.
- Now, check the box that says Use Kerberos HTTP.
- Authorize replication traffic.
- From the Authorization and storage section, check the box associated with Allow replication from any authenticated server.
- But if you just want replication traffic from primary servers, enable Allow replication from the specified server and add those servers by clicking on the Add button. Then, in the Specify the primary server field, enter the primary server’s URL, click on Browse to select the location where replica files will be stored, and enter the trust group name in the Specify the trust group field. Click OK.
- Click Apply.
You will see a pop-up window asking you to configure the firewall to allow inbound traffic. Click OK twice to confirm this.
2] Configure Firewall Exceptions

You need to allow traffic through the Windows Defender Firewall to enable replication listeners. When we install Hyper-V hosts, default exceptions for HTTP (port 80) and HTTPS (port 443) are automatically created. We need to ensure these settings are enabled on both the main and backup systems. This will help ensure that the network does not block the data stream. Follow the steps below to configure the Firewall Exceptions.
- Open the Run menu by Win + R.
- You need to type wf.msc and hit Enter.
- Now, you need to go to the Inbound rules tab, select Hyper-V Replica HTTP Listener (TCP-in), and click on Enable Rule from the right section.
Once done, close the Firewall window and move on to the next step.
3] Add a second Hyper-V host
In the Hyper-V Manager, we need to add another Hyper-V host for the replication. To do so, follow the steps mentioned below.
- Right-click on the Hyper-V Manager and select Connect to server.
- Select Another computer, type your server details, and click OK.
- Now, enable replication by following the instructions mentioned in the first step.
- When you are at the Allow replication from the specified server step and are populating the Specify the primary server section, make sure to enter the same primary host, set the location, and follow other steps to enable replication.
After enabling replication, connect to the second server using RDP and then allow the inbound rule we enabled earlier.
Read: Fix Common Hyper-V Replication Errors
4] Start Replication
The final stage involves selecting a specific workload and initiating the transfer of its configuration and disk files. You can customize the recovery point depth and the frequency of data updates to match your specific recovery time objectives.
- Right-click on the old virtual machine and select Enable replication.
- Click Next.
- Type the name of the Replica server or go to Browse, enter the name, and click on Check names.
- Click Next.
- Specify the connection parameters and authentication settings to match those on the replica server.
- Choose Replication VHDs and click on Next.
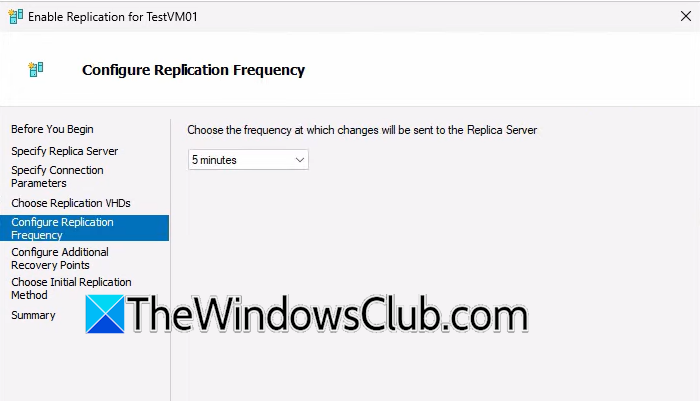
- Choose the Replication interval from the drop-down list and click Next.
Follow the on-screen instructions, and once you are done, click on Finish to start the transfer. On the second replica server, you will see Receiving changes, wait for the initial replication to complete.
That is how you can set up replication in Hyper-V.
Read: How to configure and use Hyper-V in Windows 11
Does Hyper-V have replication?
Yes, Hyper-V includes native asynchronous replication for disaster recovery. It continuously copies VM changes from a primary host to a replica server at scheduled intervals. If the main server fails, you can quickly bring the replica online. This protects data and minimizes downtime without requiring third-party tools.
Read: How to enable or disable Nested Virtualization for VMs in Hyper-V
How do I allow replication from the specified servers in Hyper-V?
On the replica server, go to Hyper-V Settings > Replication Configuration, enable the replica role, then choose Allow replication from the specified servers. Click Add, enter the primary server’s URL, pick a storage path, and assign a trust group name. This restricts inbound replication to only your authorized hosts.
Also Read: NAKIVO VM Backup software for VMware, Hyper-V, and AWS EC2.