In this post, we will see how to shrink and compact hard disks in Hyper-V. This allows you to make room for the hard disks if they are too big for your physical computer. Since Hyper-V hard disks are usually dynamic in nature, it is crucial to shrink and compact virtual hard disks in Hyper-V.
Hyper-V features dynamically expanding disks, which help you efficiently utilize physical storage. When you create such a disk, it starts small, occupying only the necessary space. As you add data, the disk expands, thereby reducing storage costs. These disks are particularly useful in testing and development environments and are highly compatible with servers that run applications with low disk usage.
If a virtual hard disk isn’t properly monitored, it can grow to its maximum size, using up significant physical storage. Deleting files from the virtual disk won’t solve this issue. You need to manually reconfigure the disk by shrinking or compacting it. When the disk is full, open the Edit Disk wizard in Hyper-V Manager and choose to shrink or compact the virtual disk. Make sure the virtual machine (VM) is turned off during this process.
How to Shrink and Compact Virtual Hard Disks in Hyper-V
To control your virtual hard drive’s size, you have two options, either Shrink it or Compact it. Shrinking a Hyper-V disk reduces its maximum size limit. Compacting a Hyper-V disk reclaims unused physical disk space and reduces the file size, but keeps the storage capacity the same.
If you want to shrink and compact virtual hard disks in Hyper-V, follow the methods mentioned below.
- Shrink Virtual Hard Disk
- Compact Virtual Hard Disk
Let us talk about them in detail.
1] Shrink Virtual Hard Disk
Shrinking a virtual hard disk means reducing its maximum storage capacity. This process changes the size limit of the virtual disk, ensuring it uses less space on the physical disk. It helps optimize storage and manage disk usage more efficiently. To shrink a virtual hard disk, follow the steps mentioned below.
- Open the Hyper-V Manager, right-click on the virtual machine, and select Connect.
- Now, you need to search out the “Disk Management” utility from the Start Menu.
- You then have to right-click on the disk volume and select the Shrink Volume option.
- You then have to enter the Enter the amount of space to shrink in MB. When you do that, Total size after shrink in MB will change automatically.
- Click on Shrink
- You then have to shut down the virtual machine.
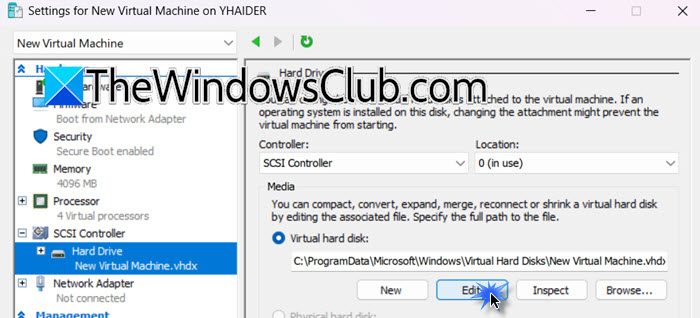
- In the Hyper-V Manager, right-click on the VM and select Settings.
- Go to the Hardware tab, then go to Hard Drive. You have to go to the Virtual hard disk and click on Edit.
- Skip the part where you are asked to locate the disk and then click on Next.
- You need to click on Shrink from the Choose Action window and click on Next.
- You now have to set the new size of the virtual disk.
- Finally, check the summary, and then click on Finish.
- You then have to click on Inspect to verify the actual disk size now after editing.
Once done, your disk will be shrunk.
2] Compact Virtual Hard Disk

Compacting a virtual hard disk means reducing the physical disk space it occupies by reclaiming unused space within the virtual disk. This process doesn’t change the maximum storage capacity but optimizes storage usage, freeing up space on the physical disk. When it comes to making the virtual hard disk compact, you don’t have to connect to it; instead, you can follow the steps mentioned below.
- In the Hyper-V Manager, you need to right-click on the virtual machine and select Settings.
- You now have to go to the Hardware tab, then go to Hard Drive. You have to go to the Virtual hard disk and click on Edit.
- We can skip the Local Virtual Hard Disk option by clicking on Next.
- You then have to click on the Compact option and then click on Next.
- Go through the Summary tab and ensure your changes are registered there. You can see that the Action will be set to Compact.
- Finally, click on Inspect and then check if the disk size is reduced.
Hopefully, this way, you will be able to manage your machine’s size more frugally.
Read: How to set up Hyper-V USB Passthrough on Windows 11
What are the three types of virtual hard disks in Hyper-V?
In Hyper-V, there are three types of virtual hard disks: fixed size, dynamically expanding, and differencing disks. A fixed size disk allocates all specified storage space immediately, ensuring consistent performance. A dynamically expanding disk starts small and grows as data is added, helping to save physical storage space. Differencing disks are linked to a parent disk and track changes separately, which is useful for creating snapshots or testing environments.
Read: How does Virtualization or Hyper-V work on Windows
What does compacting virtual disk do?
Compacting a virtual disk reduces the amount of physical storage it occupies by reclaiming unused space within the virtual disk. This process helps optimize storage usage without changing the disk’s maximum capacity. As a result, the physical disk space used by the virtual disk is minimized, freeing up storage for other uses.
Also Read: Convert Hyper-V VM to VirtualBox or vice-versa.