After installing Bluestacks on your Windows computer to emulate Android, if you receive an error message stating Virtualization Disabled, it means that hardware virtualization is disabled on your computer. Let us see what you can do in this case.

Error: Virtualization Disabled
Hardware-assisted virtualisation is disabled on your system. It is required by BlueStacks to run properly, and hence, we recommend enabling it. If you cannot enable virtualisation, try downloading BlueStacks 32-bit.
Fix Error Virtualization Disabled in Bluestacks
If you see a BlueStacks error message saying Virtualization Disabled, check if your computer can handle BlueStacks by going through the system requirements mentioned at bluestacks.com. If your computer is compatible, follow the steps mentioned below.
- Reboot your computer and try again
- Enable Virtualization
- Disable Hyper-V
- Update your BIOS
- Run BlueStack – 32-bit.
1] Reboot your computer and try again
Sometimes, BlueStacks fails to recognize the presence of hardware virtualization and requires a slight adjustment. If this is the first time you installed the application, try rebooting your computer before starting it up. This way, you will allow BlueStacks to scan and recognize Hardware Virtualization. However, make sure to open BlueStacks as an administrator and see if that resolves the issue. If the error message persists, proceed to the next solution.
2] Enable Virtualization
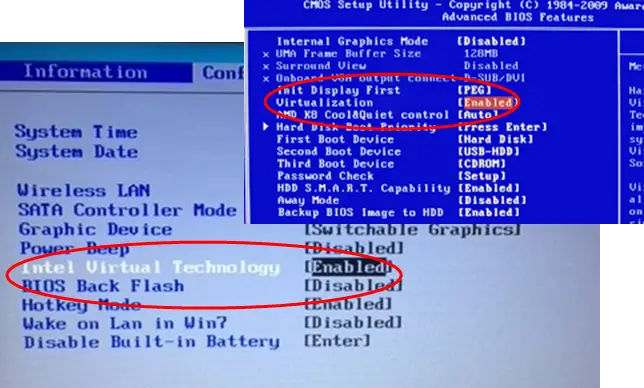
As mentioned in the error message, the virtualization on your computer is disabled, which, you encountered this issue. However, before we go ahead and enable it to go back to our system, let’s confirm if that’s actually the case.
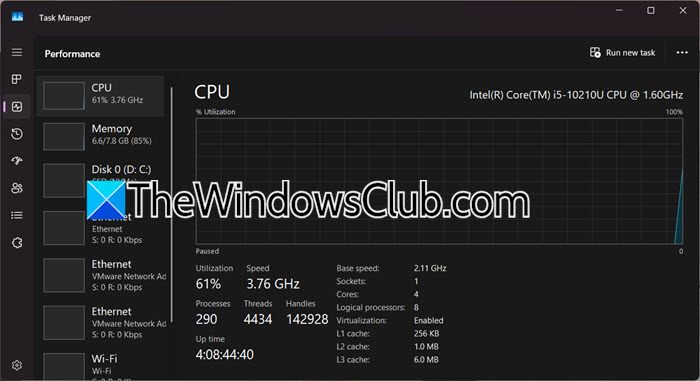
To do so, open the Task Manager, go to the Performance tab, and click on CPU. You will see if Virtualization is enabled or disabled. If it’s disabled, follow the steps mentioned below to enable it.
- Shutdown your computer and boot into BIOS.
- Now, you need to use the arrow keys to reach System Configuration.
- You then have to go to Virtualization and set it to Enabled.
- Finally, save and exit BIOS.
Since every OEM has its own BIOS, you should look into our guide to enable Hardware Virtualization and follow the guide depending on your manufacturer.
3] Disable Hyper-V
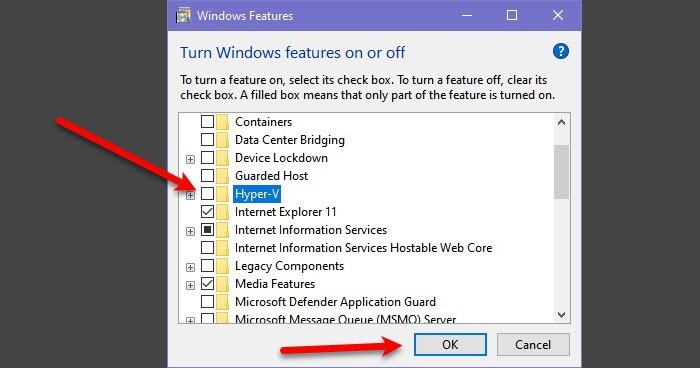
When Hyper-V is enabled on Windows, it takes over the hardware virtualization layer, preventing other applications like BlueStacks from accessing it. This can disrupt BlueStacks’ performance or prevent it from launching, as it relies on hardware virtualization to run Android apps smoothly. Ideally, BlueStacks should run on a system where Hyper-V is enabled; however, at times, it doesn’t. Therefore, there is a need to try this solution.
To disable Hyper-V, you need to follow the steps mentioned below.
- Open Control Panel.
- And go to Programs.
- Click on Programs and Features > Turn Windows features on or off.
- Now, untick Hyper-V.
- Click on Ok.
Finally, reboot your computer, and check if the issue is resolved.

4] Update your BIOS
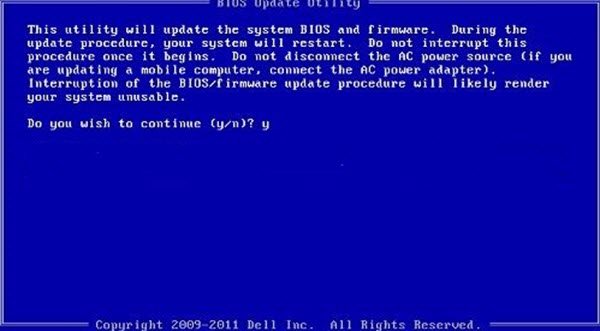
There could be a compatibility issue between your BIOS version and the one required for BlueStacks. In that case, we will have to update the BIOS. Updating the BIOS will ensure that you do not just face compatibility issues with BlueStacks, but with any other application that requires a BIOS. Go ahead and update your BIOS to see if the issue is resolved.
5] Run BlueStack – 32-bit
If nothing works, our last resort is to download the 32-bit version of BlueStack. To do so, just click on Download BlueStack – 32 bit. As mentioned in the error message, you will encounter some performance issues, but if none of the solutions work for us, we will have to resort to this.
Hopefully, with the help of these solutions, you will be able to resolve the issue.
Read: BlueStacks cannot start when Hyper-V is enabled
How to enable virtualization for BlueStacks?
To enable virtualization for BlueStacks, you must boot into the BIOS and then set Virtualization to Enabled. However, every OEM will have its own method for enabling virtualization, so we recommend visiting the hyperlink mentioned above to see how to enable hardware virtualization on your computer.
Read: Bluestacks stuck on Initializing screen
Can BlueStacks work without virtualization?
Yes, BlueStacks can work without virtualization, but with reduced performance. If hardware-assisted virtualization (VT-x/AMD-V) is not supported or disabled, BlueStacks offers a 32-bit version that can run without it. However, this may lead to slower performance, higher resource usage, and potential compatibility issues with certain apps.
Also Read: BlueStacks is not opening or launching on PC.