If your Windows 11/10 supports Windows Hello and you have set up facial recognition, then you can enable enhanced anti-spoofing. Windows Hello is a biometrics-based technology that enables users to authenticate their identity in order to access their devices, apps, networks, etc using fingerprint, face recognition, or iris scan. Now, face detection in Windows 11/10 works well, but it can’t differentiate between a photo of your face inside your mobile or the actual user’s face.
Because of this issue, a potential threat is that someone with your photo could unlock your device using their mobile. To overcome this difficulty, anti-spoofing technology comes into action. Windows Hello offers integrated anti-spoofing countermeasures to mitigate physical attacks like unauthorized device logon and access. Once you have enabled anti-spoofing for Windows Hello Face Authentication, a photo of the authentic user cannot be used to log in to the PC.
Enable Enhanced Anti-Spoofing for Hello Face Authentication in Windows 11/10
Enhanced anti-spoofing for Windows Hello face authentication is not required on unmanaged devices and you must be signed in as an administrator to enable or disable enhanced anti-spoofing. To do this:
Open the Local Group Policy Editor and on the left pane of Local Group Policy Editor, navigate to the following location:
Computer Configuration > Administrative Templates > Windows Components > Biometrics > Facial Features.
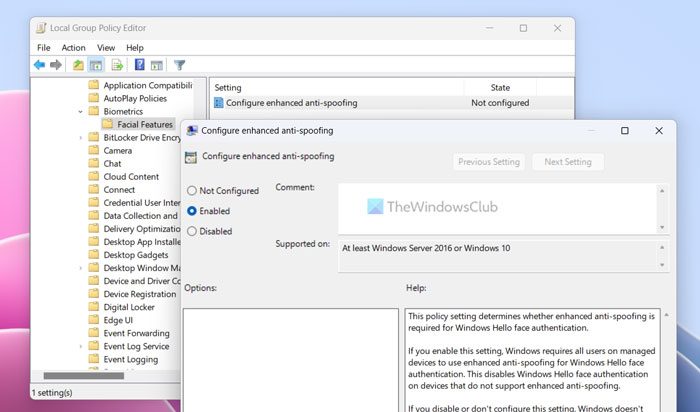
On the right pane of Facial Features in Local Group Policy Editor, double-click Configure enhanced anti-spoofing policy to edit it.
This policy setting determines whether enhanced anti-spoofing is required for Windows Hello face authentication.
If you enable this setting, Windows requires all users on managed devices to use enhanced anti-spoofing for Windows Hello face authentication. This disables Windows Hello face authentication on devices that do not support enhanced anti-spoofing.
If you disable or don’t configure this setting, Windows doesn’t require enhanced anti-spoofing for Windows Hello face authentication.
Note that enhanced anti-spoofing for Windows Hello face authentication is not required on unmanaged devices.

As indicated in the screenshot above, do the following;
To Disable Enhanced Anti-Spoofing for Windows Hello Face Authentication
- Click the radio button for Not Configured or Disabled, click OK.
To Enable Enhanced Anti-Spoofing for Windows Hello Face Authentification

- Click the radio button Enabled, click OK.
You can now exit Group Policy Editor and restart your system.
The procedure described above won’t work on Windows Home Edition because the Group Policy Editor is not built into Home Edition. However, to carry out the same procedure on Home edition, install PolicyPlus. Once you have added the utility, you can now follow the same steps as described above to enable Enhanced Anti-Spoofing for Windows 11/10 Home.
Alternatively, you can also use REGEDIT. If your version of Windows 11/10 doesn’t not have the Group Policy Editor, you may Run regedit to open the Registry Editor and navigate to the following key:
HKEY_LOCAL_MACHINE\SOFTWARE\Policies\Microsoft\Biometrics\FacialFeatures
Create a new REG_DWORD, name it EnhancedAntiSpoofing and give it a value of 1, to enable enhanced anti-spoofing.
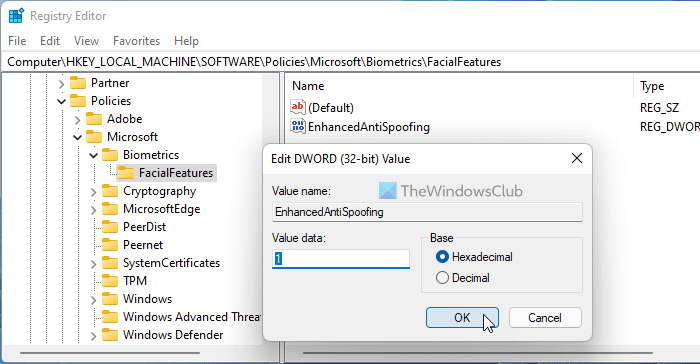
- A value of 1 will enable the setting
- A value of 0 will disable the setting
What is Enhanced anti-spoofing in Windows Hello?
Enhanced anti-spoofing in Windows Hello helps protect your computer from potential threats such as fingerprint matching and facial recognition. This feature works only when your computer supports Windows Hello. To enable or disable this extra layer of security, you can use the Local Group Policy Editor.
How do I enable Hello Face in Windows 11?
To enable Windows Hello Face recognition in Windows 11 or Windows 10, you need to open the Windows Settings first. Then, go to Accounts > Sign-in options. Choose the Facial recognition (Windows Hello) option and use your infrared camera to set things up. For your information, you can use an external infrared camera as well.