When setting up a dual-boot system, it’s not uncommon to find that your network connection works in one operating system but not the other, even when using the same physical hardware. This is typically caused by software and configuration conflicts between the two environments rather than a hardware failure. In this post, we will see what you can do if the dual boot network is not working in Windows 11.

Fix the Dual Boot Network not working in Windows 11
Network problems in Windows 11 can occur when you use a dual-boot setup with another operating system. One major cause is Windows Fast Startup. This feature hibernates the system and can “lock” the network adapter, which stops it from starting properly. Other reasons for network issues include a damaged network stack from sudden shutdowns, outdated or conflicting drivers installed during setup, and interference from virtual network adapters created by VPN software that can take over the connection from your physical hardware.
If the Dual Boot Network is not working in Windows 11, follow the solutions below.
- Disable Windows Fast Startup
- Reset the Network Stack
- Clear the Hardware State from the Other OS
- Update your BIOS/UEFI
- Disable Selective Suspend for the Network Adapter
Let us talk about them in detail.
1] Disable Windows Fast Startup

Fast Startup places the network adapter in a hibernated state, leaving it locked and uninitialized on a fresh boot. Disabling it ensures the hardware is fully powered down and reset, allowing for a clean driver initialization when Windows starts. You can follow the steps mentioned below to disable Fast Startup.
- Boot into your Windows 11 installation.
- Now, open Control Panel and go to Hardware and Sound > Power Options.
- In the left pane, click Choose what the power buttons does.
- Click Change settings that are currently unavailable.
- Under Shutdown settings, uncheck the box for Turn on fast startup (recommended).
- Click Save changes.
Note: A Windows update can sometimes re-enable this feature without warning, so it’s worth double-checking if the problem reappears in the future.
Hopefully, this would do the job for you.
2] Reset the Network Stack
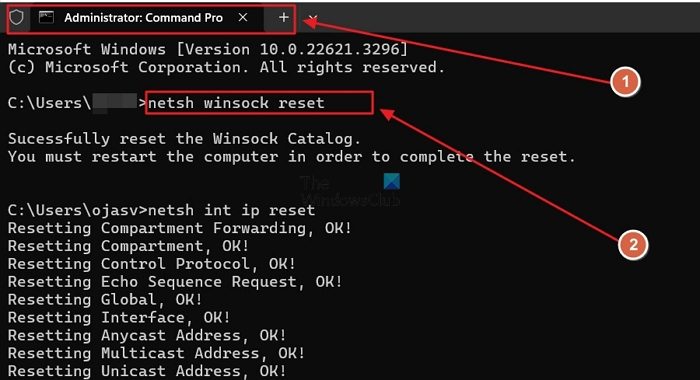
In this solution, we will reset TCP/IP and Winsock configurations, which are core software components responsible for network communication, and clear outdated DNS records. In Windows 11, you need to open Command Prompt as an administrator and then run the following command.
netsh winsock reset

 netsh int ip reset

ipconfig /flushdns

ipconfig /release

ipconfig /renew
Restart your computer after the last command.
3] Clear the Hardware State from the Other OS
We need to use the working OS to ensure the network card is completely powered down and cleared of any residual state from the previous session. We need to boot into the other OS (e.g., Linux) where the network does work, open a terminal, and fully shut down the computer from there (e.g., sudo shutdown -h now). Do not reboot.
After it’s fully off, power the machine back on and boot into Windows 11. The clean shutdown from the other OS should have reset the hardware
4] Update your BIOS/UEFI
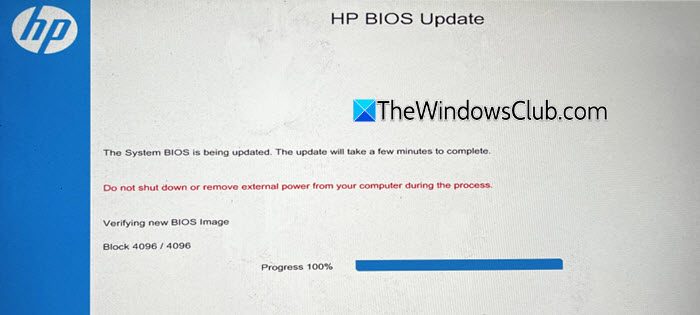
Newer BIOS/UEFI versions contain improved power management and ACPI handling, which dictate how hardware states are managed during boot and shutdown. An update can resolve compatibility issues that cause the NIC to be improperly handled during an OS switch. So, go ahead and update your BIOS. Once done, boot into your Windows 11 OS and finally, check if the issue is resolved.
5] Disable Selective Suspend for the Network Adapter
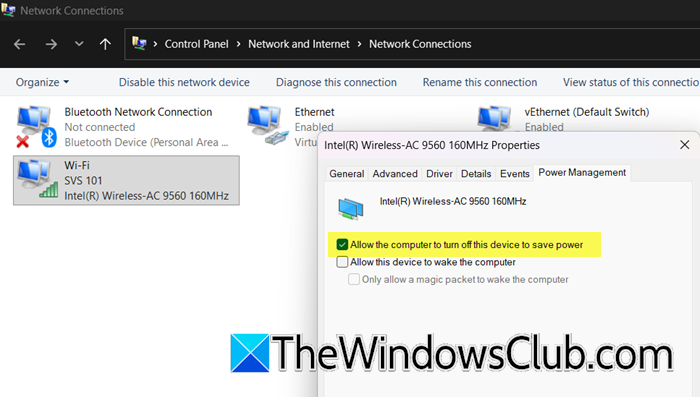
This setting prevents Windows from placing the Network Interface Card (NIC) into a deep power-saving mode, which could disrupt the boot process. Like the Fast Startup feature, this power-saving option might cause issues with the NIC’s initialization if it has been affected by another operating system. Follow the steps mentioned below to disable Selective Suspend for the Network Adapter.
- Open Run by Win + R.
- Then, type “ncpa.cpl”, and press Enter to open the Network Connections window.
- Now, go to the Ethernet or WiFi adapter, right-click, and select Properties.
- Go to Configure or Properties > Configure.
- Navigate to the Power Management tab and then uncheck Allow the computer to turn off this device to save power.
- Click Ok.
Alternatively, right-click the Start button and select Device Manager. Expand Network adapters, right-click your Ethernet device, select Properties, and go to the Power Management tab.
Hopefully, this will do the job for you.
Read: How to install Windows 11 on VirtualBox
Why is Network sharing not working on Windows 11?
Network sharing in Windows 11 may not work due to network profile settings. If your network is set to Public, Windows will block discovery and file sharing to keep your device safe. Also, make sure that the Network Discovery and File and Printer Sharing features are enabled for your connection.
Read: The boot configuration data store could not be opened.
How to fix the dual boot option not showing in Windows 11?
The dual boot menu may be missing because Windows Boot Manager can’t detect other operating systems. To fix this, open Advanced Startup settings and use Startup Repair, or manually rebuild the boot configuration from Command Prompt using the bcdedit tool to add the missing OS entry. You can use the Dual Boot Repair Tool to resolve this issue.
Also Read: Dual boot Windows 11 and Windows 10 on one PC.