You may have read our tutorials on how to install Windows on your computer and how to install Windows OS on VirtualBox. But if you want to install Windows 11 side-by-side along with Windows 10 by dual booting on the same PC, you can follow this tutorial.
![]()
A large part of you may be worried, about whether installing this new version of Windows 11, would remove the earlier version of Windows you are working with. Also, you could be worried about whether your PC meets the requirements or not and whether it supports virtualization and virtualization software. We say as long as you have 20 GB of free space in your hard drive, you can enjoy the pleasure of having both operating systems on one PC.
Dual-boot Windows 11 and Windows 10
Let me explain to you what all it takes to get this little job done, here’s how:
- First, you need to download Windows 11 ISO image then burn it on a DVD or USB drive. We prefer installing Windows from USB because of its reusability and compatibility assistance. You can download the official Windows 11 ISO file.
- Second, you need to create a 20 GB hard drive partition. How to do it? Here’s the procedure.
Create a new partition
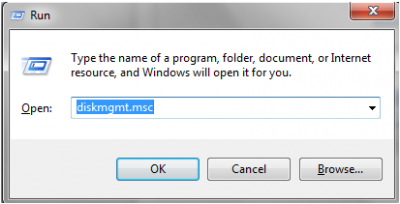
Click “run” then type > “diskmgmt.msc” hit the “OK” button.
As soon you hit “OK” button this is what appears. This is the Disk management console. Here is how it looks. Right-click on F: drive (in my case) and choose “Shrink Volume” option from the list.

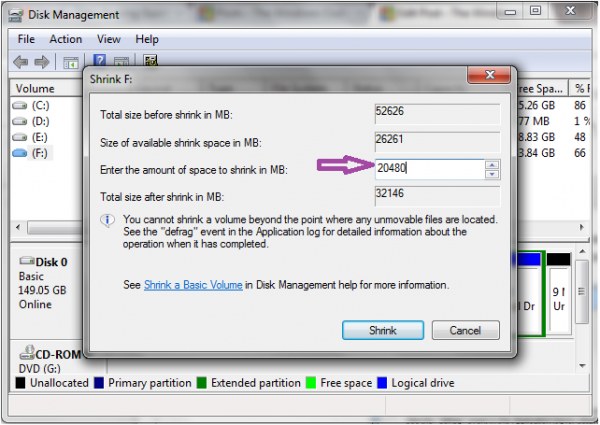
As you choose the option “Shrink Volume”, an alert message appears asking you how much you want to shrink your drive by. Well, we need over 21 GB so we would rather go a bit over 20000 MB. I have chosen 20480 in the field available. Click the “Shrink” button.
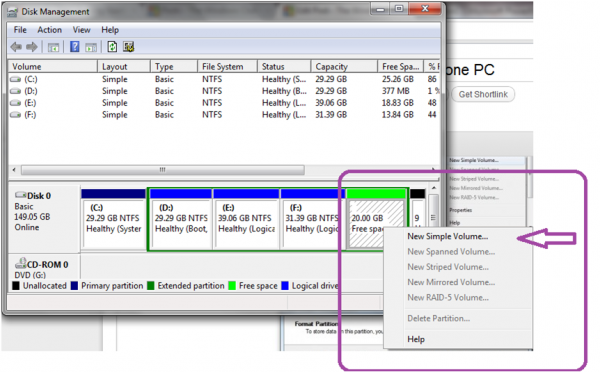
As you click the “Shrink” button you find another console appearing. Right-click the black portion of the disk just we created select new “New Simple Volume” from the options given in the list.
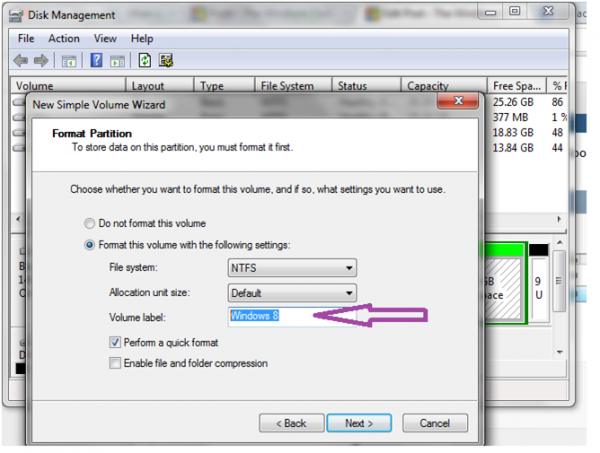
As when you click the ” New Simple Volume” you will be redirected to another page. Here you will be asked to enter the name of the volume (drive). I prefer to give it as “Windows 11” not necessary though as it is just a name to the drive.
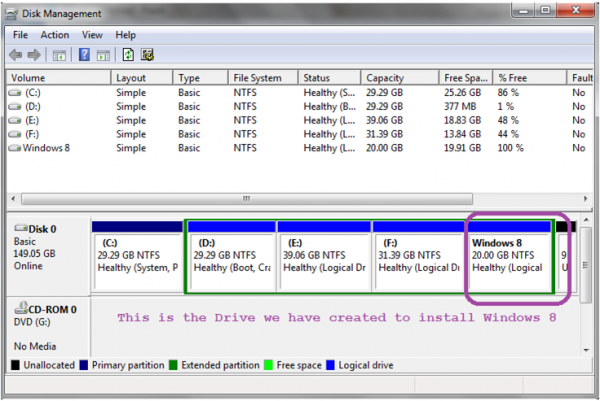
The disk partitioning is almost done. Keep clicking “Next >” button until you find the newly created partition healthy. Same as shown in the figure.

Read: Risks or disadvantages of Dual Booting Operating Systems
Installing Windows 11 from the ISO image
Load the ISO file on to either USB or DVD. Boot your system and change the BIOS settings for the first boot drive to USB or CD-ROM whichever you want to load Windows 11 from. Insert USB/DVD into the PC and reboot the system as you always do for installing the operating system. The black console asks you ” Boot from the disk”. Hit the Enter button. Now the configuration check starts for Windows 11.
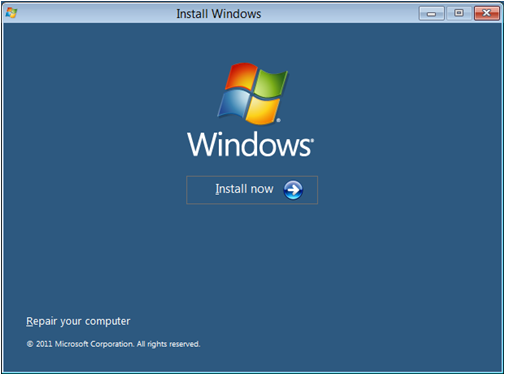
Next click “Install now”. You will be asked to choose from “Upgrade” or “Custom” installation type. Choose “Custom” installation type and proceed until you again see this.
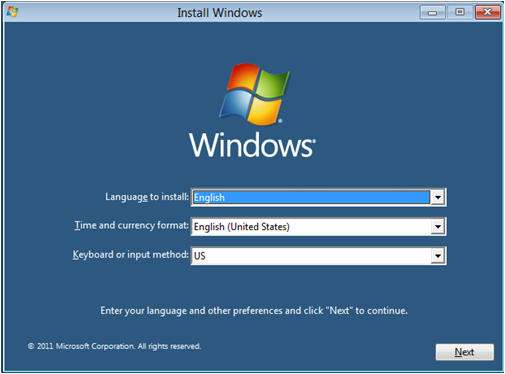
Choose an appropriate language for you. Click “Next”
Choose Windows 11 partition drive (which we have created to install Windows 11). Go ahead and click the Next button. It takes quite some time to install all the components of Windows 11.
Read: How to Dual Boot on separate Hard Drives
If you have done everything correctly then finally you be asked to choose from the two operating systems you now have on your PC. Choose Windows 11. You are all set to launch Windows 11. The system will reboot and on the black console screen, you have the option for Windows 11. Hit Enter.
If you have any questions, we will be glad to reply to them.
These links may also interest you: