A System Image in Windows can be considered as a replica of the hard drive required for running Windows. In the event of an unfortunate, when the hard drive fails to function, a System Image allows restoration. It is recommended that you create a System Image of your computer periodically as a part of your backup plan. This post shows how to create a System Image in Windows 11/10 without switching to third-party tools, and how to restore it. You can also use PowerShell. Using this post, you can move the Windows 11/10 Installation to another HDD or SSD.
Create or Restore System Image in Windows 11
Connect your external hard drive to your computer and then open Control Panel > System and History > File History. In the left pane, you will see System Image Backup. Click on it. Another way to do it is to type sdclt.exe in Start search and hit Enter. To open the Backup and Restore (Windows 7) applet and click on Create a system image link on the left side.

A Create a system image wizard will open. A System Image is a copy of the Drives required for Windows to run. It can also include additional drives. This image can be used to restore your computer if your hard drive or computer ever stops working; however, you can’t select individual items to restore.
You will have to select the location where you want to save the system image.

An external USB/Media/Hard Drive with adequate space is recommended. Make your choice and click Next.
Now select the drives you want to include in the backup and click Next.
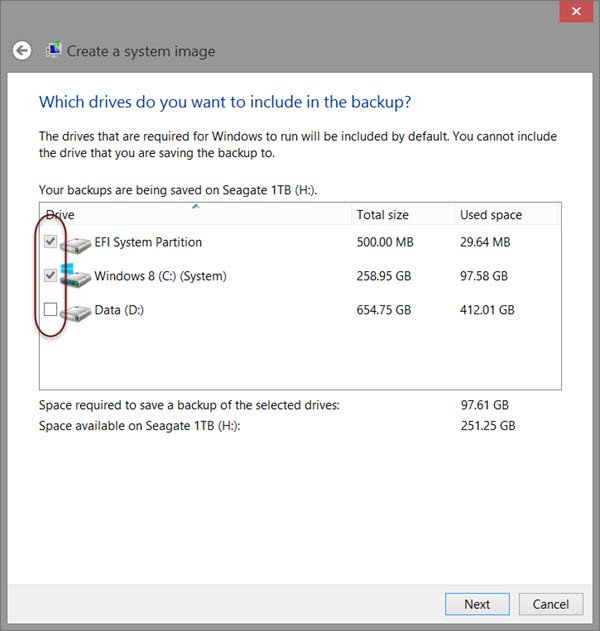
Including system drives and partitions in recommended. After you have clicked Next, you will be asked to confirm your settings.

Review them and click on Start backup. After some time, the image file will be saved to the drive you selected earlier.
After this procedure is completed, Windows will offer you the option to create a System Repair Disc. A System Repair Disc can be used to boot your computer. Create it and keep it in a safe location.
Read: How to validate Windows System Backup Image
Create System Image using PowerShell in Windows 11
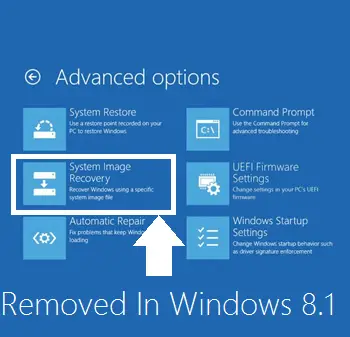
If you’re using Windows 11/10, you might have noticed that Windows 7 File Recovery, which was under the hood of File History available in Windows 8 has been removed in Windows 8.1. Due to this, you can’t create backup system images in Windows 8.1, like you could do in Windows 7 or in Windows 8 – but the good thing is that you can still extract the backup images created with Windows 8 or Windows 7.

Why did Microsoft Remove the System Image feature?
The reason behind the removal of Windows 7 File Recovery, which we could have used for complete backup or creation of a system image is that Microsoft felt that Windows 7’s backup tools were considered deprecated. That’s why with Windows 8.1, these deprecated tools are no longer present. Another strong reason could be that Microsoft wants to let users completely rely on File History feature – a simple backup solution introduced in Windows 8. Moreover, from the Advanced startup options menu, the “System Image Recovery” option has been removed as well.
So if you’re still looking to create a full system image in Windows 11/10, then you will surely need to use third-party imaging software.
Meanwhile, there is still a way using which you can create a full backup of your Windows 11/10 – the same as you do while using Windows 7 File Recovery in Windows 7 or Windows 8. You will need to use PowerShell for this.
To create System Image using PowerShell in Windows 11/10, take these steps:
1. Open the Windows PowerShell as administrator. To create a System Image in Windows using PowerShell, you will have to run the Wbadmin command.
2. Copy the following command, right-click inside the Powershell window and paste it, then press Enter:
wbadmin start backup-backup target: E:-include: C:-quiet-allCritical
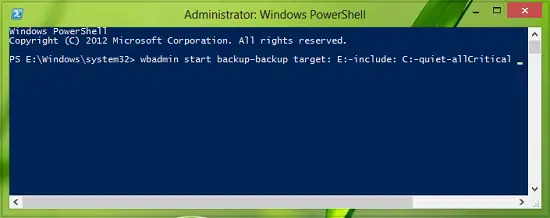
Here E: is the target drive where you’re going to save the system image, and C: is the system root drive where Windows is currently installed. Adjust these variables to suit your conditions.
3. To extract the created system image, starting over from Windows USB installation media, select advanced startup or open run and copy:
C:\Windows\System32\Shutdown.exe /r /o
In this way, you can avoid using third-party tools to create system images by following this procedure instead.
Read: How to create multiple System Images on a single external USB drive.
System Image Recovery in Windows 11
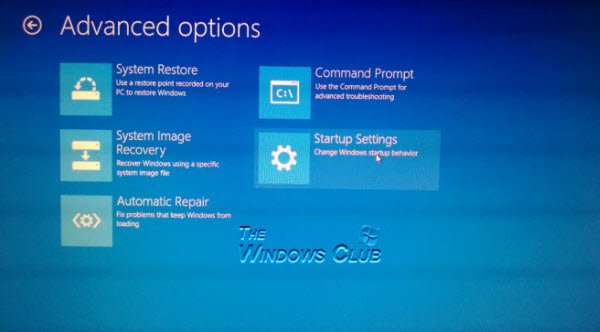
If your Windows computer fails to boot, this System Image can come in handy: you can use Advanced Startup Options to regain control and restore your computer. To restore the System Image, power on your computer, and when it is booting, keep pressing F8 to see the Advanced boot options screen.
Select Repair your computer and press Enter. Next select System Image Recovery and then follow the on-screen instructions.
You can also use the Windows installation media to restore the System Image. Insert the media and start your computer. When you get to the Install now screen, you will see Repair your computer link in the bottom left corner.
Click on Repair and ignore the other Install Now option. After being directed to the Advanced Startup menu, select Troubleshoot > Advanced options > System Image Recovery. Follow the on-screen instructions to restore your System Image.
Hope you find the article helpful!
Read:
- Extract specific files from Windows System Image Backup
- Use DISM with /scanhealth to verify that Windows Component Store is healthy.
Related: How to transfer Windows to an external hard drive.
How do you create a System Image?
Open Control Panel, go to Backup and Restore (Windows 7), and click Create a System Image. Select a location to save the backup, choose the drives to include, and start the backup process.
Read: System Image Backup failed, Error 0x80780038 on Windows.
Does creating a system image wipe the drive?
Creating a system image does not wipe the drive. It instead makes an exact copy of your system’s current state, including the operating system, settings, and files, allowing for easy restoration if needed.
Related read How to create a System Recovery Drive in Windows.