Converting images in bulk is not an easy task if you don’t have the right batch image editing software to get the job done. This is where a batch converter should come into play, and we have one that is well-suited to the task at hand. The tool we’re discussing is XnConvert, which lets users combine over 80 actions and convert images to more than 500 formats. We’re confident you won’t need that amount, but it’s about knowing your preferred format is supported.
You’ll need to know that XnConvert doesn’t come with a flashy user interface. The look is primarily white, but as we always say, the looks don’t matter if the tool can do its job without errors.
Using XnConvert is simple! You need to carry out the following four steps:
- Add Files
- View As
- Actions
- Output
XnConvert – Bulk image converter & resizer
Beyond the non-flashy user interface, users will notice after launching this tool for the first time how simple it is. It’s easy on the eyes, and most of the buttons you’ll be using are situated in the right place.
Probably the only thing we dislike about XnConvert, are the promotional social buttons at the bottom. But hey, it’s a free app; therefore, we can’t expect it to be perfect.
1] Add Files

Clicking the Add Files button lets the user add the photos they want to convert. Now, by using this button, users will have to select images one at a time. However, if the Add Folder button is selected, all images within the folder will appear in the tool.
Beforehand, locate the images you want, place them in a dedicated folder, then click Add Folder to add them all at once.
2] View as
This option can be found below Input file(s), and you’ll need it if you’re planning to batch convert dozens of images at the same time. From here, users can change the size of the thumbnails.
The options are: Small Thumbnails, Thumbnails, Big Thumbnails, and List. By default, the app is set to Thumbnails, which should be fine for most people.
3] Actions
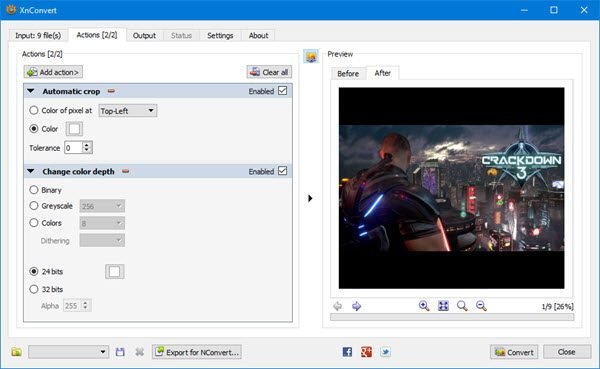
Now, this is where XnCovert begins to show off what it can really do, and we love it.
From here, the user can make changes to all added images. For example, the user can set them to be cropped or resized. Additionally, watermarks, text, vignettes, and more can be added. After adding a watermark, you can adjust its opacity, size, and other settings. You can add an image watermark as normal, a repeated image pattern, a stretched image format, etc. To change a watermark’s position, enter its X and Y coordinates or select an option from the corresponding drop-down.
The actions you add will not be removed when you close the software. You do not need to repeatedly add and remove actions while processing different images. Instead of doing this, you can disable the actions that you do not need.
After adding the preferred actions, review the before and after sections to see how the images will appear before you click Convert.
4] Output

Before clicking Convert, the user must first select the Output tab to make a few changes. This is where users will choose which folder converted images will end up in and the preferred file format, among other options.
As shown in the picture, you can choose to have the images appear in the source folder or in a different destination. Now, when it comes down to the Format section, simply click on the menu below, and from there, choose one from the many formats available.
If you want to do more, click Settings below to adjust image quality, subsampling factor, and more.
Finally, click on the Convert button below and wait for everything to take shape. Depending on your computer’s speed and the number of images added to XnConvert, the conversion process may take some time.
Fortunately, you can select how many CPU Cores the tool uses for faster performance.
Download XnConvert for free from the official website. XnConvert is provided as FREEWARE for private or educational use (including non-profit organizations). If you intend to use XnView in a company, you must purchase a license.
That’s it.
How do I resize an image in XnConvert?
You can resize an image in XnConvert. To do so, you have to add an action. Go to the Actions tab and then click on the Action button. Now, select “Image > Resize.” After that, the Resize action will be added to the list. Now, select Presets, Mode, Pixels, Image size, etc. When you convert images, XnConvert will output resized images.
How do I resize batch images in Windows 11/10?
You can resize batch images in Windows 11/10 by using batch image resizer software. Many free batch image resizer programs are available online, like Flexxi, Fotosizer, rEASYze, etc. You can install any of them. Additionally, you can use free image resizer websites.
Read next: Batch resize multiple images with Icecream Image Resizer for PC.