Cloning a hard drive or an SSD creates an identical drive that works the same way, with all the files and paths identical to the original. The process must be done carefully to protect the data. Most of the time, we can just use the drive manufacturer’s official tool to clone without running into errors or losing any data. However, sometimes we are bound to see some issues. One such issue is the cloned hard drive or SSD showing the wrong capacity instead of the actual capacity. In this guide, we show you different ways to fix the issue.
When a cloned hard drive or SSD shows the wrong capacity, it usually means the partition layout didn’t expand to fill the new drive. The cloning process often copies partitions exactly as they were, so if the source drive was smaller, the destination drive may have unallocated space.
Cloned Hard Drive or SSD showing wrong capacity on Windows PC
When you clone a hard drive or SSD in Windows, and you see the newly cloned drive showing the wrong capacity, you can fix it in the following ways.
- Extend the volume with Unallocated space
- Check your partition style
- Clone again the right way
Let’s get into the details of each method.
1] Extend the volume with Unallocated space
Cloning is done bit-by-bit to copy the entire files and paths without disturbing anything. When you clone, the disk might be limited to the space occupied by the original disk. For example, if your original drive has 250 GB of data and you clone it to a drive with 1 TB of space, the drive will be limited to 250 GB during cloning, and the rest of the data will appear as “Unallocated” space in Disk Management.
To fix the wrong capacity on a cloned hard drive or SSD, open Disk Management from the Start menu. Find the newly cloned drive from the drive listing. You will find the Unallocated space listed beside it. We need to extend the cloned disk with the unallocated space. Right-click on the cloned drive and select Extend Volume.
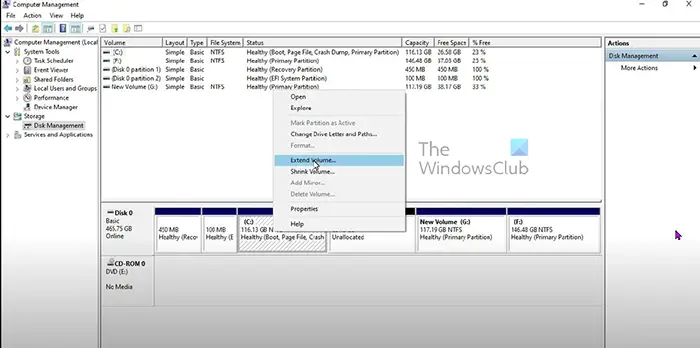
In the Extend Volume wizard that appears, select the Unallocated space. It will make the cloned drive show its full capacity instead of the cloned capacity. Instead of extending the volume, you can also create a new partition from the unallocated space.
2] Check your partition style
If you are using a drive larger than 2TB with an MBR partition style, you cannot see more than 2TB of capacity, as MBR only supports up to 2TB. MBR partition style is the default in legacy BIOS on older computers. Check the partition style of your cloned drive and convert it to GPT to ensure it works at full capacity, as GPT is recommended for Windows 11 and supports a maximum capacity of 2 TB.
To check the partition style of your cloned drive, open the Disk Management window and right-click on Disk 0 or Disk 1, which has your cloned drive listed. Select Properties from the options. Click the Volumes tab.
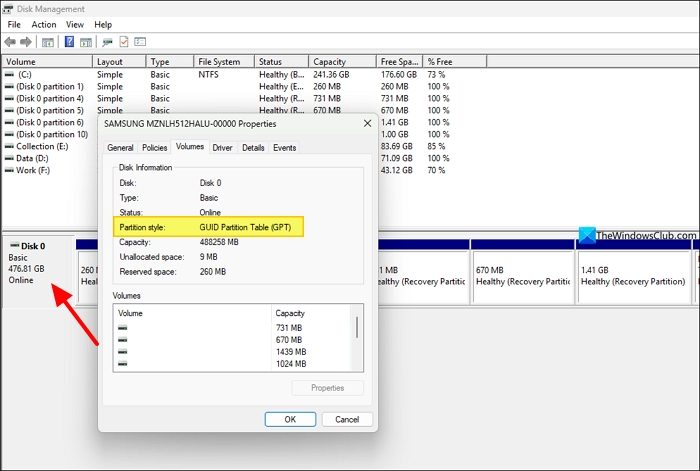
You will see the Partition style mentioned in the Volumes details. If you see the MBR partition style, you need to convert the MBR into the GPT partition style safely.
You can use third-party tools like AOMEI Partition Assistant to convert the drive safely without losing the data. If you still have the data backed up somewhere and can clone again, you can use the Command Prompt to convert.
Open Command Prompt as an administrator and type diskpart and press Enter. Then, enter the list disk and press Enter.

It will show the list of disks on your Windows PC. If your cloned disk is shown as Disk 1, type the following command and press Enter.
select disk 1
Then, enter the following command and press Enter.
convert gpt
It will wipe all data on your disk and convert it to GPT partition style. Then, clone it correctly using the tools provided by your disk manufacturer or third-party drive management tools.
3] Clone again the right way
If you have followed the above methods and are still unable to show the full capacity of the cloned drive, you will need to format the drive and clone it again correctly.
Open the Command Prompt as an administrator, and use the diskpart commands. Type diskpart and press Enter. Enter the list disk command. Then, select the disk using the select disk command followed by 0 or 1 based on your disk number. Type clean and press Enter.
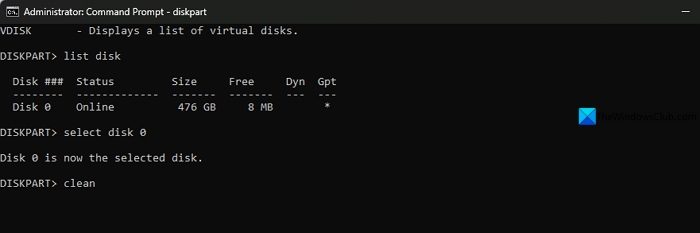
It will wipe the disk. Now, clone the drive again using the tools provided by your drive manufacturer and use it without any issues.
Related read: Disk Management not working, loading or responding in Windows 11
Why is my SSD not showing full capacity after cloning?
The cloning process involves copying data bit-for-bit from the original disk to the new disk. This happens the same with an SSD, too. If you have cloned a smaller-capacity drive to a higher-capacity drive, such as cloning a 500GB drive to a 1TB drive, it may show the drive capacity as 500GB instead of the original 1TB. The remaining capacity is shown as unallocated space. You can fix it by extending the volume.
Why is my 4TB hard drive not showing full capacity after cloning?
If you have cloned data to your new 4TB hard drive and it is not showing full capacity, you need to check its partition style in Disk Management. If the partition style is in MBR format, you need to convert it to GPT, as MBR supports storage up to 2TB only.
Read: Cloned SSD or Hard Disk won’t boot Windows 11.