
In this tutorial, we will show you how to change the maximum storage duration for Recall snapshots in Windows 11 Copilot+ PCs. That means we can choose how long we want to keep the Recall snapshots on our Windows 11 device. The storage duration for saving Recall snapshots can be set for 30 days, 90 days, 60 days, 180 days, or unlimited. When the maximum storage limit is reached, snapshots are automatically removed from the device, which helps save disk space.
If you haven’t set the maximum storage duration, the Recall snapshots are kept until the Maximum storage limit for snapshots (say 10 GB, 25 GB, 75 GB, etc.) is reached. When the maximum storage limit is reached, the snapshots are deleted in the sequence they were taken (oldest snapshots are removed first).
Change Maximum Storage Duration for Recall Snapshots in Windows 11
There are three native options to change the maximum storage duration for Recall snapshots on a Windows 11 PC. These are:
- Change maximum storage duration for Recall Snapshots using the Settings app
- Set maximum storage duration for Recall Snapshots in Local Group Policy Editor
- Change the maximum storage duration for Recall Snapshots using Registry Editor.
Let’s check these options.
1] Change maximum storage duration for Recall Snapshots using the Settings app
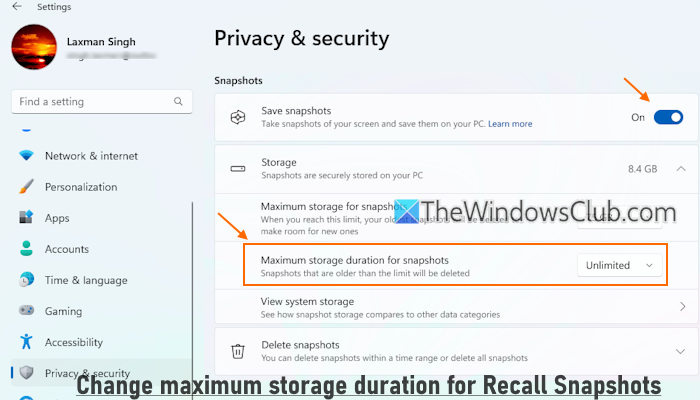
The steps are as follows:
- Use the Win+I shortcut key to open the Windows 11 Settings app
- Access the Privacy & security category
- Access the Recall & snapshots page in the Windows Permissions section
- Expand the Storage section
- You will see a Maximum storage duration for snapshots option
- Use the drop-down menu for that option and set the storage duration to 30 days, 60 days, 90 days, 180 days, or unlimited
- A Windows Security prompt will open. Press OK for the confirmation.
That’s it. Now, any Recall Snapshots older than the limit you set will be deleted.
Related: Recall is not saving snapshots in a Windows PC
2] Set maximum storage duration for Recall Snapshots in Local Group Policy Editor
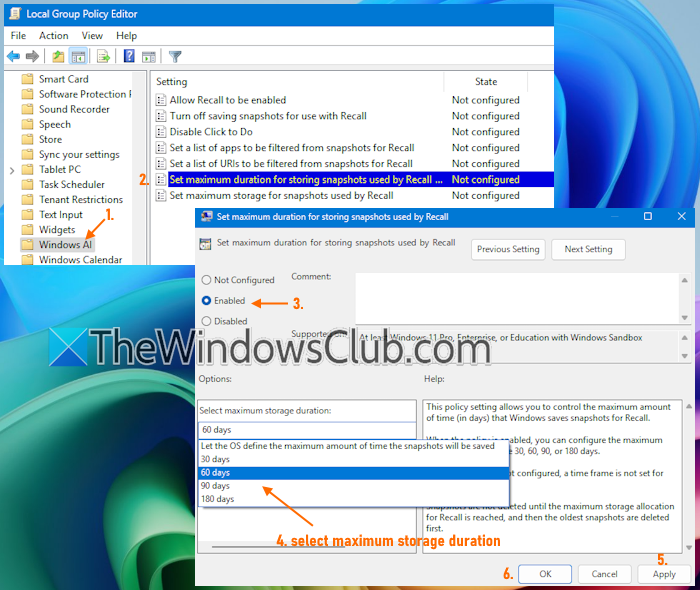
Local Group Policy Editor is available in Education, Pro, and Enterprise editions, but you can also use a trick to add Group Policy Editor to Windows 11 Home edition. The steps to set the maximum storage duration for Recall snapshots in Local Group Policy Editor are as follows:
- Open the Group Policy Editor window using the Search box, Run Command, or another preferred way
- Navigate to the Windows AI folder using the following path:
Computer Configuration > Administrative Templates > Windows Components > Windows AI
- From the right section, open the Set maximum duration for storing snapshots used by Recall setting by double-clicking on it
- In the window that opens, select Enabled
- Open the Select maximum storage duration drop-down menu available in the left-middle section
- Select an option: 30 days, 180 days, 90 days, 60 days, or Let the OS define the maximum amount of time the snapshots will be saved
- Press the Apply button and the OK button.
Note: Using this method will grey out and prevent you from using the Maximum storage duration for snapshots option in the Settings app.
To undo the changes or if you don’t want to set a time frame for deleting snapshots, follow the above options. And, select the Not Configured option for the Set maximum duration for storing snapshots used by Recall setting. Press the OK button to apply the changes.
Read: How to Import or Export Recall Snapshots in Windows 11
3] Change the maximum storage duration for Recall Snapshots using Registry Editor
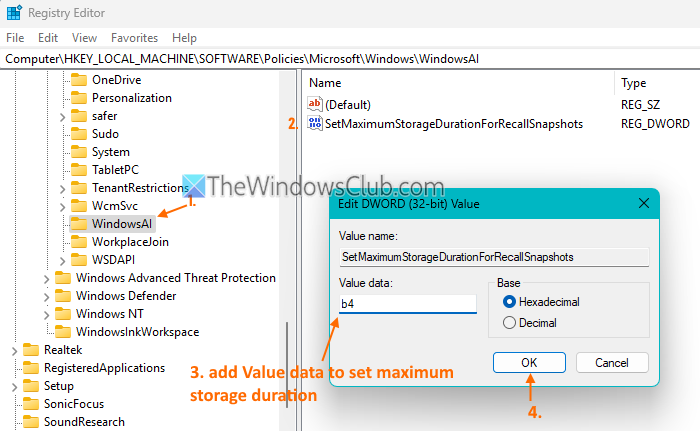
The Registry Editor feature includes crucial settings and files, so you should keep a backup of the Windows Registry before tweaking any settings. The steps to change the maximum time duration for storing Recall snapshots using Registry Editor are as follows:
- Type regedit in the Search box and hit Enter
- The Registry Editor window will open
- Access the Windows AI Registry key. Here is its path:
HKEY_LOCAL_MACHINE\SOFTWARE\Policies\Microsoft\Windows\WindowsAI
- If the Windows AI key is not present, then create a new Registry key under the Windows Registry key. For this, right-click on the Windows key > New > Key. Rename the new key to Windows AI
- Create a new DWORD (32-bit) Value
- Rename it to SetMaximumStorageDurationForRecallSnapshots
- Double-click on this DWORD (32-bit) Value
- A small Edit Value box will open
- Here, you need to use the Value data field to set the maximum storage duration for storing snapshots used by Recall:
- Add 1e as Value data for 30 days
- Add 3c for 60 days
- Insert 5a in the Value data field for 90 days
- Insert b4 for 180 days, and
- Add 0 in Value data to let the OS define the maximum amount of time the snapshots will be saved
- Press OK to apply the changes.
That’s all.
Does Windows 11 take screenshots every 5 seconds?
If you are using a Windows 11 Copilot+ PC and opt in to save snapshots for use with Recall, then Windows will take a snapshot of your screen every 5 seconds and when the content of your active screen changes. All the Recall snapshots and the associated information are encrypted and saved locally on your device.
Read: How to use Recall in Windows 11
How much storage does Microsoft Recall use?
To enable or use Recall, you need at least 50 GB of storage space free and a 256 GB storage capacity hard drive. Additionally, you can also configure the disk space allowed for Recall to store snapshots. For example, the default storage allocation option for Recall on a 256 GB hard drive is 25 GB. But you can set it to 10 GB. Also, for a 512 GB device storage capacity, 75 GB (default) disk space is allocated. However, you can change the maximum storage size to 25 GB or 50 GB for Recall snapshots.
Read next: Can’t open Recall in Windows 11: Minimum Hardware Requirements.
