If you are unable to move desktop icons in Windows 11/10, this post will help. In this post, we will show how to fix the issue. Like many users, you might have also faced this issue that – when you drag and drop some desktop icon(s) or shortcuts from one place to another, the icons aren’t moved and bounced back to their original positions and Windows automatically arranges desktop icons.
![]()
Can’t move desktop icons in Windows 11/10
Here are a few things you could try to resolve the issue:
- Test the mouse or touchpad
- Uncheck Auto arrange icons
- Uninstall any desktop organizer software
- Reset Folder Options
- Change Display Resolution
- Set scaling size for text, apps, etc
- Change desktop icon size
- Change icon spacing using Registry
- Turn off Allow themes to change desktop icons
- Update Graphics Driver.
1] Test mouse or touchpad

This basic test helps check whether your mouse or laptop touchpad is working properly. You will be able to find out if the left and right mouse buttons and the middle-click or scroll wheel are working or not.
Open Notepad and then write some text. After that, select that text using the left mouse button, and do a right-click to check if you’re able to open right-click context menus. You can also scroll up and down to test your mouse wheel. If all the buttons are working, your mouse or touchpad is OK. Otherwise, you should change your mouse.
2] Uncheck Auto arrange icons
![]()
This is the most likely cause of the error when Windows users cannot move desktop icons. When the auto-arrange option is enabled, icons automatically move to their positions when you try to change them. You can turn it off using the following steps:
- Right-click on an empty area of the desktop
- Access View menu
- Uncheck Auto arrange icons option in the context menu.
This should solve your problem.
3] Uninstall any desktop organizer software
If you have installed some third-party software to organize desktop shortcuts and icons, then that might be the reason you can’t move icons on the desktop in Windows 10. Please uninstall the software and reboot your PC to see if the issue is resolved.
Open Settings app using Win+I hotkey and access Apps & features section to find and uninstall such a program.
4] Reset Folder Options

This method is also helpful to solve this issue for many users. What you need to do is reset Folder options to default mode. For that, use these steps:

- Open This PC using Win+E hotkey
- Access View menu and click on Options
- In the General tab of the Folder Options box, click on Restore Defaults
- In the View tab of Folder Options, click on the Reset Folders button
- Press Apply and OK buttons to save the changes.
Read: Desktop Not responding or Frozen
5] Change Display Resolution
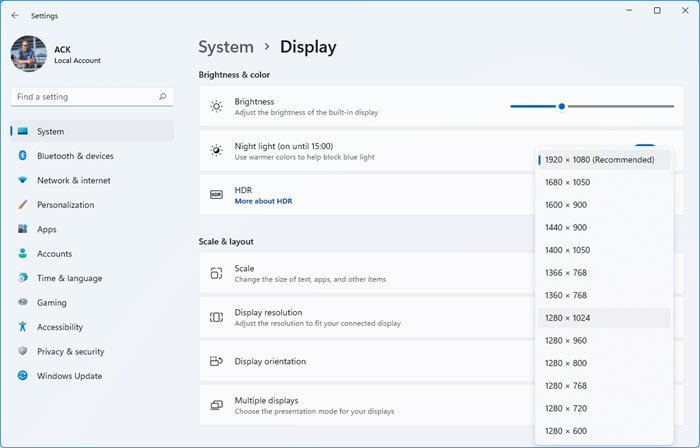
To do this:
- Open Windows 11 Settings
- Click on System settings
- Select Display from the right side
- Scroll down till you see Display resolution
- From the drop-down select the screen resolution you want.
Windows 10 user?

Access Settings app (Win+I), go to System category and open Display page. There you will be able to change the display resolution. Set the resolution to the recommended size.
6] Set scaling size for text, apps, etc.
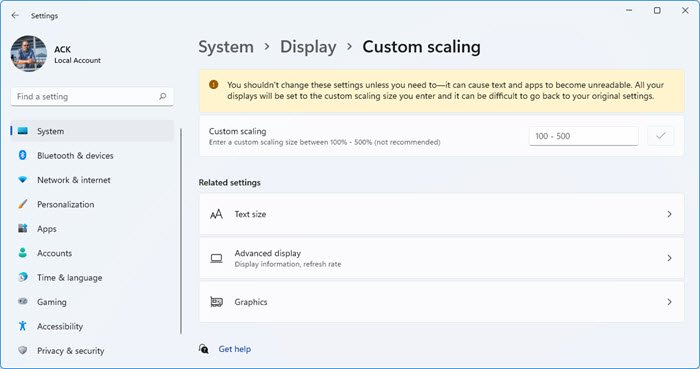
(Windows 11)
Adjusting the scaling for text, apps, and other elements may also help resolve this issue. Open the Settings app and access the Display page. On the right-hand part, set scaling to 100% (Recommended) size for text, apps, etc.
If desktop icons not moving using the recommended scaling, then you can set custom scaling. For that, click on the Advanced scaling settings option and enter a custom scaling size between 100%-500%.
In Windows 10 the Settings are here-

And here-

Apply the settings, sign out, and sign in again to your Windows 10 PC to see the change.
7] Change desktop icon size
If there are many large-sized desktop icons, they can cover the entire desktop. In that case, you cannot move desktop icons. So, simply change their size to medium or small. To do this, right-click an empty area of the desktop and select View> Size to adjust the size.
8] Change icon spacing using Registry
![]()
If there is too much spacing set between desktop icons, then also icons won’t move. For such a case, you need to use Registry Editor to change icon size for desktop shortcuts. As it is a Registry tweak, you should create a system restore point or backup Registry to overcome unwanted changes.
Open Registry Editor and then access the WindowMetrics key. The path is:
HKEY_CURRENT_USER\Control Panel\Desktop\WindowMetrics
On the right section, double-click on the IconSpacing string value. Note the default value (-1128) for later use. Now, enter any value between -2730 and 480. The higher the value, the larger the icon spacing. Set the value data and save it.
Now restart your PC to apply the changes. You may need to adjust values multiple times until you achieve the correct spacing for your desktop icons.
9] Turn off allow themes to change desktop icons
![]()
A theme installed on your Windows PC may be causing the issue, preventing you from moving desktop icons. So, you should prevent themes from changing desktop icons by accessing Desktop Icon Settings.
This is how it looks in Windows 10:
![]()
10] Update Graphics Driver
If your Graphics Drivers are outdated, this can also cause desktop icons to stop moving. So, you should update Graphics Drivers that might solve this problem.
These are the options that have helped users to fix this problem.
I hope these fixes help.
Windows can’t move icons to bottom of desktop
If you can’t move desktop icons freely, like say to the bottom of the screen, it may be due to the ‘Auto Arrange Icons’ setting being enabled. Right-click on the desktop, select ‘View’, and then uncheck ‘Auto Arrange Icons’. This should allow you to place your icons wherever you prefer on the desktop.