In this guide, we will show you how to auto-forward emails in Zoho Mail on a Windows 11/10 PC. If you want to automatically send incoming emails from your Zoho Mail account to another email address, you can use the built-in Email Forwarding feature.

In many organizations, emails sent and received through official accounts are considered company data. For backup or monitoring purposes, admins may need to forward these emails to another account automatically. Zoho Mail supports this functionality and allows you to forward emails to any valid external email address, including personal accounts (such as Gmail or Outlook) or external helpdesk systems.
Does Zoho Mail have forwarders free?
Zoho Mail does not provide email forwarding in its free plan. The auto-forwarding feature is available only with paid plans. If you are using the free version, you will need to upgrade to a paid plan to access this feature.
How to auto-forward emails in Zoho Mail
To auto-forward emails in Zoho Mail on a Windows 11/10 PC, follow these steps:
- Set up email forwarding
- Verify the destination email address
- Set up conditional email forwarding
- Disable/delete email forwarding
Let us see this in detail.
1] Set up email forwarding
Email forwarding in Zoho Mail can be configured at both the admin and user levels.
A] Set up email forwarding as an Admin
Log in to your Zoho Mail Admin Console. Go to the Users section. You’ll see the list of users that have been added to your organization account.
Select the user you want to enable email forwarding for. From the left pane, select Mailbox Settings > Email Forwarding.


In the Add email forwarding address search box, enter the destination account’s email address. Then click the + icon to add the address.
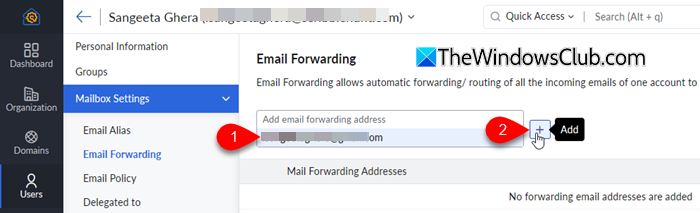
In the confirmation pop-up, click Add to finalize adding the email address for forwarding.

Note: Email forwarding works only after the destination email address is verified.
B] Set up email forwarding as a User
Log in to your Zoho Mail account and click the Settings icon. Go to Mail Accounts. You’ll see a list of accounts configured under your Zoho Mail account.
Select the email account for which you want to enable forwarding. Scroll down to the Forwards section.
In the Add New Email Forwarding field, enter the destination email address, then click Save.

2] Verify the destination email address
Once you add a forwarding address, a verification email is sent to the destination account. Open the email and copy the confirmation code.

For Admins: Go to the Zoho Mail Admin Console, click the Verify link next to the added address, paste the code, and click Confirm.

For Users: Go to Settings > Mail Accounts > Forwards, click Verify next to the added address, enter the code, and click Save.
If required, select the option to Delete original email copy after forwarding. When this option is enabled, emails will be deleted immediately after forwarding and will not be available for POP retrieval.

Finally, click Save to apply the changes.
Note: If you are forwarding emails to another address within the same organization (same domain), verification is not required. However, forwarding to external email addresses (such as Gmail or Outlook) requires verification.
Once the verification is complete, all incoming emails to the account will be automatically forwarded to the specified email address.
3] Set up conditional email forwarding
If you’re an organizational user, you can forward only specific emails by using the filter-based forwarding feature. This allows you to set conditions based on the sender, subject, or other criteria and automatically forward matching emails to another account.
Log in to your Zoho Mail account and go to Settings. Navigate to Filters > New Filter.
Enter a name for the filter, then specify the conditions or rules you want to apply. Under Actions, select Forward email to and enter the destination email address.
Click Save to apply the filter.

Once saved, the filter will be listed. Click Verify next to the added email address. In the verification pop-up, enter the confirmation code received in the destination email and click Confirm.

After verification, emails that match the defined conditions will be automatically forwarded to the specified address.
5] Disable/delete email forwarding
You can disable or remove email forwarding either from the Admin Console or from the user account settings.
Disabling will temporarily stop emails from being forwarded, while deleting will permanently remove the forwarding address.
A] Disable/Delete email forwarding as an Admin

Log in to the Zoho Mail Admin Console. Go to the Users section and select the required user from the list. From the left pane, navigate to Mailbox Settings > Email Forwarding.
Under the list of forwarding addresses, locate the address you want to manage. Toggle the switch OFF to disable forwarding for that address.
If you want to remove it completely, click the Delete icon next to the address and confirm the action.
B] Disable/Delete email forwarding a User

Log in to your Zoho Mail account and click the Settings icon. Go to Mail Accounts and select your email account.
Switch to the Forwards tab. You will see the list of added forwarding addresses. Toggle the switch OFF next to the desired address to disable forwarding.
To remove the address permanently, click the Delete icon and confirm the action.
Note:
- Email forwarding is not supported for POP accounts.
- You can add multiple forwarding addresses, but there is a limit. An admin can add up to 3 addresses, and a user can add up to 3 addresses, making a total of 6 forwarding addresses per account.
- Forwarding to the same email address via filters is not allowed if it is already added under Email Forwarding.
- If an email has already been auto-forwarded once, it will not be forwarded again if forwarding rules exist on the receiving account.
- If email forwarding fails repeatedly, it may be automatically disabled by Zoho Mail.
That’s all! I hope you find this useful.
Read: How to set up auto-replies in Outlook.
Is there a way to automatically forward emails?
Yes, most email services allow you to automatically forward emails to another address using built-in forwarding rules or filters. This feature is useful for managing multiple accounts or keeping backups of important emails. In Zoho Mail, you can enable this using the Email Forwarding feature in settings, provided it is allowed by your organization admin.
Read Next: Forward email or disable unauthorized forwarding in Outlook.com.