
Whenever you open a webpage or service (like a mic test service, video recording webpage, etc.) in Chrome that needs access to a webcam or camera, a pop-up appears asking you to allow or block that webpage from accessing the camera. You can also manually add websites to the allowed and not allowed list to use your camera. But, the thing is, anyone can change this setting or option easily. So, if you want, you can permanently allow or deny video capture for all the webpages in Google Chrome on your Windows 11/10 computer. This can be done via two different tricks or options present in Windows 11/10.
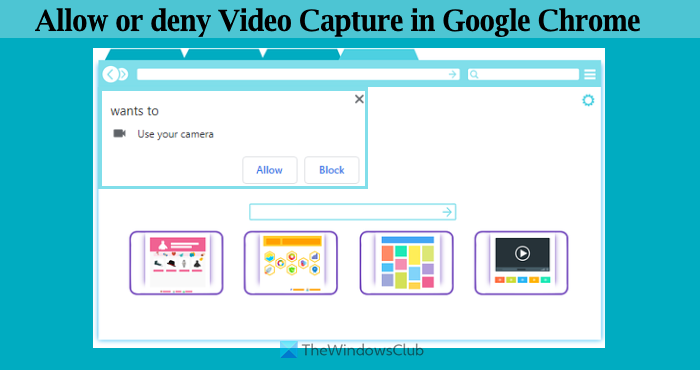
Once you apply the trick, webpages will not be able to use your webcam because camera access will remain blocked. The pop-up prompt won’t appear, and you won’t be able to change the site’s camera permissions to allow it. This applies to the built-in camera and other video inputs. The change will remain for as long as you want. You can also allow video capture for all sites in Google Chrome anytime you need. Or else, you can simply allow some specific sites that can access your camera/webcam.
How to allow or deny Video Capture in Chrome browser on Windows 11
Following are the options in Windows 11/10 to allow or deny video capture in Google Chrome:
- Group Policy
- Registry Editor.
Before trying these options for this purpose, we recommend you create a system restore point. If things are messed up for some reason, restore point will help you recover your system from it.
1] Allow or deny Video Capture in Google Chrome via Group Policy
This option is easier than the other option. But, in order to have Group Policy settings for Chrome, you need to integrate the Chrome browser with Group Policy Editor first. After that, use these steps:
- Open Group Policy window
- Access the Google Chrome folder
- Access Allow or deny video capture setting
- Use the Disabled option
- Select the OK button.
You can open the Group Policy Editor window using the Search box (type gpedit and hit Enter) of Windows 11/10 or any other way you like.
After that, access the Google Chrome folder using the following path:
Computer Configuration > Administrative Templates > Classic Administrative Templates (ADM) > Google > Google Chrome
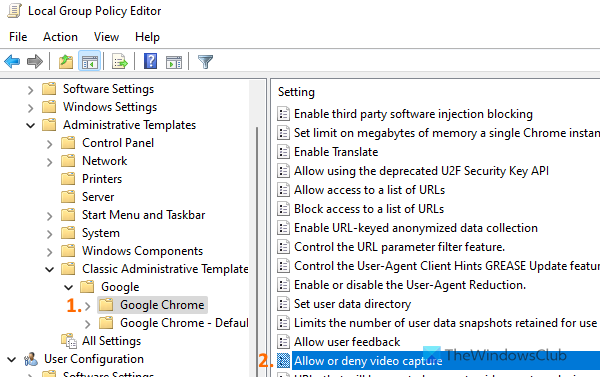
In this folder, scroll down the list of settings in the right-hand section and double-click Allow or deny video capture. This setting will open in a new window.
Use the Disabled option available on the left section in that window and then select the OK button to save the new setting.
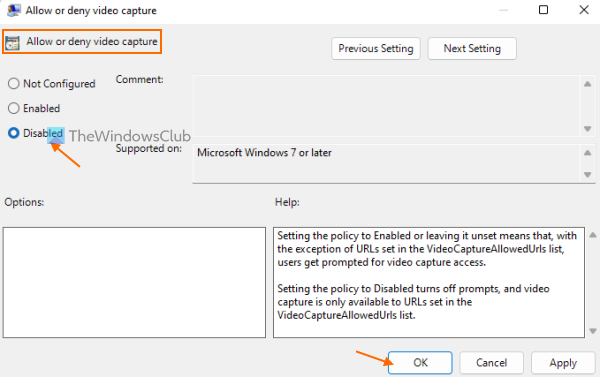
This setting takes effect instantly without restarting the browser. Now, when you open a webpage that needs access to the camera, the permission will be blocked automatically for that webpage and other webpages.
To allow or enable the video capture or camera access for webpages in Chrome, access the same Allow or deny video capture setting using the steps mentioned above. After this, use the Not Configured button for that setting, and click on the OK button.
Related: How to allow or deny Audio Capture in Chrome.
Enable Video Capture for specific sites in Chrome browser using Group Policy
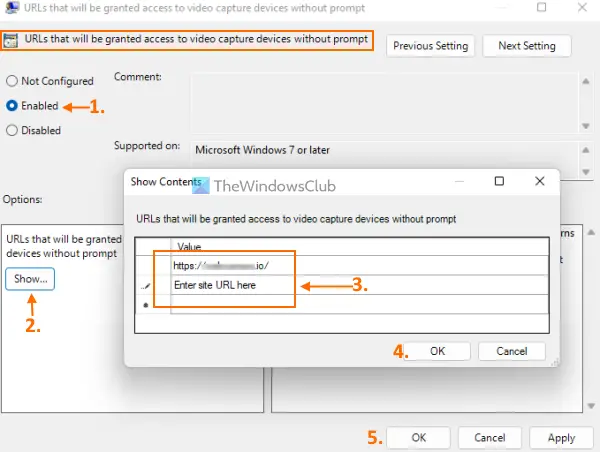
The setting above disables video capture for all sites, but if you want some site(s) to access the camera, you can use another Group Policy setting to add the URL of that website and other sites of your choice. Those sites can access the camera without any prompt. In addition, you can’t block site permission for camera access in Chrome settings. It will remain allowed only. Here are the steps:
- Launch Group Policy Editor
- Select the Google Chrome folder by following this path:
Computer Configuration > Administrative Templates > Classic Administrative Templates (ADM) > Google > Google Chrome
- Double-click on the URLs that will be granted access to video capture devices without prompt setting. That opens a separate window
- Use the Enabled option in that window
- Press the Show button to open a Show Contents box
- In the Value column of that box, add the website/webpage URL that you want to allow to access the camera. You can add multiple URLs in separate rows
- Hit the OK button
- Again, hit the OK button to save your setting.
2] Enable or disable Video Capture in Google Chrome via Registry Editor
The steps to enable or disable video capture using this option for all sites in the Chrome browser are as follows:
- Open Windows Registry
- Access the Policies key
- Add a Google Registry key
- Create a Chrome Registry key
- Create a VideoCaptureAllowed DWORD value
- Restart Google Chrome.
At first, open Windows Registry using any way you prefer. You can type regedit in the Search box of Windows 11/10 and press the Enter key or use any other option for it.
Go to the Policies key in the Windows Registry using this path:
HKEY_LOCAL_MACHINE\SOFTWARE\Policies
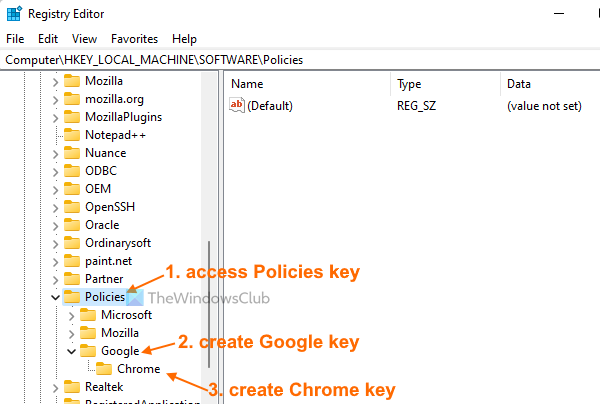
Now add a Google Registry key. For adding it, first, create a new Registry key, and then rename it to Google. In the same way, create a Chrome Registry key (under the Google key).
Now open the right-click context menu of Chrome key, then expand the New menu, and use the DWORD (32-bit) Value option. After creating the new value, name it VideoCaptureAllowed.
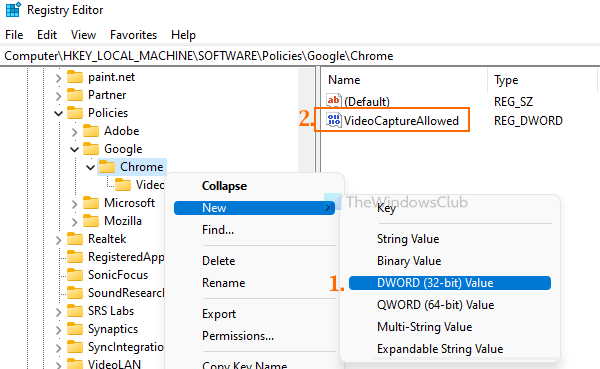
In the final step, restart Google Chrome, and video capture or camera access will be disabled for all the websites.
To enable video capture once again in your Chrome browser, go to the Policies key, and delete the Google Registry key. Restart Google Chrome and it will apply the changes.
Also read: How to prevent Bookmark Editing in Google Chrome.
Enable Video Capture for specific sites in Google Chrome using Windows Registry
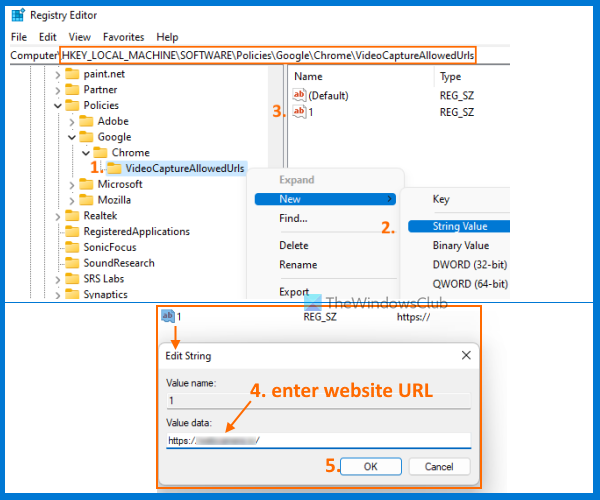
Follow these steps:
- Press Win+R hotkey. It will launch the Run Command box
- Type regedit in the text field
- Press the Enter key to open Windows Registry
- Go to the Policies key using this path:
HKEY_LOCAL_MACHINE\SOFTWARE\Policies
- In the Policies key, create a sub-key with the name Google
- In Google key, create a sub-key with the name Chrome
- Create a VideoCaptureAllowedUrls Registry key under the Chrome key
- Right-click on the VideoCaptureAllowedUrls key, open the New menu, and click on the String Value option
- Use 1 as the name for the new String value created by you
- Double-click on the String value to open its edit box
- Enter the webpage URL in the Value data field
- Select the OK button
- Restart Google Chrome.
In the same way, you can add more websites (using the above steps) to the allowed list that can access the camera in your Google Chrome browser. You just need to add a separate String value for each website/webpage and name each new String value.
How do I stop Chrome from accessing my webcam?
You can stop Chrome from accessing the webcam for a particular site by going to the Camera permissions section on the Settings page. That section lists the sites allowed to use your camera or webcam. Select the site you want to block and use the Block option for that site. Alternatively, you can use Windows 11/10 built-in settings to deny or disable video capture or camera access for all sites, except the ones you allow in Google Chrome. This post covers both options with detailed instructions.
How do I turn off screen recording on Chrome?
If you are using a Windows 11/10 computer, then you can turn off screen recording or screen capture on Google Chrome using Windows Registry and Group Policy Editor. Both are the built-in features of Windows OS. These options let you allow or block screen capture on Chrome permanently or for as long as you want. Once you do, a webpage that prompts you to select a window or tab for screen capture in Chrome will not be able to do so. Later, you can also turn on screen capture in Chrome using the same features.
Read next: How to change Tab Width in Chrome on Windows.
