
In this post, we will show you how to allow or deny audio capture for webpages in the Chrome browser on Windows 11/10 computers. By default, when a webpage (such as a mic test tool or audio recording tool) needs access to your microphone, a pop-up appears where you can choose whether that webpage can access it. Granting the permission lets that webpage capture audio in Chrome. But if you don’t want any webpage to access your microphone, you can deny audio capture in Chrome using the two options covered in this post.
Even if you added a webpage to the allowed list from the Google Chrome Settings page or granted a webpage permission to access the microphone, that website/webpage will remain blocked from accessing the microphone. You won’t be able to change that status to allowed from the Settings page. You need to use separate settings to add webpages to the allowed list so only those webpages can access the microphone. We have included those steps as well.
How to allow or deny Audio Capture in Google Chrome on Windows 11
There are two native ways in Windows 11/10 to allow or deny audio capture for all or specific sites in Chrome. These are:
- Local Group Policy Editor
- Registry Editor.
It is advised to create a system restore point before tweaking or changing any settings in the Local Group Policy Editor and Windows Registry Editor. When the system restore point is created, you can go ahead to try these options.
Allow or deny Audio Capture in Google Chrome using Local Group Policy Editor
Before using this option, you must integrate Google Chrome with Group Policy. Only then can you manage all Chrome-related settings in the Local Group Policy Editor. When it is done, you can follow these steps to use this option:
- Open Local Group Policy Editor
- Select the Google Chrome folder
- Open Allow or deny audio capture setting
- Click on the Disabled button
- Click on the OK button.
Detailed instructions for these steps are below.
Open the Run Command box (Win+R), type gpedit.msc in the given box, and use the OK button. This action will open the Local Group Policy Editor window.
You will see multiple folders in different sections. Select the Google Chrome folder. For that, use this path:
Computer Configuration > Administrative Templates > Classic Administrative Templates (ADM) > Google > Google Chrome
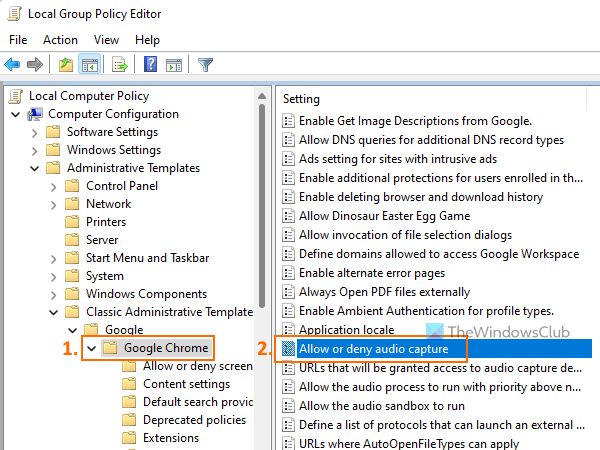
From the right-hand section, open Allow or deny audio capture setting by double-clicking on that setting.
A new window opens for this setting. First, click Disabled, then click OK.
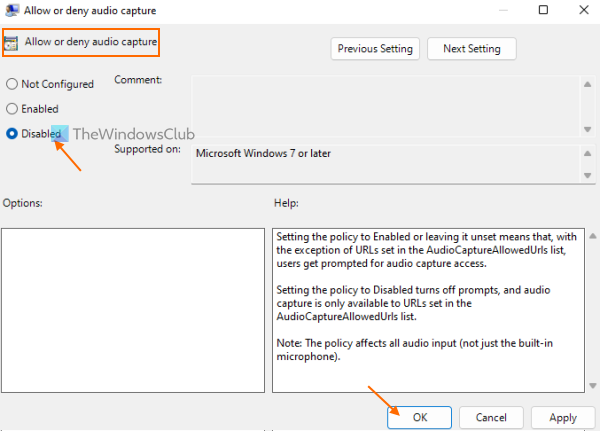
This denies or disables audio capture for all webpages in Google Chrome. The setting applies to Chrome without needing to restart It. You only need to refresh already opened tabs to apply the setting to those tabs.
To enable or allow audio capture for webpages in Google Chrome again, use the above steps, and open the Allow or deny audio capture setting. In that setting, click on the Not Configured option, and then press the OK button.
Allow Audio Capture for specific sites in Chrome using Local Group Policy Editor
If you want some sites that can use the microphone, then you can add them to the allowed list using another setting of Local Group Policy Editor. For this, here are the steps:
- Open Local Group Policy Editor
- Select the Google Chrome folder. Here is the path:
Computer Configuration > Administrative Templates > Classic Administrative Templates (ADM) > Google > Google Chrome
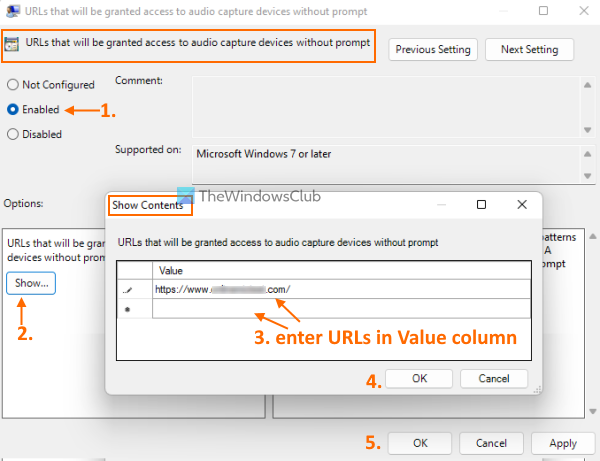
- On the right-hand section, access the URLs that will be granted access to audio capture devices without prompt setting by double-clicking on it. This will open a separate window
- In that window, select the Enabled option
- Click on the Show button available in the left middle part of that window. A Show Contents box will open
- In the Show Contents box, add the URL of a website in the Value column. In the same way, you can add URLs (one URL per line or row) for other websites in the Value column
- Press the OK button to close the Show Contents box
- Press the OK button to close the setting window.
Now only allowed sites can use the microphone without a prompt. All other sites will remain blocked from accessing the microphone in Chrome.
To remove allowed websites from audio capture in Chrome, follow the steps above. Open the same URLs you want to grant access to audio capture devices without a prompt. In that setting, click Not Configured (available in the top-left). Finally, click OK to save the changes.
Related: How to allow or block screen Screen Capture on Google Chrome.
Enable or disable Audio Capture in Chrome browser using Registry Editor
These are the steps:
- Open Registry Editor
- Select the Policies key
- Create a Google key
- Add a Chrome key
- Create an AudioCaptureAllowed value
- Restart the Chrome browser.
In the very first step, write regedit in Windows 11/10 Search box, and hit the Enter key to open the Registry Editor window.
When Registry Editor is opened, select the Policies Registry key. Here is its path:
HKEY_LOCAL_MACHINE\SOFTWARE\Policies
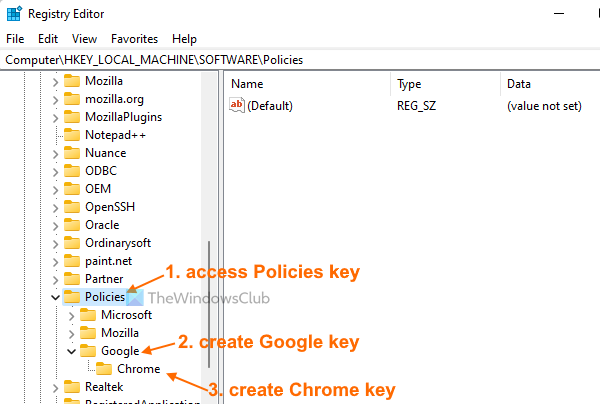
Now create a Registry key and set the name of that new key to Google. In the same way, create another key (this time under the Google key), and rename it Chrome.
Right-click on the Chrome key or an empty section on the right-hand section, expand the New menu, and use the DWORD (32-bit) Value option. This will add a new value that you have to rename with AudioCaptureAllowed.
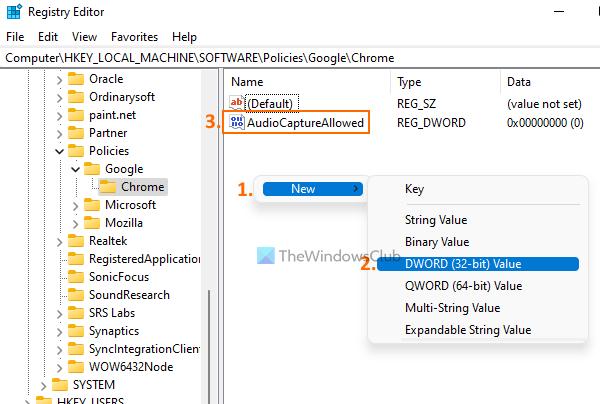
Finally, restart the Chrome browser if you have opened it and it will deny or disable audio capture for all the webpages in Google Chrome.
Whenever you want to allow or enable audio capture in your Chrome browser, follow the steps mentioned above, and access the Policies key. After that, delete the Google key that you created.
Restart Google Chrome, and it will apply the changes.
Also read: Prevent webpages from showing Images in Google Chrome.
Enable Audio Capture for selected sites in Google Chrome using Registry Editor
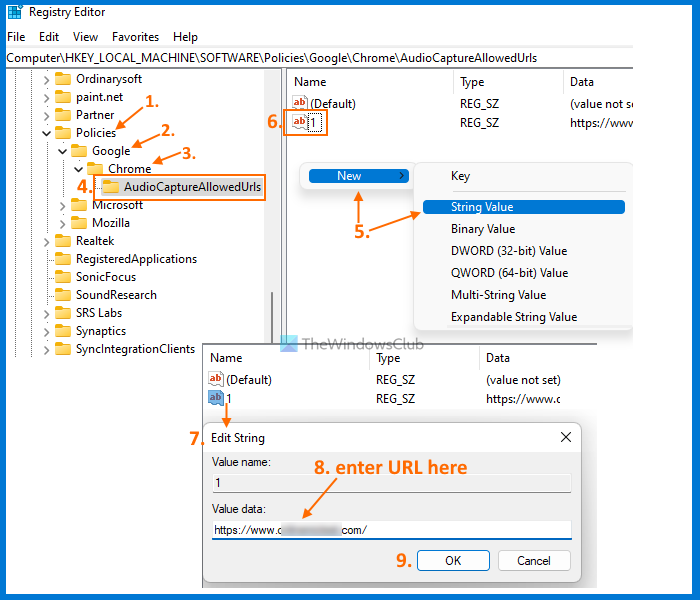
The Registry Editor above will block all sites from accessing the microphone, even if you have added sites to the allowed list using the Site Settings section of Chrome. So, if you want to allow selected sites to access to the microphone, you can use this Registry trick. Here are the steps:
- Open Registry Editor window
- Access the Policies key using this path:
HKEY_LOCAL_MACHINE\SOFTWARE\Policies
- Add a Google key under the Policies Registry key
- Now, add a Chrome key under the Google Registry key
- Under the Chrome key, create an AudioCaptureAllowedUrls key
- On the right-hand section, create a new String value. To do this, open the right-click context menu of the AudioCaptureAllowedUrls key, use the New menu, and select the String Value option
- Rename that String value to 1
- Double-click on the String value. An Edit String box will pop-up
- In the Edit String box, enter the URL of a website in the Value data field
- Press the OK button
- Restart the Google Chrome browser.
Now only that website will be allowed for audio capture in Chrome.
To add more websites to the allowed list, repeat the steps above. Create String values under the AudioCaptureAllowedUrls key with names like 2, 3, etc., and add the site URLs in the Value data field of each String value. Finally, restart the Chrome browser to apply the changes.
To remove allowed websites from accessing the microphone, follow the steps above, then delete the AudioCaptureAllowedUrls Registry key. After doing that, you might have to restart Google Chrome to save the changes.
How do I enable audio recording in Chrome?
If you have blocked some audio recording site or audio capture site from accessing the microphone, then you can enable audio recording in Chrome for that site using the following steps:
- Open the Chrome browser
- Press the Alt+F hotkey to open the Settings menu
- Click on the Settings option
- Access the Privacy and security category from the left section
- Access the Site Settings section
- Click on the Microphone option present in the Permissions section
- Check the blocked sites that are not allowed to use your microphone and select the site name for which you want to allow access to the microphone
- Select the Allow option from the drop-down menu available for the Microphone option.
You can also change location, camera, notifications, and other permissions for a particular site using the steps above.
How do I deny microphone permissions in Chrome?
Though there is a built-in feature to stop Chrome from accessing the mic, under the Site Setting section, on Windows 11/10 computer, anyone can change that setting and allow a blocked site to use the microphone. So, If you want to completely disable audio capture or deny microphone permissions for all sites in Chrome, then you need to use the Group Policy or Registry Editor feature of Windows 11/10.
These two features are more powerful as microphone permissions can’t be changed using the built-in feature of Google Chrome once you have used any of these options. This post has covered both the features with step-by-step instructions to do that. You can also allow sites of your choice to access the microphone.
Read next: How to Show or Hide Bookmarks Bar in Chrome.
