Some people are unaware that deleted files can be recovered. If you want to remove files that can not be recovered, use the “Secure Delete” option. The Sysinternals SDelete tool can help us add Secure Delete to the context menu in Windows 11 or Windows 10.

What is Secure Delete?
Secure Delete overwrites the file or folder while deleting it. The method ensures that all the unallocated portions belonging to the file are freed up and available to use.
Secure Delete can completely erase anything, but there is something it can’t. Certain folders that help run the Windows system are excluded from the list. The list includes folders like:
- C:\Program Files,
- C:\Program Files (x86),
- C:\ProgramData,
- C:\Users,
- C:\Windows, and
- C:\Windows.old.
The program will still work as it should inside the above-mentioned folders. The above folders are marked as exceptions because deleting them can lead to a fresh Windows installation.
Add Secure Delete to the context menu in Windows 11/10
To be able to permanently delete files, download SDelete from Microsoft and these Registry files from our servers.

Now create a system restore point first and then follow the steps given below carefully:
- Unzip the SDelete.zip file and open the unzipped folder.
- Copy the sdelete.exe file to C:\Windows\System32 folder.
- Click on Continue when prompted.
- Unzip the ARSDCM.zip file to a folder and navigate to it.
- Double-click on the Add_Secure_Delete_to_context_menu.reg file.
- Click on Yes when UAC prompts and then click on OK when the registry prompts.
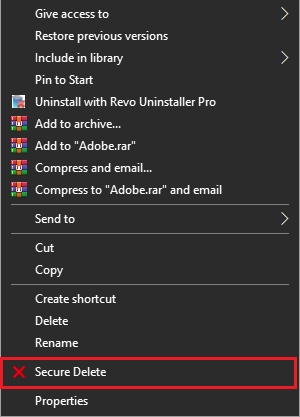
Restart your system once. Now navigate to any folder in your system, and select the file/folder you want to delete.
Right-click on it and click on Secure Delete. It is as simple as the regular deleting process.
How to remove Secure Delete from the context menu
To remove the Secure Delete option from the context menu, follow the steps below.
- Navigate to the folder where unzipped registries are stored.
- Double-click on the Remove_Secure_Delete_from_context_menu.reg file.
- Click on Yes when UAC prompts, then OK when the registry prompts.
Once again, restart your system, and the option for Secure Delete will be gone.
If you remove the option and plan not to use it again in the near future, you can delete the sdelete.exe from C:\Windows\System32 folder.
Read next: How to delete undeletable & locked files and folders.
How do I add permanent delete to context menu?
With the help of some registry tweaks, you can add the “Permanent Delete” option to the Context Menu. First, create a system restore point that can be used if something goes wrong, and then follow the steps mentioned in this guide to add the Permanent delete option to the Context Menu.
Read: Free Data Recovery Software for Windows PC
How do I secure delete in Windows 10?
The Sysinternals SDelete tool can help us add Secure Delete to the context menu in Windows 11 or 10. To do so, follow the aforementioned steps.
Also Read: Context Menu Editors: Add, Remove Context Menu items in Windows 11.