The Solid-State Drive (SSD) is a great upgrade over the hard disc drive (HDD). It is comparatively faster and is one of the best ways to increase a system’s performance. However, some users have reported that Windows 11 or Windows 10 fails to recognize the SSD.

By default, Windows automatically recognizes any external drive, including an SSD, that you insert into the system. But the real problem arises when it fails to do so.
SSD not detected or showing up in BIOS or Disk Management in Windows 11
If your Windows 11/10 computer is not recognizing SSD (Solid State Drive) & it is not showing up in BIOS or Disk Management, then the following suggestions may help you:
- Check connection.
- Initialize Disk.
- Change Drive Letter and Paths.
- Download Latest Driver Update.
- Change System BIOS Settings.
Now let’s review these solutions in detail.
Windows not recognizing SSD
1] Check Connection
The first reason Windows 11 cannot recognize the SSD is a loose connection. This issue typically occurs when using an external SSD. As a solution, reconnect the SSD to the port. You can even clean the computer port before reconnecting the SSD.
Once connected, check whether the system recognizes the drive. If not, remove the SSD and connect it to any other system. If that system recognizes the SSD, it indicates a problem with the USB port on your main system. In such a case, you can’t do much other than get it repaired by a professional.
However, if the other system also fails to recognize the SSD, it indicates the drive requires a technical fix. Below are all the technical fixes you need to follow.
Read: NVMe SSD not detected in Windows
2] Initialize Drive
An old drive, be it HDD, SSD, or USB Drive, can get corrupted due to some unavoidable reasons. In that case, Windows 11 will not recognize the drive. Furthermore, Windows will also fail to recognize the drive if it has not been initialized. In either case, you will need to create a new volume to resolve the issue. Here are the steps you need to follow.
- Press the Windows key to open the Start Menu.
- Type Create and format hard disk partitions and press enter.
- Right-click on the problematic drive (it will be represented using a black color bar), and choose the Initialize Disk option.
- Choose GPT (GUID Partition Table) as partition style, and click OK.
- The problematic SSD is now initialized. Right-click on it again and choose New Simple Volume.
- Click on the Next option in the New Simple Volume Wizard window.
- In the following window, make sure the Maximum disk space is similar to the Simple volume size. Click on Next.
- Click on Next again.
- Choose the File System as NTFS, and click on Next.
- Lastly, click on the Finish.
Now restart your system and check if this system is recognising SSD or not.
Read: Couldn’t Mount File, The disk image isn’t initialized
3] Change Drive Letter and Paths
Whenever you insert a new drive into the system, Windows automatically assigns it a drive letter after C. The letter assigned to a drive depends on the number of drives inserted into the system. But if Windows hasn’t assigned a drive letter to the SSD, it won’t be recognized by the system. Thankfully, you can do the process manually. To do so, here are the steps you need to follow.
- Navigate to Start Menu > Create and format hard disk partitions.
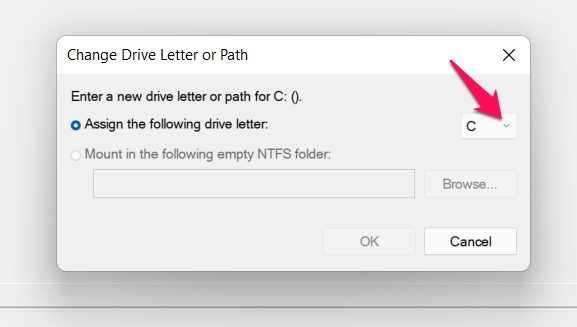
- Right-click on the problematic SSD and choose Change Drive Letter and Paths.

- Choose the Add option if the drive letter is not already assigned. And click on Change if the drive letter has already been assigned.
- Click on the dropdown menu and choose any letter you want for the SSD drive. Tap on OK.
Restart the system, and check if the problem persists.
Read: Unknown Not Initialized, Can’t initialize disk
4] Download Latest Driver Update
Outdated drivers can also cause the issue. To resolve this, you’ll need to download the latest driver update. Here are the steps you need to follow.
- Press Windows + I to open the Settings menu.
- Click on the Windows Update option.
- Navigate to Advanced options > Optional Updates.
- In the following window, you’ll have a list of all the available updates for your system including Disk Drivers.
Install the available update to resolve the problem.
Related: Windows does not recognize second Hard Drive
5] Change System BIOS Settings
You can change the SATA operation mode if Windows 11 is not recognizing the SSD.
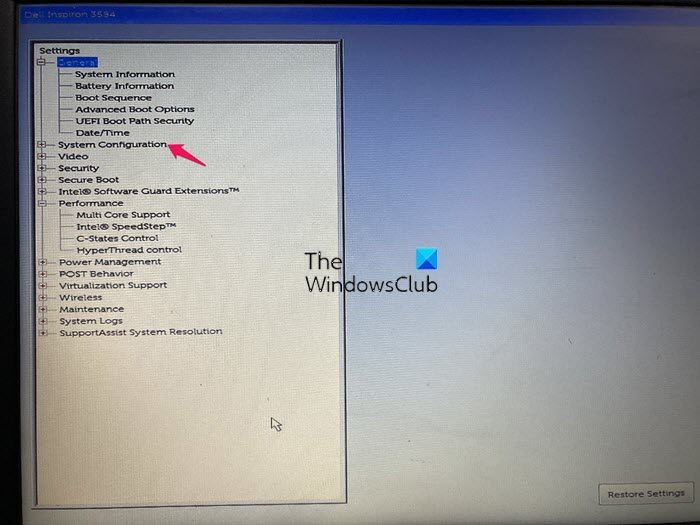
Note: Different systems have different methods to open the BIOS window. You can find the exact method on the manufacturer’s website. Although the procedure will be similar across all systems, the steps below will get the work done on a Dell system.
Go to System Configuration.
Choose SATA Operations, and set it to AHCI.
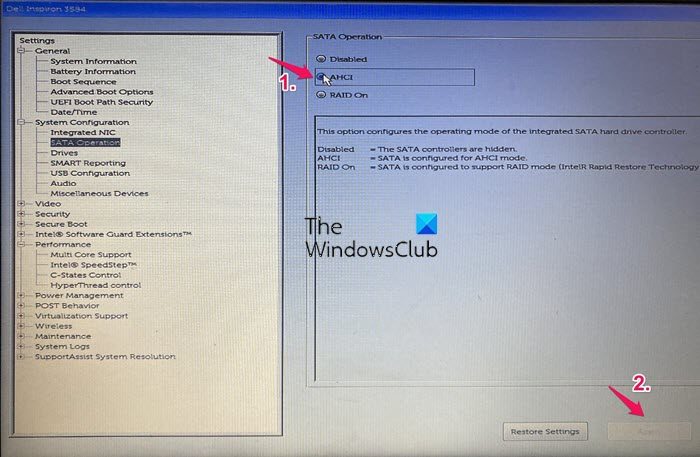
Click on Apply, and exit the BIOS.
If you are still experiencing the issue, it is likely due to a problem with the SSD itself. In that case, you can’t do anything other than have it replaced at the place you bought it.
Windows not recognizing multi-partitioned SSD
Windows often fails to recognize multi‑partitioned SSDs due to driver issues, unsupported partition style, partition table conflicts, or power/connection problems. The quickest fix is to check Disk Management, update storage drivers, and ensure the SSD uses a supported partition style (GPT/MBR). If the SSD doesn’t appear at all, test with another cable/port and verify in BIOS.
Read: Hard Drive not showing up on Boot Menu.
Why is my SSD not being detected?
The SSD will not be detected if the connector is damaged or the connection is incorrect. A defective device driver can also cause this issue. It is very simple to resolve this problem.
Read: Crucial Storage Executive not detecting SSD on Windows PC
How do I get BIOS to recognize a new SSD?
If the BIOS doesn’t recognize a new SSD, you need to manually initialize the driver. You can download the latest driver update or adjust BIOS settings to resolve the issue.
Related: Fix Disk Management errors on Windows 11.