
If you encounter the 7-Zip CRC error when installing NVIDIA drivers on your Windows 11/10 PC, this post will help you fix the issue.
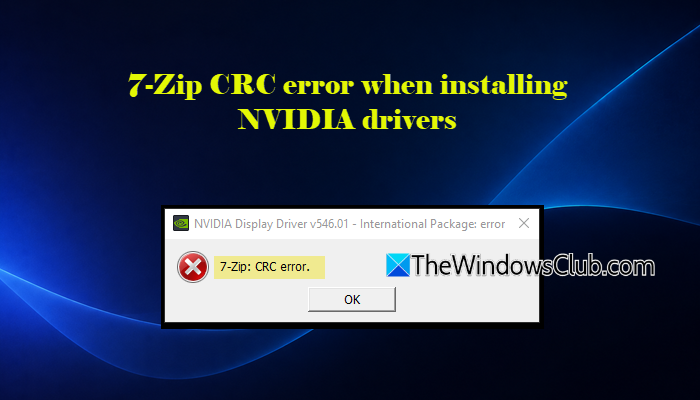
Several users have reported that they have encountered the 7-Zip CRC error while attempting to install the NVIDIA drivers on their Windows 11/10 PCs. While many encountered the error after a fresh Windows reinstall, others got the message even though they haven’t changed anything on their computer. The complete error message reads:
7-Zip: CRC error
The above error indicates a data-integrity check failure, which occurs when the data extracted from a file does not match the expected value. Although the error message mentions 7-Zip, it doesn’t necessarily mean the software itself is faulty. When installing NVIDIA drivers, the issue could be related to a corrupted download, storage issues, or system instability involving RAM or the CPU.
What is a CRC Error?
CRC stands for Cyclic Redundancy Check. It is a method used to detect data errors during storage, transfer, or extraction. When you download an NVIDIA driver, the installer contains compressed files. During installation, the installer extracts these files and uses a checksum to verify that the extracted data matches the expected value. If the data fails this integrity check, a CRC error occurs, indicating possible corruption or a data mismatch.
7-Zip CRC error when installing NVIDIA drivers
To fix the 7-Zip CRC error that appears while installing NVIDIA drivers on a Windows 11/10 PC, use these fixes:
- Install the NVIDIA driver using the NVIDIA App or official website
- Try a different browser
- Extract the driver manually using 7-Zip
- Change the Windows temporary folder
- Check for CPU instability
- Check RAM stability and memory settings
Let us see these methods in detail.
1] Install the NVIDIA driver using the NVIDIA App or official website
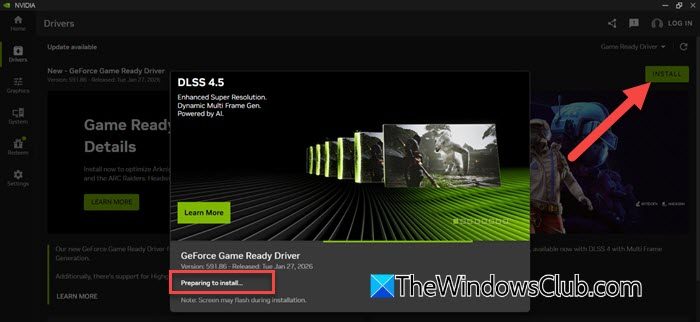
A 7-Zip CRC error may occur if the downloaded driver installer is corrupted or incomplete. To rule out this possibility, try installing the driver through the NVIDIA App. This app provides an alternative way to download and install NVIDIA drivers without manually extracting the downloaded installer.
Open the NVIDIA App on your Windows PC. Go to the Drivers section and check for available driver updates. Download the NVIDIA driver and follow the on-screen instructions to install it.
Alternatively, download a fresh copy of the NVIDIA driver from the official NVIDIA Driver Downloads page. Select your graphics card and Windows version. Download the appropriate driver and double-click the driver package to extract the files. Once the files are extracted, the NVIDIA Installer window will open up. Follow on-screen instructions to begin the installation.
If the CRC error persists with either method, proceed to the next troubleshooting step.
2] Try a different browser
A particular browser or its extensions may sometimes interfere with downloads. Some users reported that downloading NVIDIA drivers through Google Chrome caused a 7-Zip CRC error, while switching to Microsoft Edge resolved the issue. Other users reported the opposite experience.
Try downloading the driver using a different browser. For example, if you used Edge, try Google Chrome, or vice versa. Once the download is complete, run the installer and check whether it extracts successfully.
3] Extract the driver manually using 7-Zip
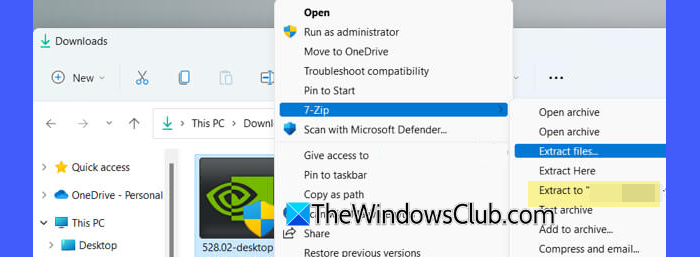
Instead of running the NVIDIA installer directly, you can extract its contents manually and launch the setup program from the extracted folder. This approach has worked for a few users experiencing the same error.
- Download the appropriate NVIDIA driver from the official NVIDIA website.
- Install 7-Zip if it is not already installed.
- Right-click the downloaded NVIDIA driver installer.
- Select 7-Zip > Extract to “folder name\”.
- Open the newly created folder.
- Double-click setup.exe to start the installation.
If 7-Zip itself reports a CRC error during extraction, proceed to the next troubleshooting step.
4] Change the Windows Temporary folder
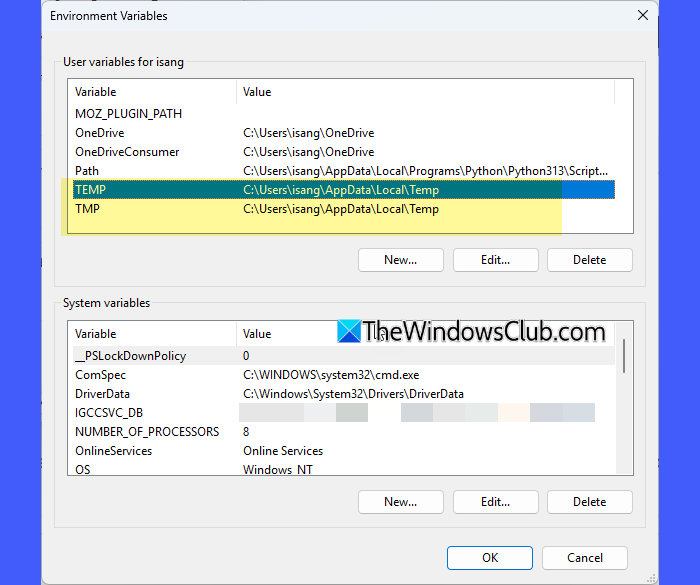
Windows and installers use Temporary folders to store files during extraction and installation. If the configured temporary directory has access or file-handling problems, creating a new folder and updating the TEMP and TMP environment variables may help resolve the issue.
- Open File Explorer and create a new folder named C:\Temp, if it does not already exist.
- Press Win + R, type sysdm.cpl, and press Enter.
- Open the Advanced tab and click Environment Variables.
- Under User variables, select TEMP and click Edit.
- Note the existing TEMP value so you can restore it if needed.
- Change the variable value to C:\Temp.
- Repeat the process for TMP, setting its value to C:\Temp.
- Click OK to save the changes and restart your computer.
Try extracting and installing the NVIDIA driver again. If this change does not resolve the issue, restore the original TEMP and TMP values.
5] Check for CPU instability
If a processor is unstable because of overclocking, incorrect settings, or other hardware issues, it may contribute to data-processing errors during extraction. If you suspect CPU instability, consider the following troubleshooting methods:
A] Adjust the Intel Performance Core Ratio using Intel XTU
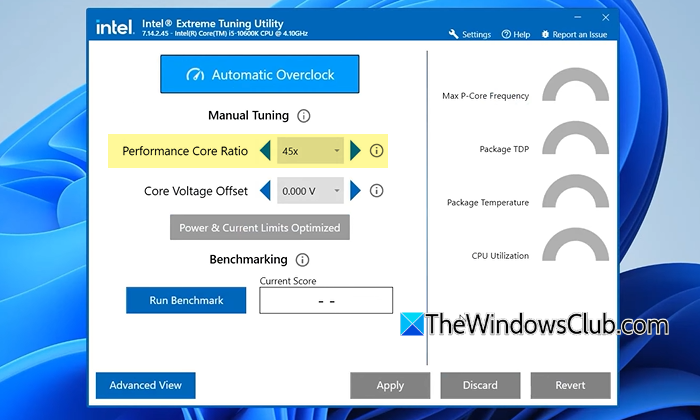
Some users have reported this error on systems with 13th- and 14th-generation Intel processors, particularly when they also experienced game crashes, application failures, blue screens, or extraction errors with other files. In some reports, reducing the Intel Performance Core Ratio from 55x to 53x, 57x to 54x, or 57x to 53x using Intel Extreme Tuning Utility (XTU) helped resolve the installation issue.
The Intel Performance Core Ratio determines the operating frequency of a processor’s Performance cores. Lowering the ratio reduces the target frequency, which may improve stability on some systems.
- Download the Intel Extreme Tuning Utility (XTU) from the official Intel website.
- Run the installer and follow the on-screen instructions.
- Open Intel XTU. You’ll see the tool’s Compact View, which offers a limited selection of parameters to adjust.
- Locate the Performance Core Ratio setting.
- Note the current value so you can restore it later if needed.
- Adjust the ratio and click Apply to save the changes.
Restart your PC if required, and try installing the NVIDIA driver again.
Note:
- Intel XTU supports only certain processors and system configurations. You can also adjust the corresponding CPU ratio setting in your motherboard’s BIOS/UEFI, if supported. The available options and steps vary by system.
- Changing CPU settings can affect performance and stability. Consult your manufacturer’s guidance before making changes.
B] Check for BIOS updates
For affected 13th- and 14th-generation Intel desktop processors, Intel recommends using the relevant Intel Default Settings and installing the latest BIOS version containing microcode 0x12F or later. Check Intel’s latest stability guidance for details.
6] Check RAM stability and memory settings
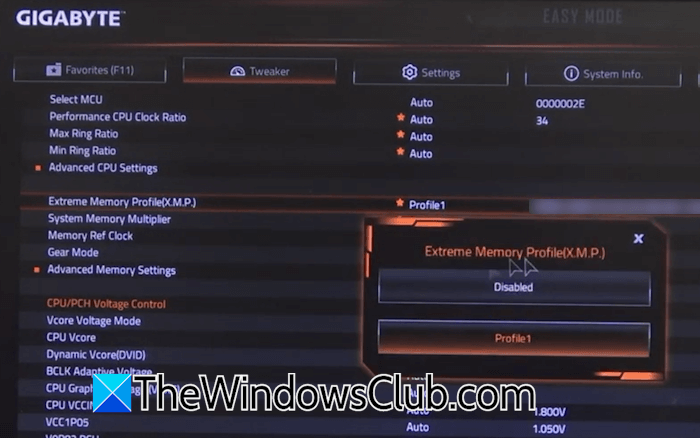
If you have enabled a memory profile such as XMP, EXPO, DOCP, or EOCP, or manually configured your RAM frequency, consider temporarily disabling the profile or restoring the memory settings to their default values in BIOS/UEFI. These profiles can improve memory performance, but they may sometimes contribute to data corruption during file extraction.
- Restart your PC and enter the BIOS/UEFI setup. Depending on your computer, you may need to press Del, F2, or another designated key during startup.
- Locate the memory, overclocking, or performance settings. The exact menu name depends on your motherboard manufacturer.
- Look for the memory profile setting, such as XMP or EXPO.
- If it is enabled, change it to Disabled, Auto, or Default.
- Save the changes and exit BIOS/UEFI.
Your PC will restart. Try installing the NVIDIA driver again and check whether the CRC error persists.
I hope this helps.
Read: GeForce Game Ready Driver Installation can’t continue in Windows.
How to solve NVIDIA driver installation error?
To fix NVIDIA driver installation errors, download a fresh copy of the driver from the official NVIDIA website or install it through the NVIDIA App. If the installation fails with a CRC error, try downloading the driver using a different browser, extracting the installer manually, or checking CPU, RAM, and storage stability.
What can I do to fix the “7-Zip CRC failed” error?
The 7-Zip CRC failed error indicates that data failed an integrity check because of a corrupted or incomplete file, extraction issues, or storage-related problems. The solution depends on the cause of the error. If you see this error while installing NVIDIA drivers, follow the troubleshooting steps in this post.
Read Next: NVIDIA GeForce Experience, Something went wrong error on Windows.
