Experiencing slow performance on a Windows Server is a common issue that can disrupt critical operations. Whether it’s a lag in application response, delayed file access, or high resource usage, it’s essential to identify the root cause to restore optimal performance. In this guide, we will cover the key troubleshooting steps to help diagnose and resolve the issue.

Troubleshoot Windows Server slow performance
If you are experiencing slow performance on a Windows Server, refer to the solutions listed below.
- Change performance power
- Quit unnecessary background tasks
- Use Performance Monitor
- Check hardware health
- Diagnose Network Latency
- Verify service/role configuration
- Clean temporary files and system cache
- Scan for malware
- Disable DOS 8.3 short filenames
- Check for missing patches and updates
Let’s get started with the troubleshooting guide.
1] Change performance power
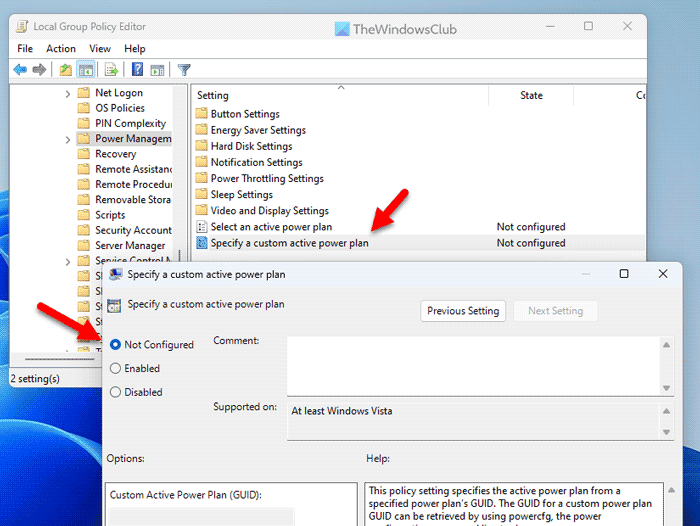
Switching the power plan to high performance prevents CPU throttling and ensures maximum processing power at all times. This tweak is particularly useful for CPU-intensive tasks and reduces lag in multi-threaded operations.
- Click Win + R to open the Run dialog box, type gpedit.msc, and hit OK to open Local Group Policy Editor.
- Navigate to the location mentioned below:
Computer Configuration > Administrative Templates >System > Power Management > Power Plan
- Double-click on ‘Select an active power plan’, set it to ‘Enabled’, and then choose ‘High Performance’ from the drop-down menu.
- Lastly, hit the Apply and OK buttons to save the changes.
- Execute the command mentioned below to immediately apply the new policies to the system.
gpudate / force
See if the server is still slow or not. If it is, see the next solution.
2] Quit unnecessary background tasks
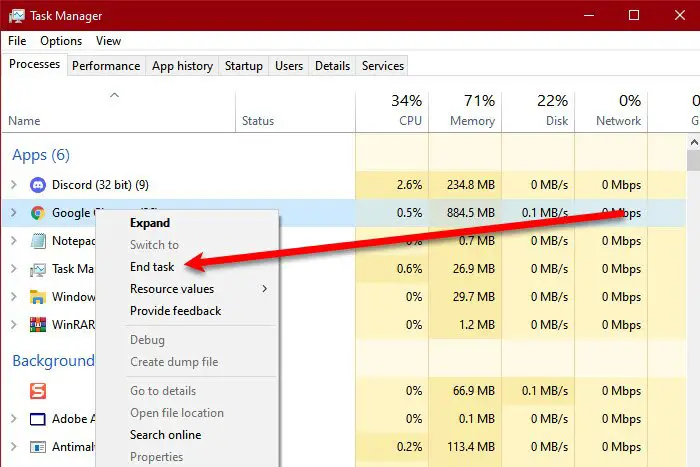
Unnecessary background tasks and non-essential tasks can consume significant system resources. Quitting them helps free up CPU and memory for critical operations. To do the same, click Ctrl + Shift + Esc to open Task Manager, and go to the Performance tab. Now, look for tasks that are consuming too much of resources, or tasks that are running in the background, or do not hold any importance, such as svchost.exe, System, or third-party apps. Once identified, right-click on non-critical processes and end them, and for critical Windows services, consider restarting them.
3] Use Performance Monitor
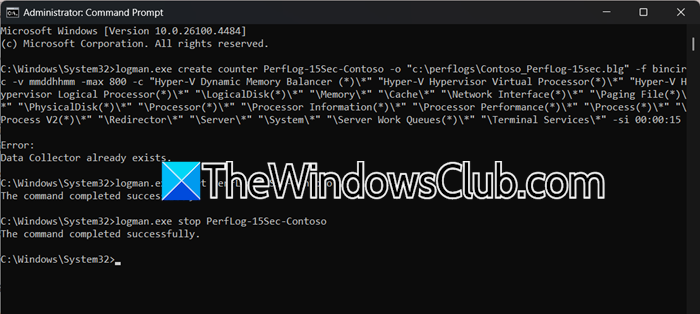
We can use the Performance Monitor to know what’s wrong with our Server. Every Windows OS has this feature, and you can try it too. First, open the Command Prompt and run the following command.
logman.exe create counter PerfLog-15Sec-Contoso -o "c:\perflogs\Contoso_PerfLog-15sec.blg" -f bincirc -v mmddhhmm -max 800 -c "Hyper-V Dynamic Memory Balancer (*)\*" "Hyper-V Hypervisor Virtual Processor(*)\*" "Hyper-V Hypervisor Logical Processor(*)\*" "\LogicalDisk(*)\*" "\Memory\*" "\Cache\*" "\Network Interface(*)\*" "\Paging File(*)\*" "\PhysicalDisk(*)\*" "\Processor(*)\*" "\Processor Information(*)\*" "\Processor Performance(*)\*" "\Process(*)\*" "\Process V2(*)\*" "\Redirector\*" "\Server\*" "\System\*" "\Server Work Queues(*)\*" "\Terminal Services\*" -si 00:00:15
Now, run the following command to start data collection.
logman.exe start PerfLog-15Sec-Contoso
Run the following command to stop data collection after some time.
ogman.exe stop PerfLog-15Sec-Contoso
Open the .blg file in Performance Monitor and identify bottlenecks using graphs (e.g., sustained 90%+ CPU, memory leaks, disk queue length >2, network saturation).
You need to analyze the .blg file for the following issues.
- Disk I/O issues: Disk Queue Length >2, slow read/write times
- Network saturation: Sustained 90%+ bandwidth usage
- Memory leaks or CPU spikes
If you see any error, make sure to take the necessary steps.
4] Check Hardware health
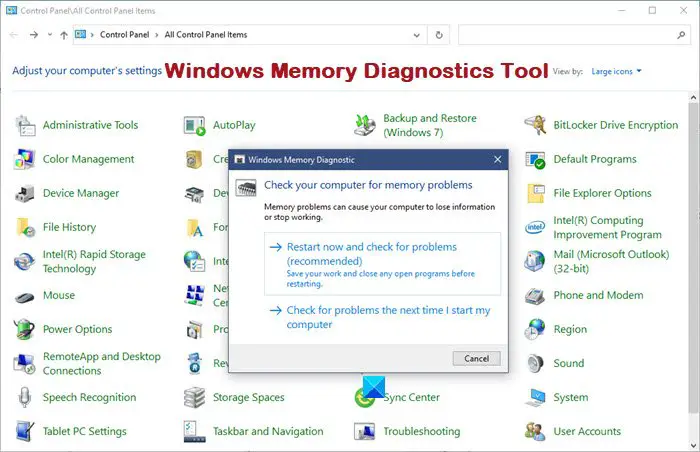
The problem could also lie in failing hardware. It’s crucial to test the RAM and storage health, as faulty memory or a dying disk can cause system instability, data corruption, and even boot failures. To do the same, follow the steps mentioned below.
- Search for Windows Memory Diagnostic Tool from the Start Menu.
- Click on Restart now and check for problems
- Once the device reboots, open the Run dialog box, type eventvwr.msc, and hit Enter to open Event Viewer.
- Navigate to the Windows Log tab, click on the System option, and look for MemoryDiagnostics-Results.
If you see No memory errors detected, then it means the RAM is healthy. However, if it showcases hardware problems detected, then it’s best to replace the faulty RAM. Once done, run System File Checker to ensure that any system file corruption caused by faulty RAM is detected and repaired. However, if you are still experiencing slow server performance, execute the next solution.
5] Diagnose network latency
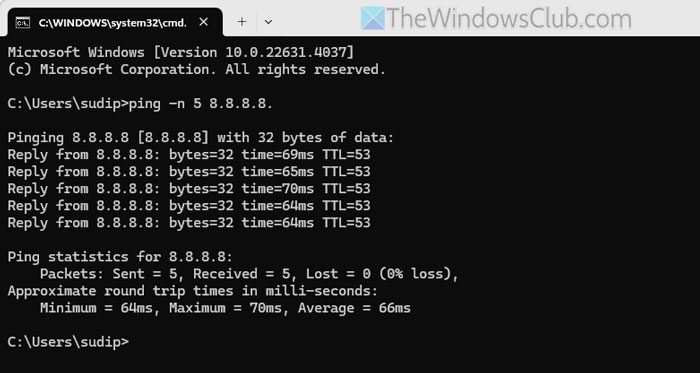
If you are encountering any network issues, such as slow remote access or applications, we need to try and diagnose network latency. To do so, we can use Ping and Traceroute Network tools in the CLI. So, open the Command Prompt and run the following command.
ping your_domain_controller or Domain IP or any_URL
tracert your_database_server or Domain IP or any_URL
You need to look for high response times (>100ms) or packet loss. Additionally, go to Resource Monitor (resmon.exe) > Network tab > check Total Bytes/sec per interface to know more.
6] Verify service/role configurations
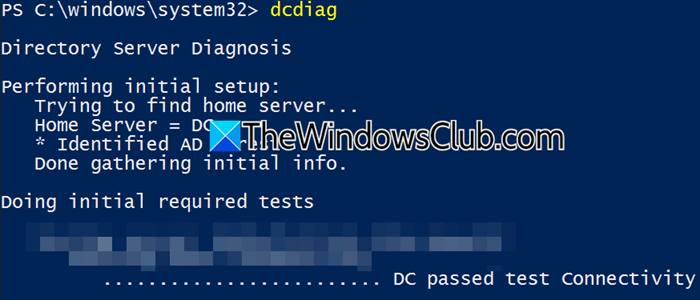
Misconfigured Windows Server roles or services are common hidden culprits behind slow performance. To resolve this issue, we need to go over a few things.
First, let’s check the Active Directory Health. For that, open PowerShell and run the following command.
dcdiag
or
dcdiag -v
You need to focus on the following checks.
- ReplicationTest
- DNS
- NetLogons
Usually, the ReplicationTest fails if one is dealing with a performance issue. To rectify it, you can run the following command.
repadmin /syncall /AdeP # Forces replication
Additionally, in IIS, check Application Pools > recycle overloaded workers.
Read: Active Directory Users and Computers not responding
7] Clean temporary files and system cache
One of the simplest ways to improve slow server performance is by clearing out unnecessary system junk and temporary files.
- Click Win + R to open the Run dialog box, type cleanmgr, and hit OK to open Disk Cleanup.
- Now, tick the boxes of Temporary Files, Windows Update Cleanup, Recycle Bin, and other items you want to delete, and click Ok.
- Lastly, select the Delete Files option to complete the process.
- Alternatively, click Win + R, type %temp%, and hit Ok to open the temporary files folder. Now, click Ctrl + A to select all the files, and select the Delete button to clear temporary files.
After deleting the files, check if the server’s performance improves. If not, continue with the next solution.
8] Scan for malware

Hidden malware is also one of the reasons why a server may start behaving abnormally. It can consume system resources, steal data, and even hijack files. In such cases, an offline malware scan should be the top priority. To ensure that malicious software is not running in the background, follow the steps below to scan and remove it.
- Hit Win + S, type “Windows Defender”, and hit OK to open Windows Security.
- Go to Virus and Threat protection, and select Scan Options.
- Select Microsoft Defender Antivirus (offline scan) from the options available to catch deep-rooted malware, and hit the Scan now option.
- Lastly, select Scan and Yes when prompted to start the scanning.
- Once the scan is done, navigate again to Virus and Threat Protection, click on Protection History, and if malware is found, select the Quarantined or Remove option. Reboot the PC if required.
After restarting the service, check if the performance is back to its usual level. Moreover, users can automate scans via Task Manager to prevent future infections. Go to the next solution if no malware was detected.
9] Disable DOS 8.3 short filenames

Windows, by default, creates a legacy-compatible 8.3 version of every file and folder name to support older apps. However, this process becomes redundant and resource-intensive. Disabling the feature reduces the slowdown of file creation, indexing, and access.
Click Win + X to open the Quick Link Menu, and select Terminal (Admin). Run the following command to check the current state.
fsutil behavior query disable8dot3
You need to analyze the output. If it’s 0, 8.3 names are enabled (default), but if it’s 1, 8.3 names are disabled. In my case, it was 2. Which means 8.3 name generation is enabled by default on new volumes, but can be configured individually per drive. To disable this, you can run the following command.
fsutil behavior set disable8dot3 1
Once done, restart the server to ensure that the changes take effect.
Read: How to deploy Feature Update on Windows Server.
10] Check for missing patches and updates
Finally, you need to confirm and check for missing patches, updates, or bad updates. Go to Settings > Windows Update > View update history, see what your latest update is, and if there is a known performance issue associated with it. Also, ensure that you install any available critical security or performance patches.
That’s it!
Read: Best Windows Server Tutorial and Tips
Windows Server slow performance after update
If Windows Server displays slow performance and sluggishness after installing an Update, you might want to consider uninstalling the recent Windows Update and then pausing Updates for a week or two till things settle down. The suggestions in this post will also help you address the issue generally.
How do you troubleshoot a server that is running slowly?
To troubleshoot a server that is running slowly, start by checking the CPU, memory, disk, and network usage through the Task Manager to identify and terminate resource-intensive tasks. Moreover, users can also disable DOS 8.3 short filenames, set the performance power to high, and restart critical services. To know more solutions, check out the article mentioned above.
Read: Configure CPU Scheduling for best performance in Windows 11
How do you troubleshoot slow performance?
To fix slow performance, reboot the device first and foremost. This is a classic move that is surprisingly effective in eradicating lingering glitches. If the issue persists, check the Task Manager for high-resource tasks, disable unnecessary startup apps, scan for malware, and free up storage.