In this post, we’ll explore some useful tips and tricks to help you make the most of the new Outlook app for Windows 11.

The new Outlook brings the latest features, a modern and simplified design, and AI-assisted capabilities that enhance and streamline your classic Outlook experience. We have already seen how to use the new Outlook app on Windows 11. This guide shares some tips and tricks to help you use it effectively, improving your email management and boosting productivity at work.
Outlook (new) app for Windows 11: Tips and Tricks
The new Outlook for Windows comes pre-installed on many Windows 11/10 PCs or can be enabled manually via the toggle in the classic Outlook app. Here are some tips and tricks for using New Outlook:
- Add and manage email accounts
- Organize the day with My Day
- Add an email signature
- Enable Focused Inbox
- Pin or snooze emails
- Enable automatic replies
- Use @mentions
- Categorize emails with colors
- Undo send and schedule send
- Improved search experience
- Attach files quickly
Let us see these in detail.
1] Add and manage email accounts

Outlook has long supported adding various types of email accounts (Exchange, IMAP, POP, Gmail, etc.). However, the New Outlook for Windows enhances this experience by offering a simplified and intuitive UI for account setup, expanded support for more account types (including Gmail, Yahoo, and iCloud), and the ability to switch between multiple accounts seamlessly within the same session, just like on the web.
When you launch the New Outlook for the first time, you’ll be prompted to add an account. You can add more accounts anytime by:
- Clicking the Settings (Gear icon) on the top right.
- Selecting Accounts > Your accounts.
- Clicking Add account and entering your credentials
2] Organize the day with My Day

My Day is a side panel in the New Outlook app that lets you view upcoming calendar events and to-do tasks, or quickly create events or tasks by dragging your emails into it. This feature is designed to help you stay organized without needing to switch views or apps. It appears when you click the My Day icon (a calendar with a tick mark) in the top-right corner of the Outlook window or go to View > My Day in the menu.
You can drag an email to the My Day panel to add it as a task or an event. When you drag it to the event section, a new calendar window opens where you can enter details, invite people, and save the event. If you drag the email to the task section, it quickly creates a Microsoft To Do task for you.
3] Add an email signature

The New Outlook offers a modern, web-style signature editor that supports multiple signatures, rich formatting, image/logo insertion, and automatic syncing across devices, making email personalization easier than ever.

To add or manage your email signature in the New Outlook for Windows, click the Settings in the top right corner. In the Settings pane, select Accounts > Signatures. Type and format your signature in the Email signature section. You can add text, images, links, etc., and choose whether to automatically include your signature in new messages or replies/forwards. When you’re done, click Save.
4] Enable Focused Inbox

Focused Inbox in the New Outlook intelligently separates high-priority emails from the rest, helping you stay focused and productive. It uses Microsoft’s AI to analyze your email habits and puts emails that are likely more relevant under the Focused tab.
Focused Inbox is usually enabled by default if you’re using a Microsoft account or Exchange. But if you don’t see the Focused/Other tabs in your inbox, you can turn them on via Settings > Mail > Focused Inbox.
If you find an important email in Other, right-click it and choose Move to Focused inbox.
5] Pin or snooze emails

The New Outlook lets you pin important emails to the top of your inbox so you can easily find them later. Just right-click an email and choose Pin, or use the Pin icon in the message list.
You can also snooze emails to temporarily remove them from your inbox and have them return at a time you choose. This helps keep your inbox focused on what matters now. To snooze, right-click the email and select Snooze, then pick a time.
6] Enable automatic replies

The New Outlook allows you to set automatic replies for when you’re away or unavailable. This feature is especially useful for vacations, holidays, or work absences.
To enable automatic replies, go to Settings > Accounts > Automatic replies, then toggle the feature On. You can customize the message, set a start and end time, and choose whether replies should go to just your contacts or everyone who emails you.
7] Use @mentions

The @mentions feature helps you quickly grab someone’s attention in an email message. It is useful in team communications where multiple people are involved.
To use it, type ‘@‘ followed by the person’s name (e.g., @John) when you’re typing an email. Outlook will suggest contacts from your address book, and when you select one, it will highlight their name in the email body and automatically add them to the To or Cc field if they aren’t already included.
8] Categorize emails with colors

The New Outlook lets you categorize emails using color-coded labels. These categories help you quickly identify and group related messages, making email management faster and more efficient.
9] Undo send and schedule send

The New Outlook gives you a few seconds to cancel a message after hitting “Send”. Known as Undo send, this feature lets you quickly recall a message if you notice a typo, forgot an attachment, or change your mind. You can adjust the delay period (up to 10 seconds) in Settings > Mail > Compose and reply > Undo send.
With Schedule Send, you can schedule a message to be sent at a later time. Click the arrow next to the Send button, select Schedule Send, then choose the date and time for delivery.
10] Improved search experience

The New Outlook offers a significantly improved search experience with faster, more accurate results. It uses AI-powered algorithms to understand your query better. You can also use advanced filters and natural language queries like “emails from last week” or “attachments from John” to find what you need.
After performing a search, you’ll see filter options at the top of the results pane. You can filter by From, To, Subject, Has attachments, Date, and more. This helps quickly narrow down what you’re looking for.
11] Attach files quickly
When composing an email, you can click the paperclip icon to quickly attach recent files from your computer, OneDrive, or other connected cloud storage services.
You can also drag and drop files directly into the message body.
If you have a Microsoft 365 Copilot subscription, you may see in-line file name suggestions when you type a forward slash ( / ) in the message body.
I hope you find this useful.
How to make a new Outlook look better?
To make the New Outlook for Windows look better, you may switch to Dark Mode or change the theme. Go to Settings > General > Appearance. Choose from Light, Dark, or Use system setting. You can also pick an accent color or use custom themes to change how Outlook looks.
What are the new features in Outlook?
The New Outlook introduces a modern design and several productivity enhancements. It supports multiple email accounts and offers features like Focused Inbox, My Day, and improved search capabilities.
Read: New Outlook app not sending or receiving emails.
Tips & tricks for using Windows Mail App
In this section, we will learn about the earlier Mail app of Windows 11/10 and check the customization options along with some tips and tricks.
- Create a new Account in Windows Mail App
- Add Account in Windows Mail App
- Calendar in the Mail app
- Customize Background Picture in Windows Mail App
- Backup email using Mail app
- dd Signature in Mail App
- Set Automatic Replies
- Other tricks.
1] Create a new Account in Windows Mail App
If you are logged into your PC with your Microsoft Account, it will automatically get linked to the Mail app as well as the built-in Calendar app. If you are logged in with your local account, you first need to set up the email account in the Mail app.
Click on the Windows icon on the PC and click on the Mail App live tile. Follow the instructions to link your email account to the app.
2] Add Account in Windows Mail App
The Mail app is not just about the Outlook account; you can add any of your email accounts and get it handy. Just click on Settings Icon in the lower-left corner and select Add Account, follow the steps, and you can create any of your email accounts to the app.

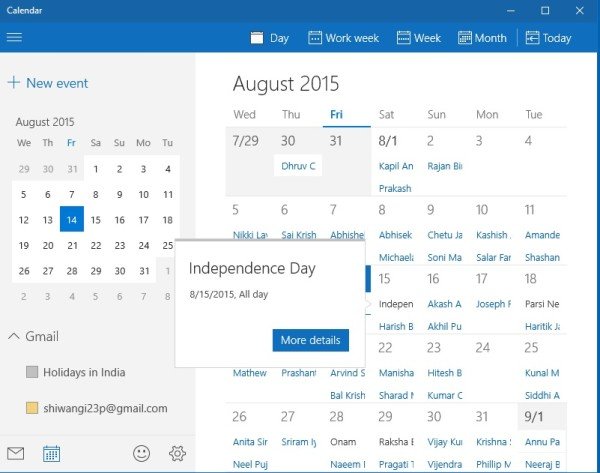
3] Calendar in the Mail app
The new Mail app comes with a built-in Calendar, which indeed plays an important role in the productivity of the app. Type Mail in the search bar and open the Mail app and click on the Calendar icon in the lower-left corner of the app.
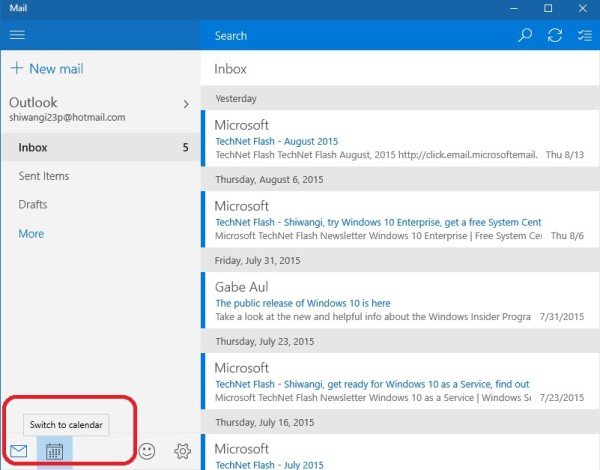
The Calendar comes with a very detailed interface with the birthdays of all your email contacts, holidays list, event lists, and more. You can adjust the Calendar view in Days, Weeks, or Months. The Calendar also lets you create a new event and keep a reminder too.
4] Customize Background Picture in Windows Mail App
You can customize the background picture with just a few clicks. Go to Settings and click on Background Picture. Browse and select any picture stored on your PC.

5] Backup email using Mail app
You can save or backup email messages as follows. Open the email and then click on the 3-dotted Actions menu in the top right corner and click on the Save as the link.
6] Add Signature in Mail App of Windows 10
You can now send personalized emails from the Mail app in Windows 10. Adding a signature is the only way to personalize the emails, and the Mail app here has an option for the same. Go to Settings and click on Options. Scroll down to get the Signature tab. Turn it ON and add the signature initials you want to show at the end of every email you send.

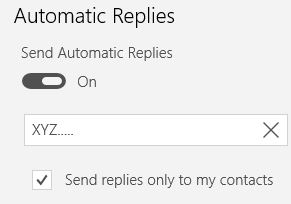
7] Set Automatic Replies in Mail app of Windows 10
Right below the Signature tab in the Options, you can see the Automatic Replies tab where you can turn the option On or Off. You can also add a message you want to send with every automatic reply. Do check the box below if you want to send those automatic reply messages only to your contacts.
The new Windows Mail Desktop App is a much need clean and simple app that helps you connect more email accounts than just Outlook. If you like the app, do not forget to leave your feedback at Microsoft.
Click on the Smiley near the Settings icon, and it will open up a Windows Feedback tab where you can leave your feedback for any of the Windows 10 apps.
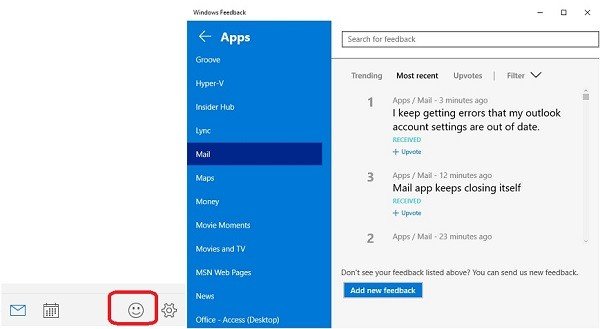
Select the Mail App from the left pane, and you will get a window that shows the trending, most recent, and upvoted feedback left by the users. Click on Add a new feedback and leave your feedback about the Mail Desktop App.
8] Other tricks

- You can drag and drop attachments and also attach emails as attachments.
- You can control how frequently email should be synced. Click Settings > Manage accounts > Select the email account > Click Options for syncing your content and make the changes here.
- Enable or disable the use of Focused Inbox via Settings > Focused inbox.
- Use @mentions to tag a contact in an email conversation.
- Enable or disable Caret browsing via Settings > Reading pane.
- You can link email accounts together. You will see it at Settings > Manage accounts > Link inboxes.
I hope you find the post useful.