Your virtual machine suddenly shows as Inaccessible with a Document is empty error, and you can’t start it. This usually means VirtualBox can’t read the essential configuration file for that VM. The good news is that you can often recover it without losing your data. In this post, we will see what you can do if the VirtualBox VM is Inaccessible.

VirtualBox VM Inaccessible error on Windows 11
This error occurs because the VM’s primary configuration file (the .vbox file) has become empty or corrupted, or because VirtualBox’s global registry (VirtualBox.xml) is damaged. Common triggers include an unexpected system crash, improper shutdown of the VM, disk errors, or permission changes after a Windows update. Sometimes, Windows 11’s Hyper‑V or other virtualization features conflict with VirtualBox, causing VirtualBox to lose access to the configuration. In all cases, the VM itself (the virtual hard disk) is usually still intact; you just need to point VirtualBox back to it.
If the VirtualBox VM is inaccessible, follow the solutions mentioned below.
- Re-register the existing VM
- Restore the .vbox file from its backup
- Repair or reset the global VirtualBox.xml file
- Restore the VM folder to its original location
Let us talk about them in detail.
1] Re‑register the existing VM
We are not going to fix any files; it simply helps VirtualBox locate the VM’s .vbox file again. It resolves issues when the global registry is missing, but the individual VM settings are still intact. To do the same, follow the steps mentioned below.
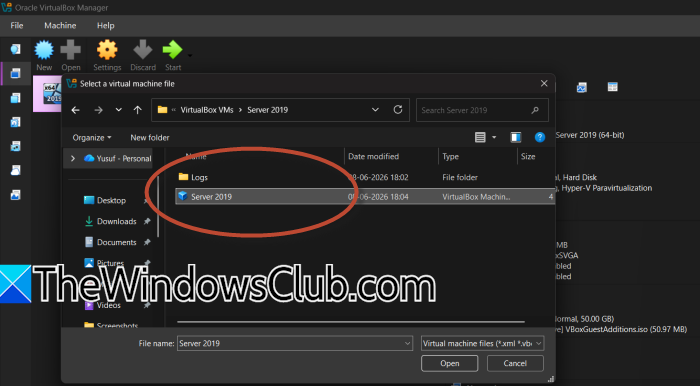
- Open the Oracle VM VirtualBox Manager.
- Click on the Machine menu and choose Open.
- In the file dialog, navigate to your VMs folder (usually C:\Users\YourUsername\VirtualBox VMs\).
- Open the folder for your VM (e.g., Windows 11).
- Select the .vbox file (e.g., Windows 11.vbox) and click Open.
The VM should reappear with a normal status.
2] Restore the .vbox file from its backup
VirtualBox automatically keeps a backup copy of the .vbox file with a .vbox-prev extension. If the main file is empty or corrupt, renaming the backup to replace it often recovers the VM settings. To restore the .vbox file from its backup, follow the steps mentioned below.
- Close VirtualBox completely.
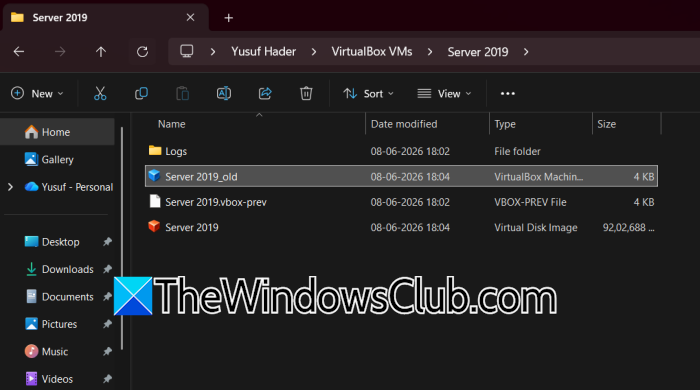
- Go to your VM’s folder (e.g., C:\Users\yusuf\VirtualBox VMs\Server 2019\).
- Locate the main configuration file, e.g., Server 2019.vbox, and rename it to Server 2019_old.vbox (or any other name).
- Find the backup file named Server 2019.vbox-prev.
- Copy this backup file and rename the copy to Server 2019.vbox (remove the -prev suffix).
Reopen VirtualBox and check if the VM is now accessible.
3] Repair or reset the global VirtualBox.xml file
If all your VMs show as inaccessible, or if VirtualBox itself fails to open with a Document is empty error, the global configuration file is likely broken. Renaming it forces VirtualBox to create a fresh one, and you can then re‑register your VMs manually. You need to follow the steps mentioned below to do the same.
- Shut down VirtualBox entirely (check Task Manager for any VirtualBox.exe processes).
- Open File Explorer and go to C:\Users\YourUsername\.VirtualBox\.
- Rename the file VirtualBox.xml to VirtualBox.OLD.
- If a file named VirtualBox.xml-prev exists, rename it to VirtualBox-prev.OLD as well.
- Launch VirtualBox again. It will create a new VirtualBox.xml (your VM list will be empty).
Use Solution 1 above to re‑add each VM by browsing to its .vbox file. Finally, check if your issue is resolved.
4] Restore the VM folder to its original location
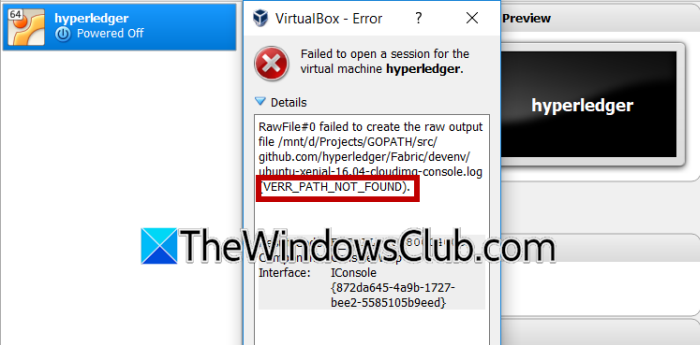
The VERR_PATH_NOT_FOUND error occurs when VirtualBox loses track of your VM’s folder because it was moved, renamed, or copied to a different location, causing it to search for a path that no longer exists. You will usually see a red icon next to the VM name in the Manager. To fix this, follow the steps mentioned below.
- Open Oracle VM VirtualBox Manager and hover over the inaccessible VM to see the exact folder path VirtualBox is expecting (e.g., D:\VirtualBox VMs\Windows 11).
- Open File Explorer and search your drives, Desktop, Downloads folder, or any external storage to find the current location of your VM folder containing the .vbox file.
- Once located, move or cut the entire VM folder and paste it back to the exact path shown in the error message, making sure the folder name also matches.
- If the folder was renamed, right‐click it and select Rename to restore it to its original name (e.g., Windows 11).
Finally, check if the issue persists.
Hopefully, with these solutions, your issue will be resolved.
Read: Could not open guest session: VERR_NOT_FOUND VirtualBox error
How to fix inaccessible virtual machines in VMware ESXi?
To fix inaccessible VMs in VMware ESXi, start by removing the VM from inventory without deleting its files, as the issue often stems from stale registration metadata after an upgrade rollback. Then, create a new VM with identical settings and attach the original virtual disk (.vmdk) file from the datastore. This rebuilds the VM shell while preserving your data. If the datastore itself is inaccessible due to LUN issues, restoring from backup may be necessary.
Read: VirtualBox unable to insert the virtual optical disk
How to fix error 0x80004005 in VirtualBox?
The 0x80004005 error in VirtualBox typically arises from conflicts with Microsoft’s Hyper-V or corrupted configuration files. To resolve it, disable Hyper‑V via Windows Features and run bcdedit /set hypervisorlaunchtype off in an admin command prompt, then reboot. Also, ensure VirtualBox is updated to the latest version, and try renaming the VM’s .xml-prev backup file to restore a working configuration.
Also Read: VirtualBox Aborted: The VM session was aborted on Windows PC.