You are not alone if you opened Oracle VirtualBox and found the Virtual Media Manager missing from the File menu. This problem often appears after an update or when the sidebar is collapsed. Fortunately, it’s not a big issue and can be easily resolved. In this article, we will explore all the solutions to restore full access to virtual disks and ISO images.

Virtual Media Manager not showing in VirtualBox
If you find that the Virtual Media Manager is missing when working with Oracle VM VirtualBox, execute the solutions mentioned below.
- Check the new location
- Expand the hidden sidebar or Tools panel
- Open the full VirtualBox Manager instead of only a VM window
- Use the keyboard shortcut directly
- Reset the VirtualBox GUI layout
- Access media management directly from VM settings
- Update or reinstall VirtualBox properly
Let’s get started with the troubleshooting guide.
1] Check the new location
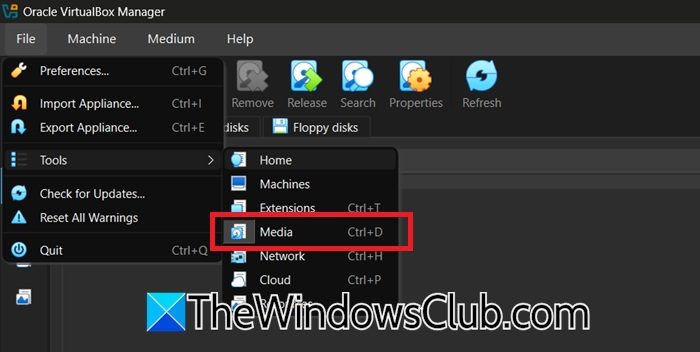
VirtualBox 7 .x moved the Virtual Media Manager from the File menu to a new Tools section on the left sidebar. If you are missing the feature, it might be because you are looking in the wrong direction. Many users overlook this change and assume the feature is missing. To access it, navigate to the correct location to instantly restore full media management without any repair. For that, open Oracle VM VirtualBox Manager, go to the left sidebar, and click on Tools. There, click on the Media option, and the Virtual Media Manager will open up as a separate window. If this doesn’t reveal the Media Manager, we need to switch to Expert Mode.
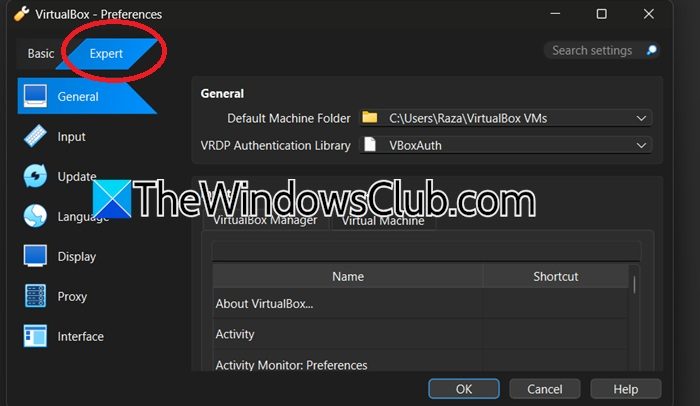
Follow the steps mentioned below to do the same.
- In the VirtualBox window, go to File > Preferences.
- Go to the Expert tab and click OK.
- Now, click on File > Tools > Media.
If you see the Media option there, your issue is resolved, as that is the Media Manager we were looking for.
2] Expand the hidden sidebar or Tools panel
Sometimes the VirtualBox Manager window remembers a previous state where the left sidebar was dragged to zero width, and therefore hides the Tools and Media entries. To bring the hidden panel back into view and restore access to the Media Manager, we need to expand that divider.
- First and foremost, ensure that VirtualBox Manager is open and not maximized, and then move your mouse cursor to the far-left edge of the VirtualBox window.
- Look for a thin vertical draggable driver and click it.
- Drag the divider to the right until the sidebar appears and the Tools, Machines, Media, etc. options are visible.
If it is still missing, go to the next solution.
3] Open the full VirtualBox Manager instead of only a VM window
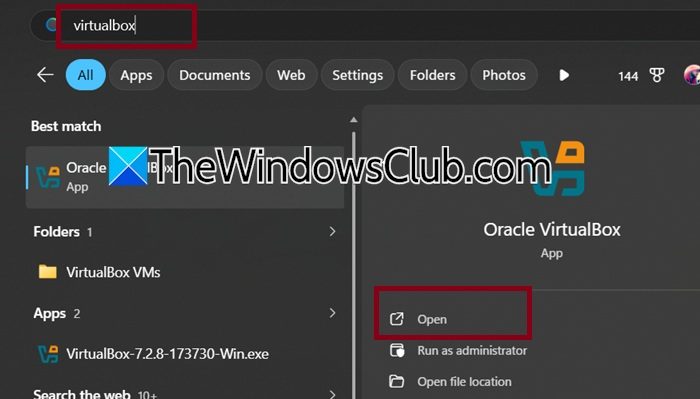
If you are launching a virtual machine from a desktop shortcut or via a .vbox file, only the VM’s console window opens, not the full VirtualBox Manager. The Media Manager option is completely unreachable without the manager; therefore, it is recommended to open the Manager separately to re-expose the entire interface. Close all running virtual machines, press Win + S, then type “VirtualBox”. Now, select Oracle VM VirtualBox Manager, or double-click the VirtualBox desktop icon, or find it in the start menu. Once the full Manager window appears, check the left sidebar for Tools > Media. Proceed to the next solution if the Media Manager still doesn’t appear.

4] Use the keyboard shortcut directly
VirtualBox has a built-in global shortcut that launches the Virtual Media Manager regardless of the menu’s visibility or the sidebar’s state. This shortcut key bypasses any misconfiguration, so open the Oracle VM VirtualBox Manager, and then press Ctrl + D keys. The Virtual Media Manager dialogue should appear immediately. If it opens, users can manage all disks and ISOs from there. However, if Ctrl + D does nothing, the issue might be due to a deeper profile issue.
5] Reset the VirtualBox GUI layout
VirtualBox stores its window layout, menu visibility, and toolbar settings in a file named VirtualBox.xml inside the user profile. If this file is corrupted, which often happens after an update or a crash, the Media Manager can become hidden. In such a situation, deleting or renaming the file pushes VirtualBox to generate a fresh default layout, which restores all missing entries.
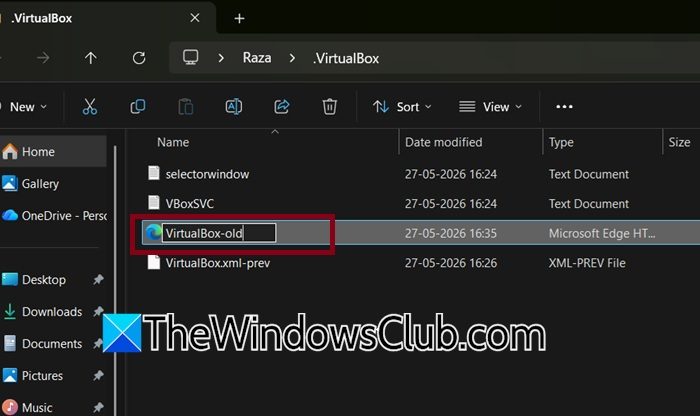
- Close all VirtualBox windows, and press Win + R to open the Run dialogue box.
- Type %HOMEPATH%\.VirtualBox and press Enter to open the default folder directory where VirtualBox stores its configuration settings, logs, and global XML files.
- Locate the VirtualBox.xml file, and rename it to VirtualBox-old.xlm, or delete it if you prefer it that way.
- Once done, relaunch Oracle VM VirtualBox Manager, and a new VirtualBox.xml will be created with default settings.
Check the File menu or Tools > Media, and ensure that the Manager is visible. See the next solution in case the issue persists.
6] Access media management directly from VM settings
If the standalone Virtual Media Manager does not appear, users can perform all essential media tasks, such as attaching, detaching, removing or creating disks, through an individual virtual machine’s Storage settings. This bypasses the missing Manager entirely and gives users full control. To do the same, select any virtual machine in the VirtualBox Manager and click Settings. Go to the Storage tab, and under the Storage Devices tree, click the empty disk icon next to the controller and select the Choose a disk file option to add an ISO. To remove a disk, select it and click the minus icon, whereas to attach an existing VDI/VMDK, click the Add Hard Disk icon and select Add. Lastly, click Ok to save the changes.
7] Update or reinstall VirtualBox properly
The Virtual Media Manager can be partially missing or non-functional due to incomplete upgrades between major versions or corrupted installation files. A clean reinstallation removes old UI components, restores registry entries and ensures that the correct version-matched layout files are in place to bring back the missing manager. Users can download the latest VirtualBox installer from the official website. But first, uninstall the current VirtualBox version by going to Settings, then clicking on the Apps tab, searching for VirtualBox, and then selecting the Uninstall button. Now, install the latest version, reboot the device, and then right-click the downloaded installer. Select the Run as administrator option, and follow the installation wizard. After installation completes, launch VirtualBox Manager as administrator, and hopefully the Media option will be present in the Tools tab.
That’s it!
Read: Download VirtualBox and get into the world of Virtualization
How do I get the Virtual Media Manager in VirtualBox?
In the recent VirtualBox version, the Virtual Media Manager has been moved from the File menu to Tools > Media. It is a change that often confuses users. However, if you still don’t see it, the sidebar may be collapsed, or the GUI layout may be corrupted. For more details, check out the article mentioned above.
Read: VirtualBox not signed with build certificate
How to enable TPM on VirtualBox?
To enable TPM on VirtualBox, right-click the VM and select Settings. Then, click Systems, Processor Tab, and set TPM to 2.0. Next, go to the Motherboard tab, and enable Enable EFI and Enable Secure Boot options for Windows 11 compatibility. This ensures that the VM meets the requirements for the latest Windows version.
Also Read: VirtualBox VM is not opening or starting in Windows 11.