We encountered an issue where, after the Windows 11 upgrade, the VHD created on the computer’s hard disk was removed or disappeared, including all its contents. In this post, we are going to talk about this issue, see why this is happening, and what you can do if the VHD is removed after a Windows 11 upgrade.
Why was my VHD removed after Windows 11 upgrade?
After upgrading to Windows 11, VHD files may disappear due to accidental overwriting during installation or migration to Windows.old folder, changes in disk management, file system corruption, or disruptions in Hyper-V and WSL integration.
Fix VHD removed after Windows 11 upgrade
A Virtual Hard Disk (VHD) disappearing after a Windows 11 upgrade is a problem that typically occurs due to accidental overwriting during installation, system file relocation, or configuration changes. This issue often arises when users attempt to install Windows 11 onto a VHD but mistakenly overwrite their primary drive, or when system updates relocate files without user awareness. To resolve this issue, you need to follow the solutions mentioned below.
- Check the Windows.old folder
- Reattach VHD via Disk Management
- Bypassing Compatibility checks
- Roll Back Windows within 10 days
Let us talk about them in detail.
1] Check the Windows.old folder
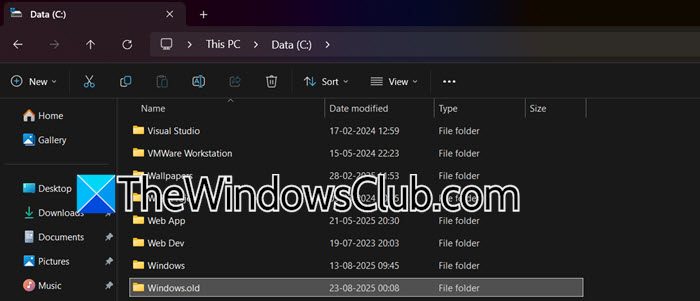
When you perform an in-place upgrade of Windows, for example, from Windows 10 to Windows 11, the installer doesn’t simply delete everything on your drive. To ensure you don’t lose data, it has a built-in safety mechanism. It takes your entire existing operating system, along with all the files in key system folders, and moves them into a new folder named Windows.old, present in your C: drive.
If your Virtual Hard Disk (.vhd or .vhdx file) was stored in a location that the installer considers a system location, most commonly within the C:\ProgramData directory or its subfolders, it gets caught up in this relocation process and is moved to C:\Windows.old\ProgramData.
You need to go to C:\Windows.old.old. Look for directories like Program Files, Windows, Users, and ProgramData. You need to look for .vhd files and then extract them from their original location to any other folder of your choice.
2] Reattach VHD via Disk Management

This solution is for when your VHD file still exists on your hard drive but is no longer visible in File Explorer because the Windows 11 upgrade detached it. The key distinction is that the file is not deleted; it’s just no longer mounted or connected to your operating system. If that is your case, then follow the steps mentioned below.
- Hit Win + X and click on Disk Management.
- Now, go to Action > Attach VHD…
- Now, navigate to the folder where you originally saved your VHD file (e.g., C:\VHDs, D:\VirtualMachines, etc.)
- Leave the option defaults, and Disk Management will now mount in the VHD.
Once the new disk appears as Unknown or Offline with unallocated space in Disk Management, right-click on its label (e.g., “Disk #”) to bring it Online; then, if no drive letter is assigned automatically, right-click the volume to assign one via “Change Drive Letter and Paths…”, after which your VHD will become immediately accessible in File Explorer.

3] Bypassing Compatibility Checks
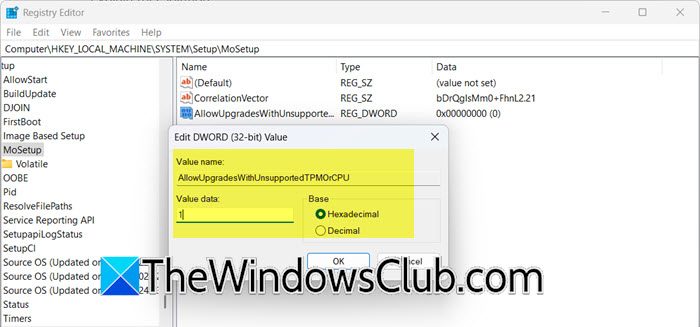
In this solution, we are going to bypass compatibility checks by making certain adjustments to the registry. The Windows 11 installer enforces strict hardware requirements, blocking installation on unsupported PCs. However, these requirements are artificially enforced for a VHD installation, as the process does not affect your main operating system.
To bypass this blocker, users often try risky workarounds like modifying the installation media, which can mistakenly overwrite the main OS drive. The registry edit is a safer, more reliable method that allows the installation to proceed and correctly target the VHD file; however, before that, you need to take a registry backup. Then, go to the following location in the Registry Editor.
Computer\HKEY_LOCAL_MACHINE\SYSTEM\Setup\MoSetup
Create a DWORD named AllowUpgradesWithUnsupportedTPMOrCPU and set its value to 1.
4] Roll Back Windows within 10 Days
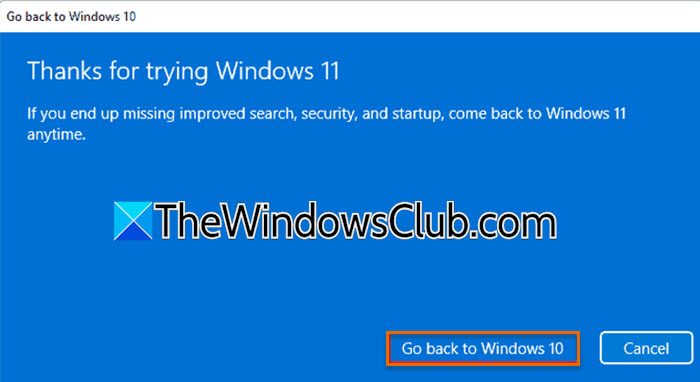
To make the undo button work, Windows keeps a backup of your old Windows 10 system in the Windows.old folder. To free up space, it automatically deletes this folder after 10 days. Once that folder is gone, the Go back option disappears from your settings, and you can no longer use this simple fix. You need to go to Settings > System > Recovery. Now, select Go back to Windows 10 and follow the prompts.
Hopefully, with the help of these solutions, your issue will be resolved.
Read: How to create a Virtual Hard Disk on Windows 11
Does anything get deleted when upgrading to Windows 11?
When you upgrade to Windows 11, your personal files are kept safe, but some apps might be removed if they aren’t compatible. The upgrade also saves a copy of your old Windows system in a temporary folder that is automatically deleted after 10 days. So, while your photos, documents, and other files remain, you may need to reinstall some applications afterward.
Read: How to Mount VHD or VHDX (Virtual Hard Disk) File in Windows
What is VHD in Windows 11?
A VHD (Virtual Hard Disk) in Windows 11 is a single file that acts like a complete hard drive. Think of it as a container file that can hold an entire operating system, along with all its programs and files, all stored inside one file on your actual physical hard drive. Windows 11 can treat this single VHD file as if it were a separate, real disk, allowing you to run another instance of Windows or Linux from it without needing to reformat your main drive or set up a complex virtual machine program.
Also Read: Create a virtual hard drive (VHD) with ImDisk Toolkit.