In this post, you will learn how to change the User Profile Name and the User Folder Name of your account or another user’s account in Windows 11 or Windows 10 using NETPLWIZ and REGEDIT.
Changing a user account name in Windows 7 wasn’t a big deal, and most users were able to do it easily. In Windows 7 you could use the Change your account name setting on the left side of the User Accounts applet in Control Panel.
However, in the case of Windows 11/10, people are facing a challenge as it is not so simple to change their user account name. This is because when you install Windows 11/10, you can provide the name of the user account. But after doing so, there is not even a single option in Settings to change the name you provided earlier. In this article, I’ll tell you how to change the user account name of your account, as well as another user’s account.
Change the User Account name in Windows 11/10 using NETPLWIZ
Before you proceed, please create a system restore point so that if things don’t work as you want them to, you can restore your computer.
Windows 11/10 users may want to back up all their data and read the comments below before proceeding with the changes.
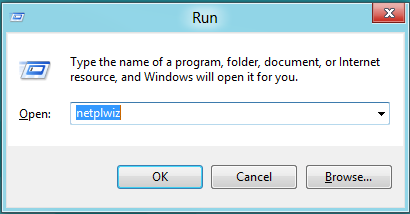
1. Press Windows Key + R combination and then type netplwiz in the Run dialog box. Click OK. If prompted by UAC, click Yes.
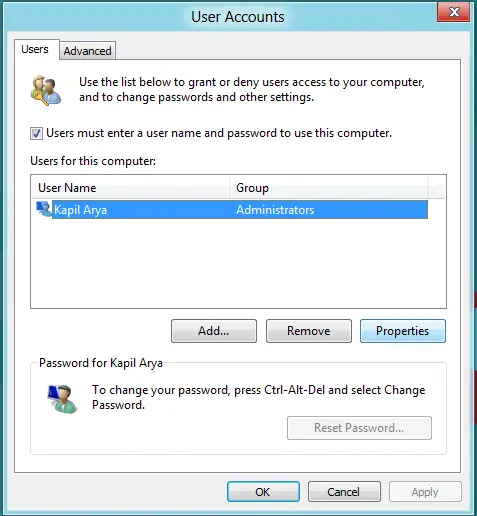
2. Now in the User Accounts window, check Users must enter a user name and password to enter this computer, if it is unchecked. In the User Name section, select the user name to which you want to change the name and click Properties.
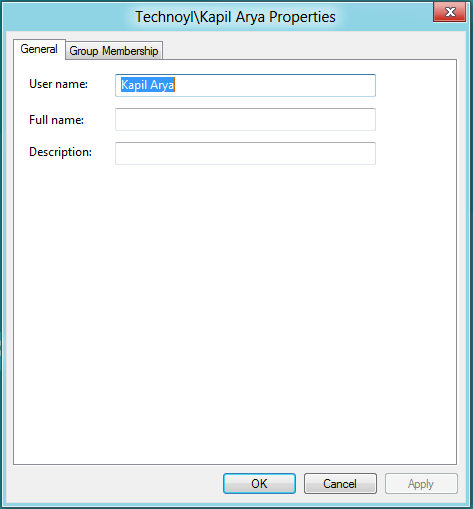
3. In the Properties window, in the User name field, provide the desired user name. Then click Apply followed by OK.
You will be successful in changing the user name. Reboot to see the change.

Change User Folder name in Windows 11 using Registry
Even after you change the username using this NETPLWIZ method, your personal folder will continue to display the old username. You may let it remain as it is or you may rename the user folder.
I repeat, create a system restore point first. Then open Registry Editor and navigate to the following key:
HKEY_LOCAL_MACHINE\SOFTWARE\Microsoft\Windows NT\CurrentVersion\ProfileList

You will find several folders here like S-1-5-. Search through them till you find a ProfileImagePath pointing to your old username.
Double-click on it and replace your old username with your new username.
Restart your computer to see the change.
TIP: To quickly locate the SID of your profile, you may open an elevated command prompt, copy-paste wmic useraccount get name,SID and hit Enter. Note down the SID against your name and use it to locate your folder in the Registry.
Create a Symlimk from old to new User folder
Finally, you will have to link the old user folder with the newer one. Open Command Prompt as administrator and execute the following command, replace OldUserName and NewUserName with the actual names you have used:
mklink /d "C:\Users\OldUserName" "C:\Users\NewUserName"
All the best.
If things do not go as expected, you should restore your computer to the created system restore point right away.
TIP: This post will show you how to change your Microsoft Account User Name by visiting the Microsoft Dashboard.
Rename User Folder by creating a New User Account
To rename the User Folder, you have another way, and that is by creating a New User Account.
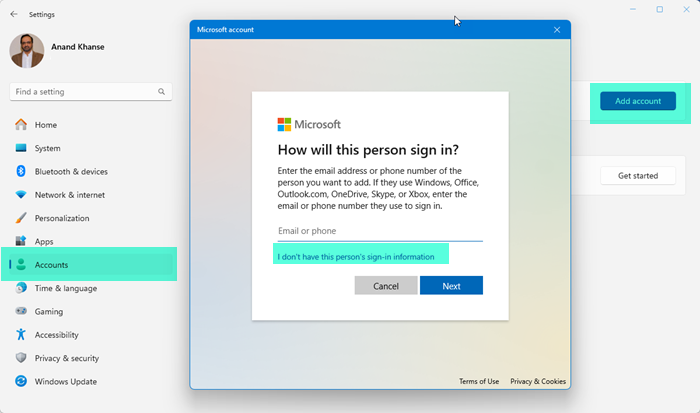
So open Windows Settings > Accounts > Family and click on the Add account button. Create a new user account by clicking on “I don’t have this person’s sign-in details” with the desired name. Once this is done, change its Account type to Administrator.
Restart your PC and then you may move your data from your old user folder to the new one and then finally delete the data from the old user folder name.
For Older versions of Windows 11 and Windows 10
Change User Account name using Control Panel
In earlier versions of Windows 11 and Windows 10, you could use the Control Panel.
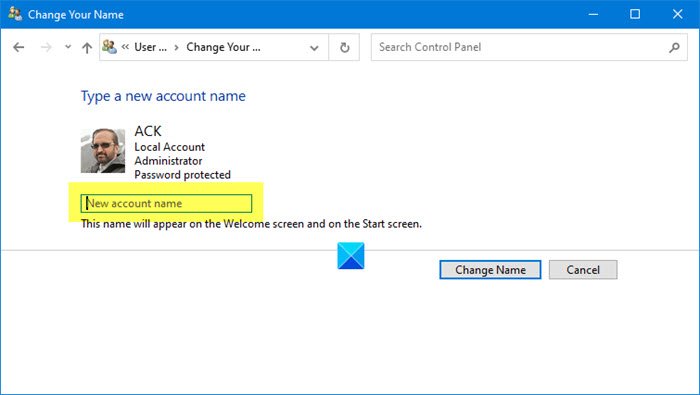
- Open Control Panel
- Select All Control Panel Items
- Click on User Accounts
- Click Change your User account
- Enter the new username in the box provided
- Click Change name and you are all set!
Change the User Account name of another User Account
To change the User Account name of another user account in earlier versions of Windows 11and Windows 10:
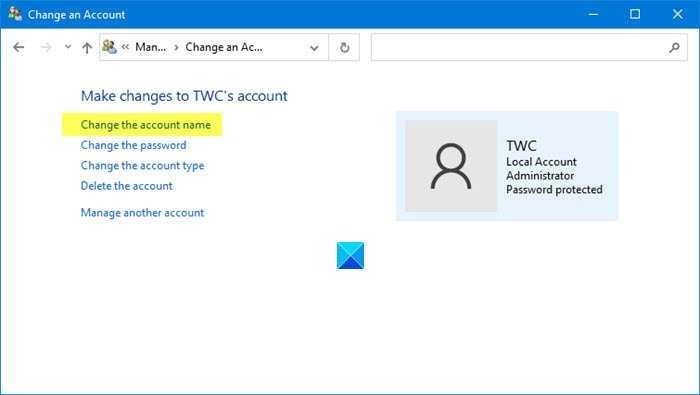
- Open Control Panel
- Select All Control Panel Items
- Click on User Accounts
- Click Manage another account
- Click on the account User image
- Select Change an Account
- Here click on Change the account name link.
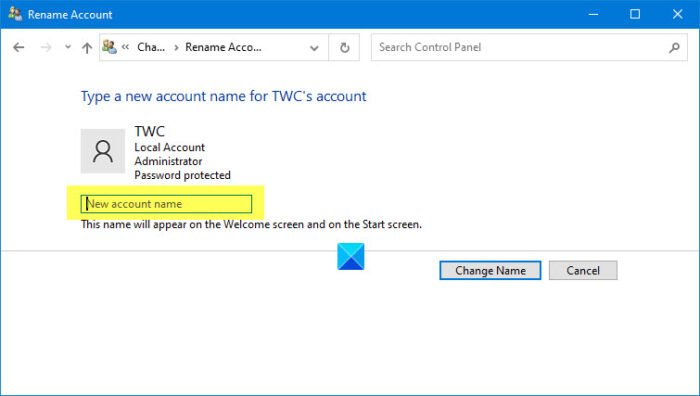
In the next window, you will be able to change the User Account Name.
How do I change my account name on Windows 11?
To change your account name on Windows 11/10, you need to open the Control Panel, go to All Control Panel Items > User Accounts > Change your User account, and enter the new user account name. At last, you might have to restart your computer to get the job done.
How to change Administrator name on Windows 11?
To change the administrator name in Windows 11/10, do the following if you are using a Microsoft account:
- Open Computer Management
- Select the arrow next to Local Users and Groups to expand it
- Select Users
- Right-click Administrator and select Rename.
- Type the desired new name.
Choose a different user name, It can’t be the same as the PC name
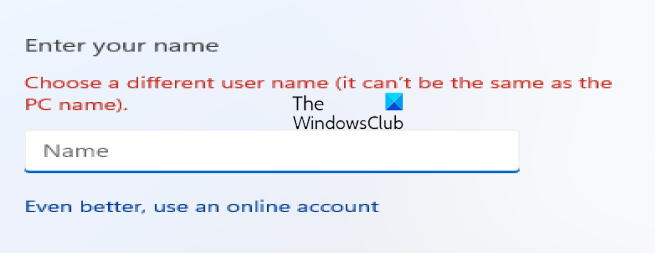
If you see the message – Choose a different user name, It can’t be the same as the PC name, then. Yes, you can use the same username as your PC name. You need to Choose a different user name.
How do I change my user folder name in Windows 11?
You need to use the Registry Editor to change the c /users/username user folder name in Windows 11/10. Open ProfileList in the HKLM, and double-click on the ProfileImagePath. After that, enter the new user folder path in the box and click the OK button. At last, restart your computer.
NOTE: Read the comment below by Grof Gergely.