
Some users have reported issues with USB headsets, particularly USB Type-C headsets, in Windows 11. Common symptoms include unresponsive volume controls, the volume remaining at 0, or audio working only through an HDMI-connected device.
In some cases, the USB headset repeatedly connects and disconnects, and Device Manager displays the following error:
USB Device not recognized: The last USB device you connected to this computer malfunctioned, and Windows does not recognize it.
In this guide, we will walk you through troubleshooting steps to fix a USB headset that is not working in Windows 11.
Why is my PC not recognizing my USB headset?
Your PC may not recognize a USB headset if Windows cannot establish a proper connection with the device. The issue may be related to the USB connection or the software responsible for detecting and managing the headset. Common causes include:
- A faulty USB port or loose connection.
- A corrupted or incompatible USB audio driver.
- Outdated headset firmware.
- USB power management settings interrupting the connection.
- A Windows update affecting compatibility with certain USB audio devices.
USB Headset not working in Windows 11
If your USB headset is not working in Windows 11, use the following fixes:
- Uninstall and reinstall USB audio device
- Update or roll back audio drivers
- Install the headset manufacturer’s driver, firmware, or companion software
- Disable USB power management
- Perform a hard reset on the headset
- Switch to Stereo or 2-channel audio mode
Before you begin, check these basics
- Unplug and reconnect the headset: Disconnect the USB headset and plug it back in securely. Check the USB connector and port for dust or debris, and clean them carefully if necessary.
- Try a different USB port: Connect the headset to another available USB port on your computer. If you are using a USB hub, connect it directly to the PC.
- Check the physical volume control: If your headset has a physical volume button or dial, make sure the volume is turned up and the headset is not muted.
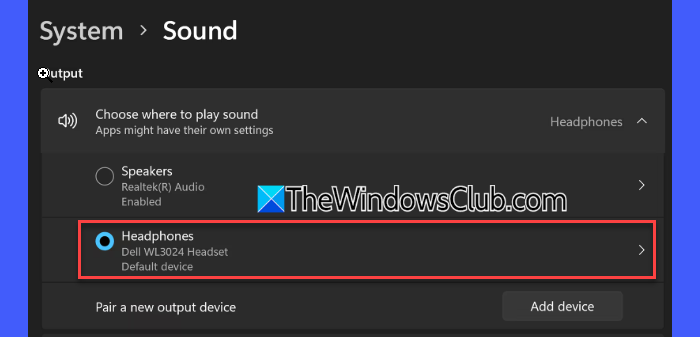
- Select the headset as the sound output device: Go to Settings > System > Sound and select your USB headset under Output. If it is not listed, click More sound settings under Advanced, switch to the Playback tab, right-click an empty area, and select Show Disabled Devices. If your headset appears, right-click it and select Enable.
Now let’s take a detailed look at the above fixes.
1] Uninstall and reinstall USB audio device
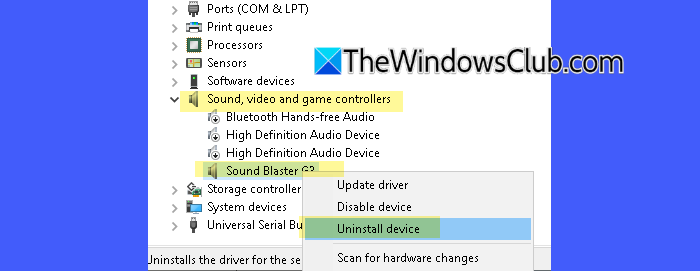
Windows may fail to detect a USB headset or play audio through it if its device installation is corrupted. Uninstalling and reinstalling the affected device forces Windows to detect it again and reload its driver, potentially resolving detection or connection issues.
- Press Win + X and select Device Manager.
- Expand Sound, video and game controllers and look for your USB headset.
- If it is listed as an unknown USB device, check under Universal Serial Bus controllers instead.
- Right-click the affected device and select Uninstall device.
- Disconnect the headset and restart your PC.
- Reconnect the headset and check whether Windows detects it and plays audio correctly.
2] Update or roll back audio drivers
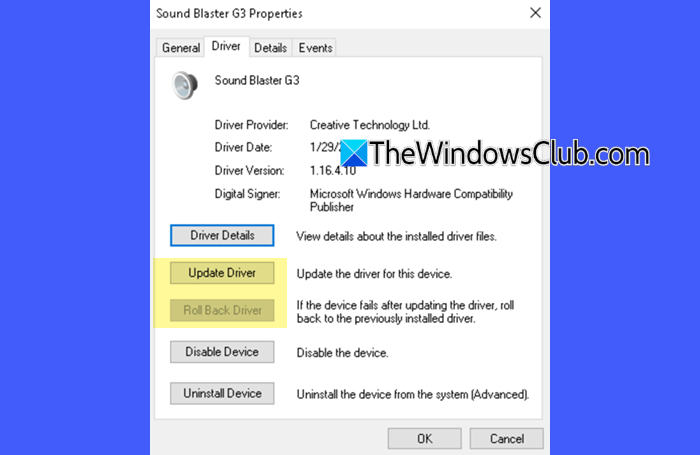
An outdated or incompatible audio driver can cause sound issues even when Windows detects the USB headset. Updating the driver may resolve compatibility issues, while rolling it back can help if the problem began after a recent driver update.
- Open Device Manager and expand Sound, video and game controllers.
- Right-click the audio device associated with your headset and select Update driver.
- Select Search automatically for drivers and follow the on-screen instructions.
- If the problem started after a driver update, right-click the device and select Properties.
- Open the Driver tab and select Roll Back Driver, if available.
- Restart your PC and test the headset.
3] Install the headset manufacturer’s driver, firmware, or companion software
Some users have resolved headset audio issues by reinstalling manufacturer-provided software. For example, a user reported restoring Razer THX Spatial Audio functionality after removing the Razer audio drivers and applications, reinstalling Synapse, and reconnecting the headset. Check your headset manufacturer’s support page to see whether a dedicated driver, firmware update, or companion application is available. Follow these steps:
- Identify your headset’s make and model.
- Visit the manufacturer’s official website and open its support or downloads section.
- Search for your headset model and check for compatible drivers, firmware updates, or companion software.
- Download and install the recommended software, following the manufacturer’s instructions.
- If a driver or firmware update is available, install it and restart your PC.
- Reconnect your USB headset and check whether it works correctly.
Note: Not all USB headsets require dedicated software or firmware updates. Before installing anything, verify that it supports your specific headset model and Windows 11 version.
4] Disable USB power management
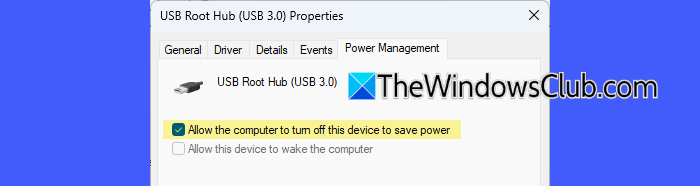
Windows may turn off certain USB devices to save power, which can sometimes cause a USB headset to disconnect repeatedly or stop working correctly.
- Press Win + X and select Device Manager.
- Expand Universal Serial Bus controllers.
- Right-click each USB Root Hub entry and select Properties.
- Open the Power Management tab.
- Uncheck Allow the computer to turn off this device to save power.
- Click OK and repeat the steps for other USB Root Hub entries that have this option.
- Reboot the PC, reconnect your USB headset, and check whether the issue persists.
5] Perform a hard reset on the headset
Some USB headsets may stop responding because of a temporary firmware or hardware state. Performing a hard reset may help restore normal operation.
- Disconnect your USB headset from your PC.
- Turn off the headset, if it has a power button.
- Check the headset manufacturer’s website or user manual for the specific hard-reset procedure for your model.
- Follow the instructions to reset the headset. The procedure may involve holding a button or a combination of buttons for a few seconds.
- Reconnect the headset to your PC and turn it on.
- Check whether Windows detects the headset and plays audio correctly.
6] Switch to Stereo or 2-channel audio mode
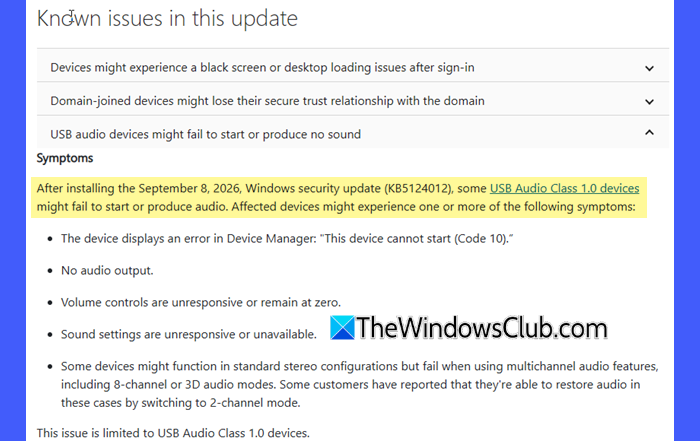
Microsoft acknowledged an issue affecting some USB Audio Class 1.0 devices after installing the September 8, 2026, Windows security update (KB5124008 or KB5124012, depending on the Windows version). Affected devices may produce no sound, display Code 10 in Device Manager, or have unresponsive volume controls. Some devices may work in standard stereo mode but fail when using multichannel audio features, such as 8-channel or 3D audio.
If your USB headset stopped working after installing the update and the problem involves multichannel audio, switching to 2-channel stereo may temporarily restore sound.
Note: Microsoft released an out-of-band update, KB5129195, that resolved the specific issue affecting 8-channel and 3D audio modes. Other USB Audio Class 1.0 audio problems were still under investigation. Install the latest available Windows updates before trying this workaround.
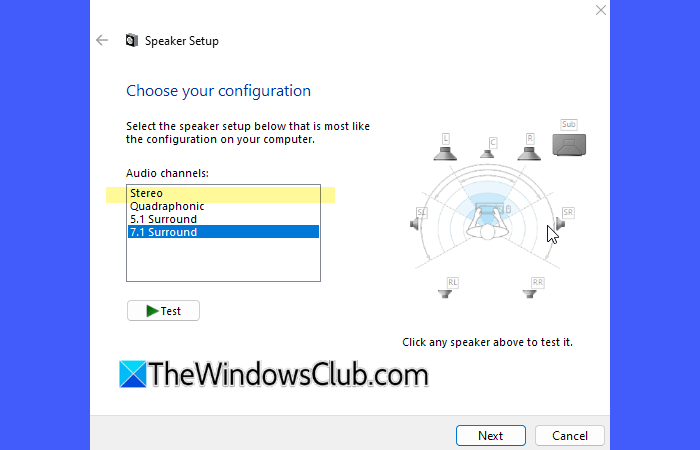
- Press Win + R, type mmsys.cpl, and press Enter.
- In the Playback tab, select your USB audio device and click Configure, if available.
- Under Audio channels, select Stereo.
- Click Next and follow the on-screen instructions.
- Click Finish and test your headset.
I hope this helps.
Read: How to set up and use a Headset on Windows PC.
How to fix USB not working in Windows 11?
If a USB device is not working in Windows 11, try connecting it to a different USB port and restarting your PC. Check Device Manager for driver errors and install any available driver updates. If the issue affects a USB headset specifically, disconnect and reconnect it, reinstall the affected USB audio device, and check whether Windows detects it in Sound settings.
Read Next: How to fix Echo in Headphones in Windows.
