Most of the Xbox One Games have a size in two to three-digit figures (in GBs), and if you only have a 500 GB or a 1TB hard drive, running out of space for a regular gamer is not a surprise. Adding to this, if you are into buying digital games, re-downloading them takes a toll on your bandwidth and time, especially during those big updates.
The good news is that Xbox One supports external drives, which can be used to install games and keep them there, while you still use the internal storage for downloading and installing the new games. In this post, I will share how you can achieve it.
While I am using Games in this context, you can also move apps to external drives as well. It’s an uncommon scenario, but it’s possible and works the same way as it works for the game.
Hardware Requirement & Initial Setup
You will need a hard drive with at least 256 GB of storage and USB 3.0 support. I use my Western Digital hard drive, and it works fine. However, if you are picking a new one, take one with high storage space and a faster speed for performance.
Setting up a new Hard Drive:
Plug in your drive into any of the Xbox One USB port, and it will prompt you on how you intend to use it. You can use it for storing media files, like DVR game clips, etc., or you can use it for installing games. If you select gaming, it will format the hard drive as per Xbox One need, and it cannot be used for anything unless you format it. This is a screenshot of what happens when you plug a hard drive into your Xbox One. Select Format Storage Device.

When you select this option, all your data on the drive will be erased permanently. So if you have anything on the drive, make sure to back it up.
In case you accidentally choose Use for Media, follow the steps below to convert it for games.
- Press Guide button on your Xbox One controller.
- Navigate to the right using the right bumper to System.
- Select Settings, and navigate to System section, and select Storage.
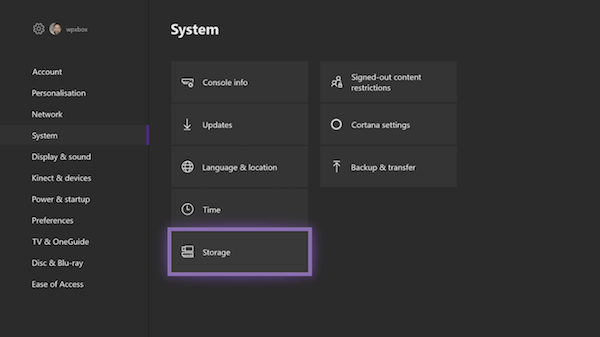
- This will list all your drives, both external and internal.
- Use the cursor keys on your controller to find the hard drive you want to use for gaming.
- Once you find it, press A button on the controller to open the options.
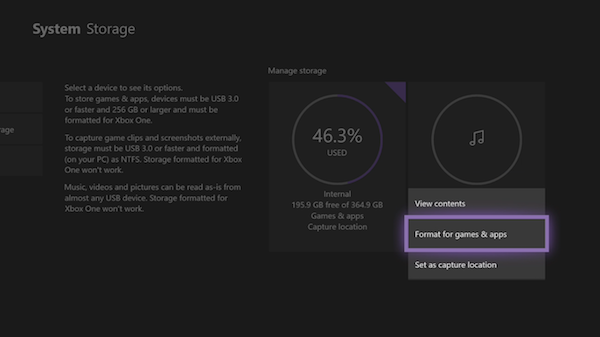
- You should see
- View Contents.
- Format for games, & apps.
- Set as Capture Location.
- Select Format for games, & apps.
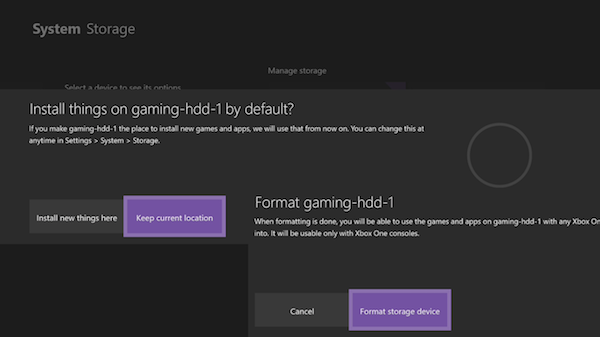
- In the next screen, select Format Storage Device, and give a unique name to the drive.
- After this, Xbox One will prompt you to choose this as the default storage device for games from now on. Choose Keep Current location.
- You will have to re-confirm it again, and you should get a message that the drive is ready.
Transfer Xbox games to an external hard drive
Now that our setup is complete, let’s learn how to move the games from your internal drive to your external drive.
The primary reason I suggested not setting the new external drive as the default storage location was for performance. The internal drive will always be faster, and you can always use the external drive to move games that you are not playing for now. If you intend to play them occasionally, you don’t have to move them back, but always play from right there, seamlessly.

Let’s start:
- Make sure you are signed in with your account.
- Press the Guide button, and open My games & apps.
- Go to the game you want to move using cursor keys on the controller.
- Press the Menu button on the controller. Then select Manage Game.
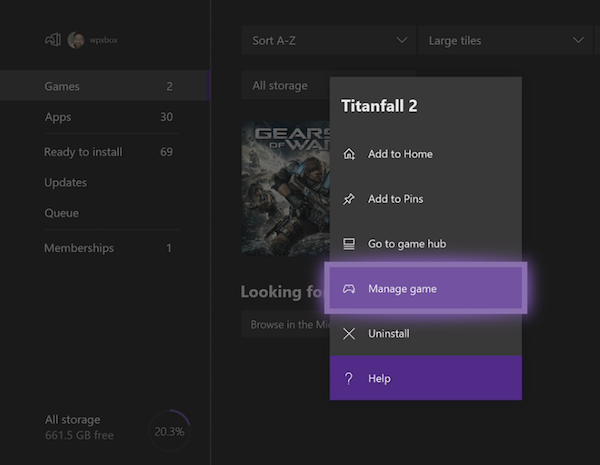
- Surprisingly, the next screen offers two options.
- Move All: This will copy all related content over to the external hard drive.
- Copy All: This will keep a copy on both internal hard drive and external drive.
- Select Move All.
- Confirm the drive on the next screen.
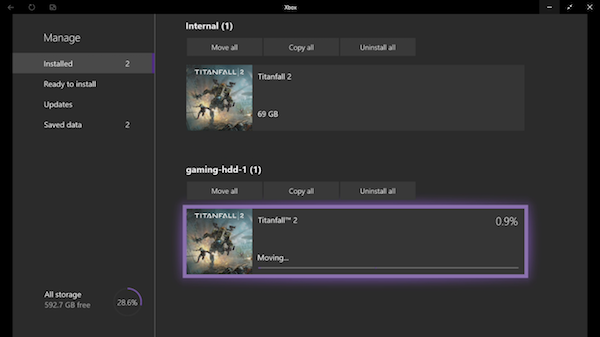
Once done, you will see your drive listed with the name you gave it. It will list the game you moved here, along with a progress bar. This will give you a fair idea of how long it might take to move the game. The bigger the game is, the more time it will take.
That said, there are some important things you should know:
- You can cancel the transfer anytime, and your games will still work. There is an option to pause it as well.
- The reason why there is a copy option is that if you are planning to transfer the games to a new console or another one, you will need to have a copy left on your primary console.
- Lastly, you can perform multiple move or copy. The next game will be added to the queue. You can see it under “Queue” section in My apps & games.
To transfer the game back to internal storage, follow the same steps and choose internal storage instead of external storage.
How to bulk transfer Apps and Games on Xbox One
Microsoft has added a bulk transfer option for those who have too many games to move to an external drive or internal storage. It’s called as Transfer, and you can move both apps and games using this.
Microsoft recently added the ability to transfer items between drives in bulk to ease the process during big transitions. This should be especially helpful for those upgrading to the Xbox One X this fall, allowing large games (and their 4K updates) to be transferred with ease.
- Go to Settings > System > Storage, and open it.
- Navigate to the drive from which you want to bulk transfer.
- Press A on the controller for the menu.
- Select Transfer.
![]()
- This screen offers
- Option to select the destination if you have multiple external drives.
- Select All or select ones you want.
- Sort by name or last used or last update or by size.
![]()
- Next select Move Selected.
- This will initiate the transfer, and you should be able to see them in Queue.
This covers all the options for transferring, moving, and copying files between Xbox One internal storage and internet storage.
Read: Change default location of where Xbox app install games.
How to install Xbox games on External hard drive on PC?
To install Xbox games on an external hard drive using your PC, first connect the drive and ensure it’s formatted as NTFS. Then, open the Xbox app, go to Settings > General, and under “Game install options” select the external drive as the default location. Confirm the drive has enough free space and is properly recognized by Windows. When installing a game, the app will now prompt or automatically use the external drive. If issues arise, try reconnecting the drive or adjusting the install location in Windows storage settings.