
If you have installed the Microsoft Teredo Tunneling Adapter on your Windows 11/10 computer but find that Teredo Tunneling Pseudo-Interface is missing from the Device Manager, then this post will help you. You may also see The device cannot start – Code 10 message in Device Manager.
What is Teredo Tunneling Pseudo-Interface?
Teredo tunneling is a pseudo-interface that allows communication between IPv4 and IPv6 devices by encapsulating IPv6 packets in IPv4 packets. This enables the transmission of packets even if the network devices fail to support the IPv6 standard.
Teredo Tunneling Pseudo-Interface missing in Windows 11/10
Here are a few things you can try to fix the issue. But before you begin, create a system restore point first.
1] Enable TCPIP6 via Registry
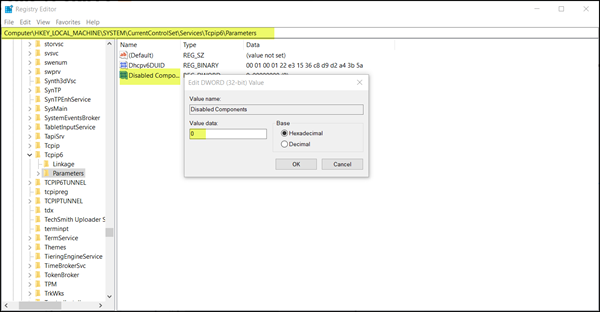
The Teredo Tunneling adapter missing error message in Windows 10 could be resolved by changing the TCPIP6 component value to 0.
Press Windows + R to open Run. Enter ‘regedit’ in the box and hit OK to open the Registry Editor. In Registry Editor, go to the following address:
HKEY_LOCAL_MACHINE\SYSTEM\CURRENTCONTROLSET\SERVICES\TCPIP6\PARAMETERS
Double-click ‘Parameters’ and move to the right pane. There, right-click the ‘Disabled Components‘ to Modify its Value.
Change the Value data to 0 and click OK to save changes
Open Device Manager > Action > Scan for new hardware.
Now from the View tab, select Show hidden devices. You will now see that it is present without errors.
2] Re-install Microsoft Teredo Tunneling Adapter
From the WinX Menu, open Device Manager.

If you see a yellow exclamation mark next to Microsoft Teredo Tunneling Adapter, then you need to uninstall Microsoft Teredo Tunneling Adapter – as well as Teredo Tunneling Pseudo-Interface if you see it. Right-click on these two entries and select Uninstall.
Next, choose the ‘Action’ menu, and from the list of options displayed, select ‘Add a legacy hardware’.
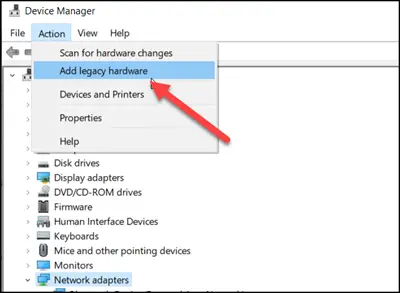
Next select Network Adapters.
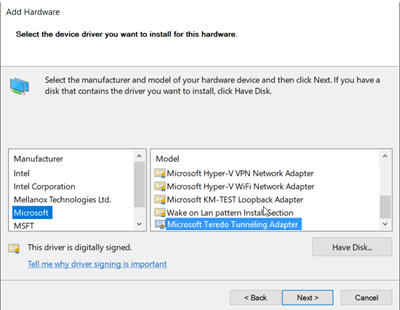
After that, simply follow the onscreen instructions to install the Microsoft Teredo Tunneling Adapter.
3] Enable Teredo client using Command Prompt
Next, open an elevated command prompt and execute the following commands one after the other:
Press Windows key + x and select Command prompt (Admin).
netsh
int teredo
set state disabled
int ipv6
set teredo client
After this, open Device Manager > Action > Scan for new hardware.
Now from the View tab, select Show hidden devices. You will now see that it is present without errors.
To verify that all is fine, in a CMD window, run the following command:
netsh interface teredo show state
Type client would mean that all is fine – else it will display disabled.
Hope this works for you.
How to install Microsoft Teredo tunneling adapter?
To install the Microsoft Teredo Tunneling Adapter, open Device Manager, click ‘Action’ and select ‘Add legacy hardware.’ Choose ‘Network adapters’ and click ‘Next.’ Select ‘Microsoft’ from the list of manufacturers, then find ‘Microsoft Teredo Tunneling Adapter.’ Follow the prompts to complete installation. Ensure your system is fully updated for compatibility.
How do I enable Teredo Tunneling Interface?
To enable the Teredo tunneling interface in Windows 11, open the Command Prompt as an administrator and type netsh interface teredo set state type=default This command configures Teredo to its default setup and facilitates IPv6 connectivity over an IPv4 network.
