OpenClaw is an open-source AI agent framework that acts as a bridge between users and digital tasks. It is an assistant that runs on the computer and helps users execute commands, manage files, and interact with other apps. In this guide, we will see how to set up and use OpenClaw on a Windows PC. So, if you are attracted to AI automation, then this article is for you.
What is OpenClaw AI setup assistant?
OpenClaw is an open-source AI agent framework that lets users run a personal assistant on their devices. It connects to messaging apps like WhatsApp and Telegram, and enables task execution, file management, and automation through natural conversation language.
How to set up and use OpenClaw on your Windows PC?
If you want to set up and use OpenClaw on a Windows PC, follow the steps given below.
- Prepare the environment
- Install and initialise OpenClaw
- Startup and verify
- Configure advanced features
Let us talk about them in detail.
1] Prepare the environment
Before diving into this, it is recommended to back up important data, use a clean spare device, or rent a cloud-based Virtual Private Server. This is because the tool uses automated operations and can interact with the system. Once done, the next step is to set up the Node.js environment, as OpenClaw runs on it. Follow the steps to install nvm for Windows:
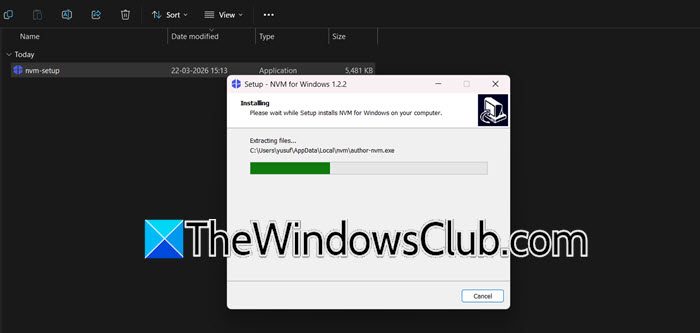
- Go to nvmnode.com, download nvm-setup.zip, and extract it.
- Navigate to the extracted website, double-click on the setup file, and install it.
- Once done, click Win + S search for PowerShell, and select the Run as administrator option.
- Now run the following command to install and use Node.js:
nvm install 22

nvm use 22.22.1 (or the version you have installed)
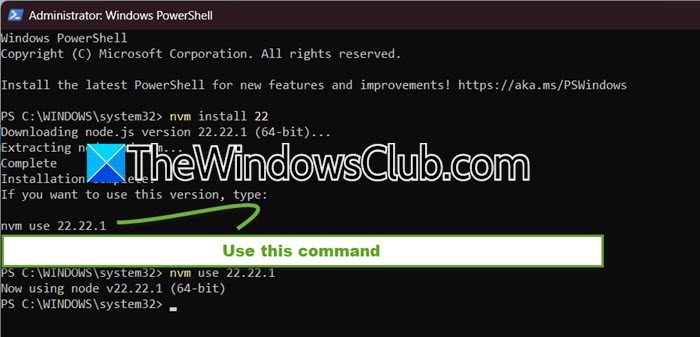
Users will instantly see the “Now using node v22.22.1” message upon success. To double-check, type node-v and it should display the version number. This number will change depending on the version you use.
2] Install and initialise OpenClaw
After installing Node.js, we have created a suitable environment and can now install and download OpenClaw using the same PowerShell with admin rights. To do the same, follow the steps given below.
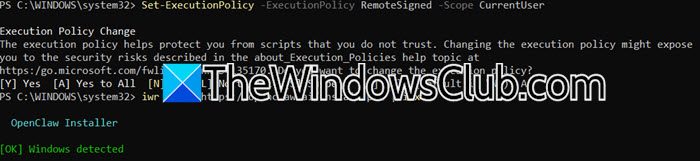
- To prevent execution policy errors, first run the following command to allow scripts to run in a new window of PowerShell.
Set-ExecutionPolicy -ExecutionPolicy RemoteSigned -Scope CurrentUser
- Next, run the following command to install and download OpenClaw.
iwr -useb https://openclaw.ai/install.ps1 | iex
- After the installation finishes, the script will usually start a configuration wizard automatically.
- You need to follow the on-screen instructions to complete the onboarding.
- If it doesn’t, or if you need to run it again later, simply type:
openclaw onboard --flow quickstart

Once done, follow the on-screen prompts to choose the AI you want to use, such as OpenAI or Claude, and enter your API key. Moreover, you can set up a chat app and skills; however, the optional ones can be skipped for now and added later.
3] Startup and verify
We have downloaded and installed OpenClaw, so we can move on to the next exciting part: running it. First things first, we need to start the core service called the Gateway. It is like the assistant’s ears, constantly listening for messages from apps or the web dashboard. Therefore, it must keep running in the background for anything to work.

To do the same, type openclaw gateway start and hit Enter. This will open a brand new PowerShell window for the Gateway, so do not close this. Next, we can open the web-based control panel by launching the web browser and navigating to the http://127.0.0.1:18789/ address.
Alternatively, type openclaw dashboard in PowerShell, and it will automatically open up. Once you are on the dashboard, there will be a chat box. To make sure everything is working, type a simple message like Hello or What can you do, and hit Send.
If you get a reply, congratulations! We have successfully set up OpenClaw.
Read: How to install LLaMA AI locally on Windows PC?
4] Configure advanced features
Once OpenClaw is set up and running, we can connect it to a messaging app like WhatsApp, Feishu, or Lark. However, to make that happen, we need to install a plugin. So, the first step is to install the Feishu plugin using the following command.
openclaw plugins install @m1heng-clawd/feishu
Once the plugin is installed, the next step is to create a bridge between OpenClaw and Feishu. To do this, we need to create a custom app on the Feishu developer platform.
- Go to the Feishu Open platform, sign in to the account, and look for the Create App button in the top right corner.
- Select it, click Create Enterprise Self-built App, fill in the basic information, then click Create and wait a moment. The new app will be created, and users will be navigated to the settings page.
- Click on Credentials and Basic information, note the App ID and App Secret, and save them somewhere else.
- Now, navigate back to PowerShell and run the following command while replacing the placeholder text with the actual App ID and App Secret.
openclaw config set channels.feishu.appId "your-app-id-here"

openclaw config set channels.feishu.appSecret "your-app-secret-here"

openclaw config set channels.feishu.enabled true
- Once done, navigate back to Feishu, go to Settings, click on Permission, and add each permission one by one:
im:message

im:message:send_as_bot

im:message.p2p_msg

im:chat

im:chat:readonly
- Head over to Event and Callback, choose Use Long connection to receive events, and then click Add events. Search for im.message.recieve_v1, and add it. Additionally, users can also add im.message.message_read_v1, im.chat.member.bot.added_v1, and im.chat.member.bot.deleted_v1 for better fucntionality.
- Now, go to Version Management and Release, click Create Version, enter a version number, add a brief description, and then click Save. Finally, click Submit for Review or Publish.
- Once done, navigate back to the PowerShell and restart the Gateway to load all the new settings.
openclaw gateway restart
Now, open Feishu, search your bot name, and start a chat. To test the connection, type a simple message and congratulations if you get a response; your OpenClaw is now successfully connected to Feishu.
Read: Best AI tools for Developers
How do I set up OpenClaw?
To set up OpenClaw, users first need to prepare an environment with Node.js, run the installation script, configure the AI model and API key, and start the Gateway service. For a complete step-by-step guide, refer to the article mentioned below.
Also Read: Free tools to run LLM locally on Windows PC.