Llama is Meta’s latest large language model. You can use it for various purposes, such as resolving your queries, getting help with your school homework and projects, etc. Deploying Llama AI on your Windows 11 machine locally will help you use it anytime even without access to the internet. This article shows you how to install LLaMA 4 and LLaMA3 locally on a Windows 11/10 PC.

Installing Llama AI on a Windows 11/10 PC through Python requires technical skills and knowledge. However, some alternate methods allow you to locally deploy it locally on your Windows 11 machine. I will show you these methods.
To install and run Llama AI on your Windows 11 PC, you must execute some commands in the Command Prompt. However, this will only allow you to use its command line version. You must take further steps if you want to use its web UI. I will show you both these methods.
Meta has released multiple versions of Llama, including Llama 2, Llama 3, Llama 3.1, Llama 4, etc. The steps to install all these Llama versions locally on Windows 11 are the same. In this article, I will show you the installation steps of Llama 3.1 and Llama 4.
How to install Llama 3 locally on a Windows 11 PC
Installing Llama 3 on a Windows 11/10 PC through Python requires technical skills and knowledge. However, some alternate methods allow you to locally deploy Llama 3 on your Windows 11 machine. I will show you these methods.

To install and run Llama 3 on your Windows 11 PC, you must execute some commands in the Command Prompt. However, this will only allow you to use its command line version. You must take further steps if you want to use its web UI. I will show you both these methods.
Deploy Llama 3 on Windows 11 PC via CMD
To deploy Llama 3 on your Windows 11 PC, you need to install Ollama on your Windows machine. The steps for the same are as follows:

- Visit Ollama’s official website.
- Click on the Download button and then select Windows.
- Now, click on the Download for Windows button to save the exe file on your PC.
- Run the exe file to install Ollama on your machine.
Once the Ollama gets installed on your device, restart your computer. It should be running in the background. You can see it in your System Tray. Now, click on the Models option on the Ollama website. You will see its different models.
The Llama 3.1 is available in the following three parameters:
- 8B
- 70B
- 405B
The last one is the largest parameter and obviously cannot be run on a low-end PC. The Llama 3.2 has the following two parameters:
- 1B
- 3B
Click on the Llama version you want to install on your PC. For example, if you want to install Llama 3.2, click on Llama 3.2. In the drop-down, you can select the parameter you want to install. After that, copy the command next to it and paste it into the Command prompt.

For your convenience, I have written both commands for the Llama 3.2 model. To install the Llama 3.2 3B model, run the following command:
ollama run llama3.2:3b
To install the Llama 3.2 1B model, use the following command:
ollama run llama3.2:1b

Open the Command Prompt, type any of the above-mentioned commands (based on your requirements), and hit Enter. It will take some time to download the required files. The download time will also depend on your internet connection speed. After the completion, you will see the success message in the Command Prompt.
Now, type your message to use the Llama 3.2 model. If you want to install the Llama 3.1 model, use the commands available on the Ollama website.
The next time you launch the Command Prompt, use the same command to run Llama 3.1 or 3.2 on your PC.
Installing Llama 3 through CMD has one disadvantage. It does not save your chat history. However, if you deploy it on the local host, your chat history will be saved and you will get a better User Interface. The next method shows how to do that.
Read: Can I run AI locally on my PC or Phone?
Deploy Llama 3 Web UI on Windows 11
Using Llama 3 on a web browser provides a better user interface and also saves the chat history as compared to using it on the CMD window. I will show you how to deploy Llama 3 on your web browser.
To use Llama 3 in your web browser, Llama 3 through Ollama and Docker should be installed on your system. If you have not installed Llama 3 yet, install it using Ollama (as explained above). Now, download and install Docker from its official website.
After installing Docker, launch it and sign up to create an account. Docker will not run until you sign up. After signing up, sign into your account on the Docker app. Minimize Docker to the System Tray. Docker and Ollama apps should be running in the background. Otherwise, you cannot use Llama 3 in your web browser.

Now, open the Command Prompt, copy the following command, and paste it into the Command Prompt:
docker run -d -p 3000:8080 --add-host=host.docker.internal:host-gateway -v open-webui:/app/backend/data --name open-webui --restart always ghcr.io/open-webui/open-webui:main

The above command will take some time to download the required resources. Therefore, have some patience. After the completion of the command, open Docker and select the Containers section from the left side. You will see a container is created automatically with the port 3000:8080.
Click on the port 3000:8080. This will open a new tab in your default web browser. Now, sign up and sign in to use Llama 3 on your web browser. If you see the address bar, you will see localhost:3000 there, which means that Llama 3 is hosted locally on your computer. You can use it without an internet connection.

Select your Llama chat model from the drop-down. If you want to add more chat models of Llama 3, you have to install it via Ollama using the required commands. After that, the model will automatically be available in your web browser.
All your chat history will be saved and accessible on the left side. When you want to exit, log out your session in your web browser. After that, open the Docker app and click on the Stop button to stop Docker. Now, you can close Docker.
When you want to use Llama 3 in your web browser the next time, launch Ollama and Docker, wait for a few minutes, and then click on the port in the Docker container to open the localhost server in your web browser. Now, sign in to your account and start using Llama 3.
How to install Llama 4 on Windows 11
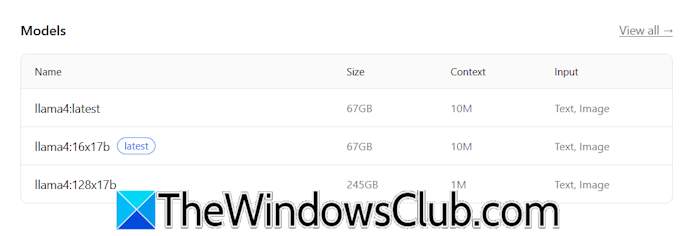
Since you have installed Docker and OpenWeb UI on your system, you just need to run the required commands to deploy Llama 4 locally. After installing Llama 4 via the Command Prompt, it will be automatically available in the openWeb UI.
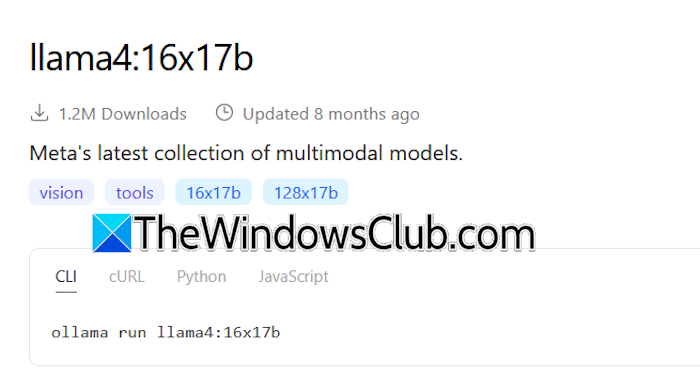
Llama 4 is available in different parameters. The size of each model is also displayed. Based on the available disk space and your system’s hardware, select the Llama 4 version. You will see the command to install it. Copy the command and execute it in the Command Prompt by following the instructions described above in this article.
After installing, refresh the OpenWeb UI, and you will see the Llama 4 version there.
I hope this helps.
Can Llama run on Windows?
Depending on your computer’s hardware configuration, you can run Llama 4 or Llama 3 on your system. Its 1B model is the lightest. You can install and run it on your system through the command prompt.
How much RAM do I need for Llama?
Llama 4 requires at least 16 GB. VRAM needed is 6–8 GB VRAM (RTX 4060/5060 class). The lightest model of Llama 3 is Llama 3.2 1B. Your system should have 16 GB of RAM to run the Llama 3.2 1B model. In addition, your system should have a high-end GPU. The higher models of Llama 4 or Llama 3 require more system resources.
Read next: How to use Leonardo Phoenix AI.