When using UEFI, if you receive an error screen saying “Selected boot image did not authenticate,” it means UEFI is having trouble determining whether the boot image has been tampered with. UEFI supports Secure Boot, and if the boot image is invalid, you will not be allowed to boot the HP desktop or laptop. You may also use endpoint encryption; the software cannot validate the certificate. In this post, we will suggest some methods to resolve the problem on Windows 11/10.

This error message can appear if the boot image doesn’t match trusted signatures. It can also appear in case the Bootloader is corrupted or the BIOS/UEFI does not recognize the installed OS.
Selected boot image did not authenticate HP error
If you see Selected boot image did not authenticate problem when booting into a HP desktop or laptop running Windows 11/10, follow these suggestions.
The first thing you need to check is whether the error references any software you might have for encryption. If yes, then follow the first method; else, move to the third.
- Disable Encryption Tool
- Disable Secure Boot
- Perform Startup Repair
- Switch to Legacy Boot.
If you are in a hurry, the second method is for you.
1] Disable Encryption Tool
There are reports that some encryption tools, like ESET Endpoint Encryption, will not let you boot into the computer if the system manufacturer doesn’t include the correct certificates as a part of the UEFI BIOS. As there is no way to bypass it, disable Secure Boot to boot into the computer. Get in touch with your IT admin, or uninstall the software completely, then later enable UEFI to see if it works.
2] Disable Secure Boot
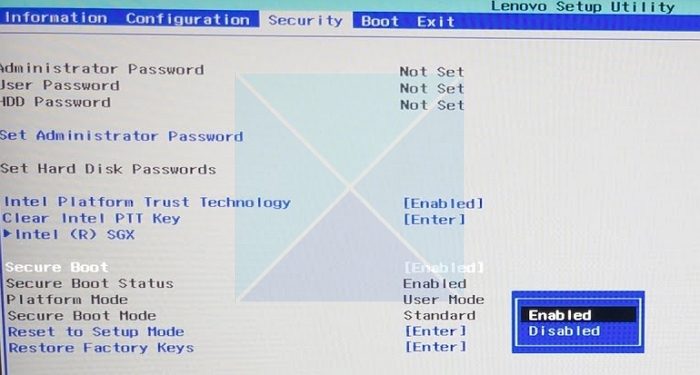
If you are using UEFI, it is recommended to use Secure Boot. However, if it is not letting you boot into the device, it’s best to disable Secure Boot from your System BIOS, save the changes, and restart the computer. The system will proceed to boot as usual. However, it’s only a temporary solution. It will make the Selected boot image did not authenticate problem go away.
3] Perform Startup Repair
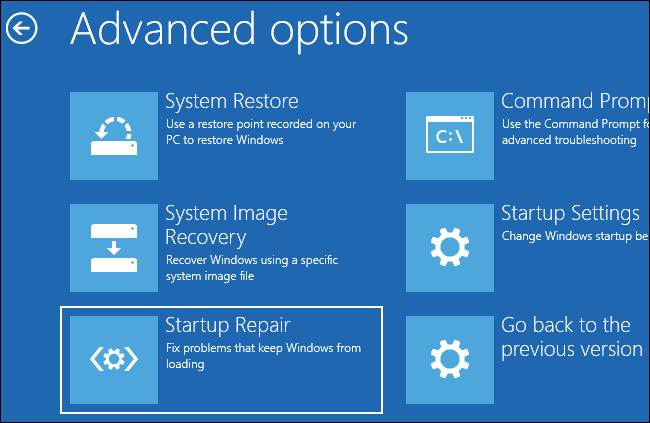
While disabling Secure Boot is an option, it’s not something many will agree; UEFI is there for a reason. So, performing Startup Repair is a better option. I have seen reports in the forum that have worked for a few. Make sure to keep the Secure Boot option ON and legacy mode disabled.
- Boot into the Advance Recovery Mode
- Select Troubleshoot > Startup Repair
- Follow the on-screen instructions and finish the repair.
- Then, check if the block is gone once the reboot is complete.
Secure Boot ends with loading the OS’s certified Bootloader into memory. The digital certificate is issued by the OEM or the Enterprise. To completely resolve the problem, contact the IT admin or Microsoft support.
4] Switch to Legacy Boot
Boot into BIOS, and enable Legacy Support. Set Legacy Boot Order to prioritize your hard drive, save the changes and restart your omputer and see.
Read: Windows Boot Manager not showing in BIOS in Windows 11
What is Secure Boot in Windows PC
Secure Boot is a built-in security measure found in Windows computers. Its purpose is to safeguard against unauthorized code execution during the boot-up sequence. Allowing only digitally signed and authenticated bootloaders, kernels, and boot managers to run effectively blocks potential threats such as malware and rootkits. The UEFI firmware plays a vital role in verifying these signatures, ensuring the system’s integrity, and effectively countering low-level attacks.
Should I disable TPM in Windows?
Disabling TPM in Windows should be done cautiously and only when necessary. TPM provides hardware-based security, protecting sensitive data and defending against unauthorized access. While it might be disabled for troubleshooting or specific tasks, its benefits for overall system security should be considered before making the decision.
Does Selected boot image did not authenticate mean hardware failure?
Not necessarily, as most cases are due to BIOS or bootloader issues. Hardware failure is only suspected if fixes don’t work or the drive isn’t detected. You should try running HP’s built‑in diagnostics tool to see if it helps.