Whenever you plug a new hardware device into your Windows machine, you’re asked what you want to do with the hardware you’ve just plugged in. Windows has the AutoPlay functionality, which can remember how you treat the devices that are plugged into the system. For example, you plug a USB drive into the system and Windows prompts what you want to do with this device. You picked the Take no action option. Now Windows will remember this choice on behalf of AutoPlay and wouldn’t take any action whenever you plug that USB.
Prevent AutoPlay from remembering User Choices in Windows 11/10
To prevent AutoPlay from remembering user choices in Windows 11/10, follow these methods:
- Using Local Group Policy Editor
- Using Registry Editor
To learn more about these methods, continue reading.
1] Using Group Policy
1. In Windows 10 Pro & Enterprise Editions, press the Windows Key + R combination, type put gpedit.msc in the Run dialog box, and hit Enter to open the Local Group Policy Editor.

2. In the left pane, navigate here:
Computer Configuration -> Administrative Templates -> Windows Components -> AutoPlay Policies
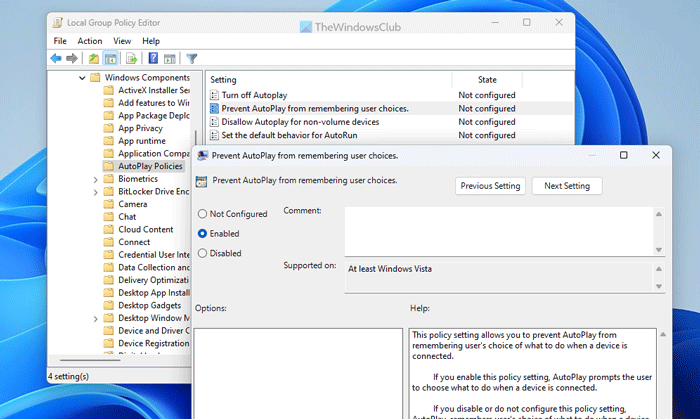
3. In the right pane of the above-shown window, look for the Setting named Prevent AutoPlay from remembering user choices which is Not Configured by default.

4. In the above-shown window, select Enabled and then click Apply followed by OK. Here is the policy explanation so far:
This policy setting allows you to prevent AutoPlay from remembering user’s choice of what to do when a device is connected. If you enable this policy setting, AutoPlay prompts the user to choose what to do when a device is connected. If you disable or do not configure this policy setting, AutoPlay remembers user’s choice of what to do when a device is connected.
You may now close Local Group Policy Editor and reboot to make changes effective.
2] Using Registry Editor
1. Press the Windows Key + R combination, type put regedit in the Run dialog box, and hit Enter to open the Registry Editor.

2. Navigate here:
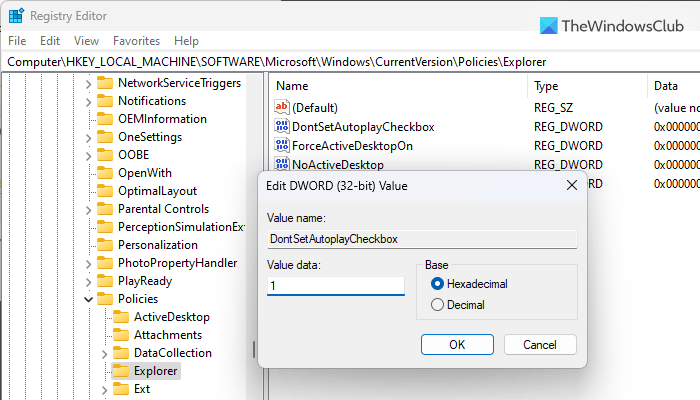
HKEY_LOCAL_MACHINE\SOFTWARE\Microsoft\Windows\CurrentVersion\Policies\Explorer
3. In the right pane of this registry location, right-click in the blank space, and select New -> DWORD Value.
Name this newly created DWORD as DontSetAutoplayCheckbox and double click the same to get this:

4. In the above-shown box, put the Value data as 1 in order to prevent AutoPlay from remembering your choice. Click OK and close the Registry Editor, reboot to observe changes.
That is all you need to do!
Read: How to enable, configure and set AutoPlay defaults in Windows
How do I prevent AutoPlay from remembering user choices?
To prevent AutoPlay from remembering user choices in Windows 11/10, you can use the Local Group Policy Editor. For that, open the GPEDIT and navigate to this path: Computer Configuration > Administrative Templates > Windows Components > AutoPlay Policies. Double-click on the Prevent AutoPlay from remembering user choices setting and choose the Enabled option. Finally, restart your computer.
How do I change AutoPlay settings in Windows 11?
To change, enable or disable AutoPlay in Windows 11, open the Windows Settings panel and go to Bluetooth & devices > AutoPlay. To enable AutoPlay in Windows 11, toggle the Use AutoPlay for all media and devices button to turn it ON. Then, you can head to the Choose AutoPlay defaults section to choose the setting as per your devices. For example, you can choose one option for a removable drive and select another one from the Memory card.
Leave a Reply