
NVIDIA Image Scaling (NIS) is a scaling technology developed by NVIDIA, a leading graphics card manufacturer. NIS is a driver-based upscaling feature that uses improved sharpening and scaling algorithms to deliver an enhanced gaming experience. Some users have complained that the NIS technology is not working on their computers. There are several reasons why NVIDIA Image Scaling may not be showing or working on your Windows PC. In this article, we will explore some possible fixes for this problem.
You can enable the NVIDIA Image Scaling feature via the NVIDIA Control Panel and GeForce Experience. After enabling NIS, you can also make it appear as an overlay indicator in your game. If the NIS text label (on the upper left corner of the screen) is green, it indicates that the NIS technology is working on your computer, whereas the blue color of the NIS text label shows that the NIS technology is not working on your system.
How do I get NVIDIA Image Scaling to work?
To get NVIDIA Image Scaling to work, you have to enable it. There are two ways to enable NVIDIA Image Scaling, via the NVIDIA Control Panel and via the GeForce Experience. If you do not find an option to enable NVIDIA Image Scaling in GeForce Experience, enable the Experimental features option instead. After that, a new version of the app will be downloaded automatically. Now, restart the GeForce Experience app and you will see the option to enable NIS there.
We have explained the step-by-step process for enabling NVIDIA Image Scaling using both of the options below in this article.
NVIDIA Image Scaling not showing or working on Windows PC
If NVIDIA Image Scaling is not showing or working on your Windows 11/10 computer, try the suggestions below to fix the problem.
- Make sure that you have setup NVIDIA Image Scaling correctly on your device
- Make sure that your game supports the full-screen mode
- Switch to the dedicated GPU from the integrated GPU
- Disable NVIDIA Optimus (if applicable)
- Disable Integer Scaling
- Modify a Registry key
Let’s see all these fixes in detail.
1] Make sure that you have setup NVIDIA Image Scaling correctly on your device
NVIDIA Image Scaling does not work until you set up and configure it correctly on your device. As we explained earlier in this article, there are two ways to enable NIS on a Windows computer with an NVIDIA Graphics Card: via the NVIDIA Control Panel and via GeForce Experience. We have explained the steps to enable NIS using both of these methods below.
Enable NVIDIA Image Scaling on a Windows computer using NVIDIA Control Panel
The following steps will help you enable NVIDIA Image Scaling from the NVIDIA Control Panel.
- Launch NVIDIA Control Panel.
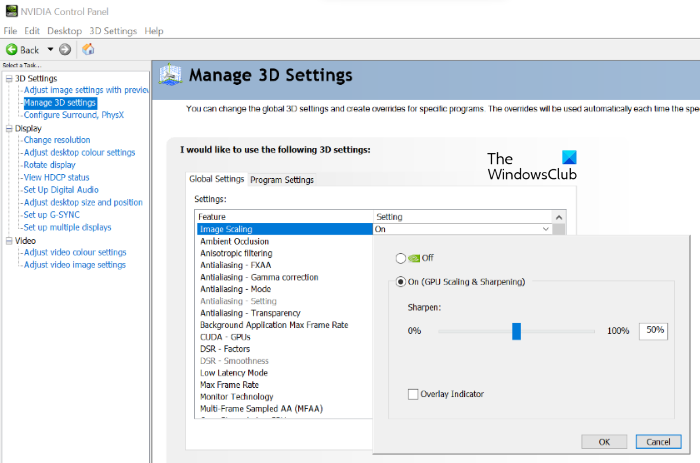
- When the NVIDIA Control Panel appears on your screen, expand the 3D Settings node and select Manage 3D Settings.
- On the right-hand side, you will see two tabs, Global Settings and Program Settings. Select the Global Settings tab.
- Select Image Scaling, click on the drop-down menu next to it and select On.
- Click OK. This will enable NVIDIA Image Scaling for your games.
When you enable NVIDIA Image Scaling, the driver will generate 5 additional scaling resolutions based on your monitor’s native resolution. Now, the next step is to ensure your game recognizes these new resolutions. To do this, you have to restart your system after completing the above steps. After rebooting your system, you can select the desired resolution for your game in the in-game settings.
Enable NVIDIA Image Scaling on a Windows computer via GeForce Experience
To enable NVIDIA Image Scaling via GeForce Experience, make sure that you have enabled the Experimental features in GeForce Experience. Without turning on the Experimental features, you will not see an option to enable the NIS. The following steps will guide you on this.

- Launch NVIDIA GeForce Experience.
- Click on the Enable Experimental features option available on the bottom left side of the interface. After enabling it, a new version of GeForce Experience will be downloaded automatically.
- After the download completes, close GeForce Experience and reopen it. Now, you will see the new Image Scaling option in GeForce Experience. By default, it is turned off. Turn it on by clicking on the toggle switch next to it.
- After enabling Image Scaling, you will see a pop-up message on your screen, saying “Image Scaling is enabled. Optimize all games and settings…” If you click on Optimize, the Image Scaling setting will be applied to the games supported by GeForce Experience installed on your computer.
You can also select the NVIDIA Image Scaling resolutions in the in-game settings.
2] Make sure that your game supports the full-screen mode
If the above methods won’t let you enable NVIDIA Image Scaling for a particular game, make sure that the game supports fullscreen mode. By default, NVIDIA Image Scaling works for games that offer fullscreen mode. Therefore, you have to enable the fullscreen mode in your in-game settings. If the game does not support the fullscreen mode, lowering the render resolution can help. You can change resolution via the NVIDIA Control Panel.
3] Switch to the dedicated GPU from the Integrated GPU
The problem mostly occurs when the game uses the integrated graphics card instead of the NVIDIA dedicated GPU. If this is the case with you, you can fix it by forcing your game to use the high-end GPU instead of the integrated GPU. Some laptops have a MUX switch that lets users switch between the integrated and dedicated graphics card. If your laptop has a MUX switch, you can use it to switch from the integrated graphics card to the dedicated graphics card.
Users whose laptops do not have a MUX switch can go through the following steps to switch from an integrated graphics card to a dedicated graphics card:
- Open NVIDIA Control Panel.
- Expand the 3D Settings node on the left side and select the Manage 3D Settings option.
- Select the Program Settings tab on the right side of the interface.
- Click Add. Now, click on the Browse button and select the executable file of the game which is giving you trouble.
- Click Add Selected Program.
- Select the High-Performance GPU under the Use Selected Graphics Processor for this program.
- Save the changes and restart your system.
After that, your game will start using the dedicated GPU instead of the integrated GPU. This should fix the problem. If the problem still persists, try the next solution.
4] Disable NVIDIA Optimus (if applicable)
NVIDIA Optimus is the technology that automatically optimizes users’ notebooks to deliver the best performance and battery life. It is a GPU switching technology developed by NVIDIA. It makes your laptop switch automatically between the integrated and discrete graphics card based on the applications you use.
For some users, this feature was creating a problem. After disabling it, they were able to fix the issue. You might be facing the problem due to NVIDIA Optimus technology. If this is the case with you, disabling NVIDIA Optimus can fix the problem. The steps to disable NVIDIA Optimus vary by laptop brand.
5] Disable Integer Scaling
NVIDIA Integer Scaling is a feature that upscales low-resolution images to better match the user’s monitor. Although it is a useful feature on NVIDIA Graphics Cards, some users have found it to conflict with NVIDIA Image Scaling. If you have enabled Integer Scaling, turn it off and check whether this resolves the issue.
The steps to disable the Integer Scaling for NVIDIA GPU are as follows:
- Open NVIDIA Control Panel.
- Expand the Display node on the left side.
- If your GPU supports the Integer Scaling, you will see it in the options listed under the Display node. Select the Integer Scaling option to disable it.
6] Modify a Registry key
If NVIDIA Image Scaling is not showing on your computer, you can restore it in the NVIDIA Control Panel by modifying the EnableGR535 key in your Windows Registry. Before you proceed, we recommend you create a system restore point and backup your Windows Registry.
Click on the Windows Search and type Registry Editor, then select the Registry Editor from the search results. Click Yes in the UAC prompt.
When the Registry Editor appears on your screen, copy the following path and paste it into the address bar of the Registry Editor. After that, press Enter.
HKEY_LOCAL_MACHINE\SYSTEM\CurrentControlSet\Services\nvlddmkm\FTS
Make sure that you have selected the FTS key on the left side. Now, double-click on the value named EnableGR535 on the right side of the interface and enter 0 in its Value Data. When you are done, click OK to save the changes.
If the Value EnableGR535 does not exist on the right side, you have to create it manually. For this, right-click in the empty space on the right side and go to “New > DWORD (32-bit) Value.” Right-click on the newly created Value and select Rename. Rename it to EnableGR535.
When you are done, close the Registry Editor and restart your computer. This should restore the NIS setting.
Hope this helps.
Read: NVIDIA GeForce Experience unable to open Share.
How do I know if NIS is working?
After enabling NVIDIA Image Scaling, you can make it appear as an overlay indicator in your games. This is similar to the FPS displayed in the games by FPS Counter software. This NIS overlay indicator will help you determine whether NIS is working. If NIS is working, the overlay indicator (NIS text label displayed in the top-left corner of the screen) will be green. If it is not working, the indicator will be blue.
Read next: NVIDIA graphics card not detecting HDMI on Windows.
