A common and frustrating issue in Microsoft Word is when a table refuses to split across two pages, forcing an entire row or a large block of cells to jump to the next page, leaving awkward white space. This problem can disrupt the flow of your document and make formatting lengthy tables a challenge. In this solution, we are going to see what you can do if the Microsoft Word tables are not splitting across pages.
Why won’t my table split across pages in Word?
Your table won’t split across pages in Word primarily because of specific formatting settings that override the default page break behavior. The most common reason is that the “Allow row to break across pages” option is disabled in the Table Properties for the row, or the text inside the cells has paragraph formatting like “Keep with next” applied, which forces content to stay together on one page.
A table may not split across pages due to certain formatting settings that unintentionally interfere with the standard page break behavior. Common factors include specific properties within the table, such as rows configured to remain together or text wrapping enabled for the entire table. Additionally, paragraph-level formatting applied to the text within the table cells can contribute to this issue. Recently, users of the online version of Word (Word for the web) have reported that this feature no longer functions as expected, which appears to be a known issue with the service.
Fix Microsoft Word table not splitting across pages
If the MS Word table is not splitting across pages, follow the solutions below.
- Check the Allow row to break across pages settings
- Inspect Paragraph Formatting
- Disable Text Wrapping and Header Repetition
- Adjust Fixed Row Height
Let us talk about them in detail.
1] Check the Allow row to break across pages settings

Enabling the “Allow row to break across pages” setting gives Microsoft Word the necessary permission to insert a page break in the middle of a table row. When this box is unchecked, Word treats each row as an indivisible unit that must remain together on a single page, forcing the entire row to move to the next page if all its contents don’t fit. Checking it resolves this by allowing the row’s content to flow naturally across the page boundary.
You can follow the steps mentioned below to do the same.
- Right-click anywhere inside the table row that is not splitting.
- Select Table Properties from the context menu.
- In the dialog box, click the Row tab.
- Ensure the checkbox for Allow row to break across pages is checked.
- Click OK to apply the change.
Finally, check if the issue is resolved.
2] Inspect Paragraph Formatting
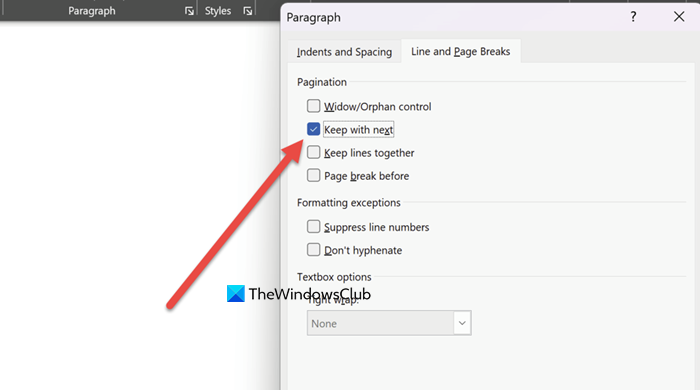
The “Keep with next” paragraph setting prevents page breaks between selected paragraphs. When applied to text inside a table cell, this command overrides the table’s own row-splitting settings. It forces the paragraph to stick to the next one, preventing the entire row from being split across a page break.

- Click to place your cursor inside the problematic table cell.
- Right-click and select Paragraph, or go to the Layout or Home tab and click the small arrow in the Paragraph group.
- In the dialog box, select the Line and Page Breaks tab.
- In the Pagination section, ensure the checkbox for Keep with next is unchecked.
- Click OK.
Finally, check if your issue is resolved.
3] Disable Text Wrapping and Header Repetition
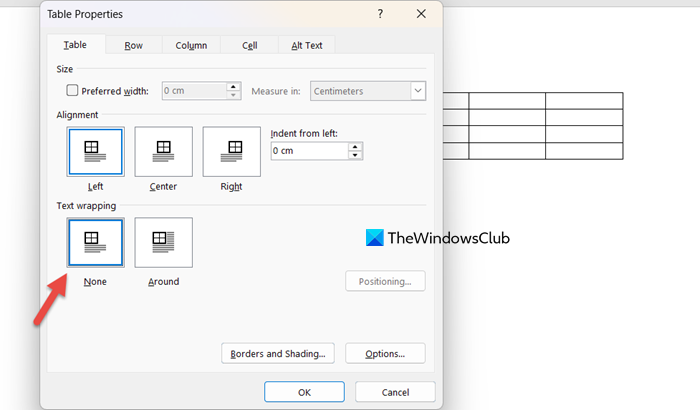
Setting text wrapping to None treats the table as inline content, allowing for normal page breaks. The Repeat header row feature can complicate formatting, causing issues with the middle rows splitting correctly. To make the changes, you need to follow the steps mentioned below.
- First of all, go to Table Properties.
- Go to the Table tab, and make sure that the Text wrapping is set to None.
- Click OK.
- Re-open Table Properties, go to Row tab.
- If your table has a header row, uncheck the box for Repeat as header row at the top of each page.
- Click OK.
Finally, check if your Table is splitting or not.
Read: How to view multiple pages in Word at once
4] Adjust Fixed Row Height
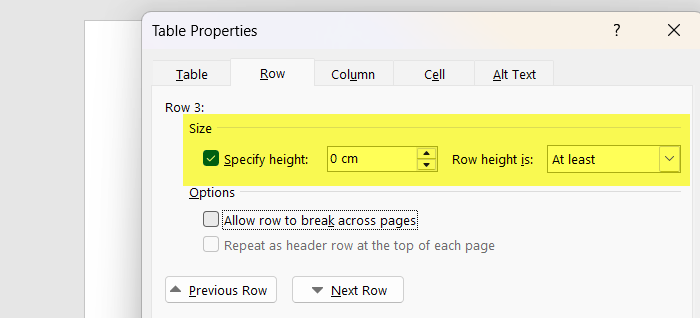
Setting a fixed or specified row height in a table forces the row to maintain a precise vertical size. This rigidity prevents Microsoft Word from automatically adjusting the row’s layout or inserting a natural page break within its content, as the entire defined block must move as a single unit. You can follow the steps mentioned below to do the same.
- Navigate to Table Properties of the problematic table.
- In the dialog box, go to the Row tab.
- Locate the Specified height option and uncheck its checkbox.
- Ensure the row height is set to At least or left to adjust automatically.
- Click OK.
Now, check if your table is displayed correctly.
Hopefully, with these solutions, your issue will be resolved.
Read: How to compress and reduce the size of a Word document
Why is my Word not separating pages?
Your Word document may not be separating pages correctly, usually due to pagination settings in paragraph formatting. This issue often arises when the “Keep lines together” setting is enabled for a paragraph, preventing a page break within that paragraph. Additionally, if manual page breaks have been accidentally deleted, the content can flow continuously without proper separation.
Also Read: Mark a Document as Final in Word.